Overview #
The Pallets module within the Distribution section of ERPat is a comprehensive tracking and inventory management tool. It is designed to provide real-time visibility and granular control over the physical movement and storage of goods within the warehouse hierarchy. By integrating digital identification through QR codes and barcodes, the system ensures that every pallet is accounted for from the moment of creation to its final dispatch.
Key Features #
- Multimodal Identification – Every pallet is assigned a unique Pallet ID, a scannable QR Code, a standard Barcode, and an optional RFID Num for high-speed scanning and error-free tracking.
- Granular Location Mapping – Tracks the precise location of inventory through a multi-tiered hierarchy including Zones, Racks, Bays, Levels, and specific Positions.
- Real-time Status Monitoring – Instantly view whether a pallet is ENABLED or currently locked/disabled, helping floor managers prioritize active inventory.
- Bulk Management Tools – Supports high-volume operations with Bulk Add capabilities and the ability to Export Barcodes for physical labeling.
- Detailed Audit Metadata – Records essential data for accountability, including the Date created, the administrator who Created by the record, and custom Remarks for internal communication.
- Categorical Labeling – Allows the application of custom Labels to group pallets for specific projects or quality control batches.
Accessing the Pallets Module #
To access the Pallets management interface, follow these steps:
- Log in to your ERPat account.
- Locate the Sidebar Menu on the left-hand side of the dashboard.
- Click on the Distribution dropdown menu to expand the logistics options.
- Select Pallets from the list.
- You will be redirected to the main Pallets listing page, where you can view the full inventory ledger and use the top-right controls to Add Pallet or Export data to Excel.
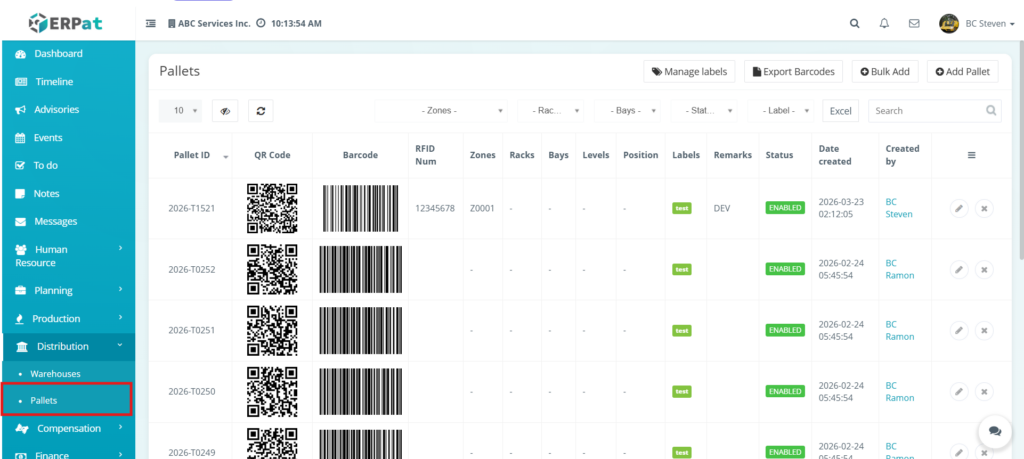
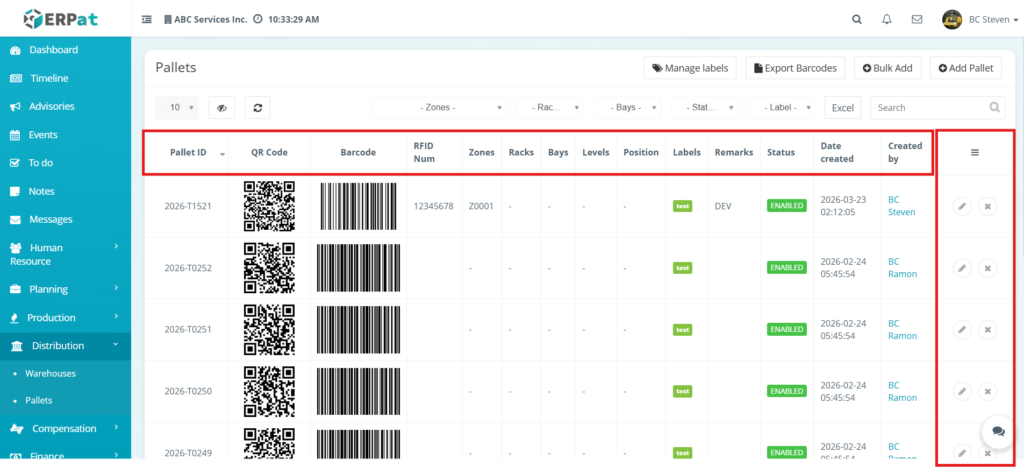
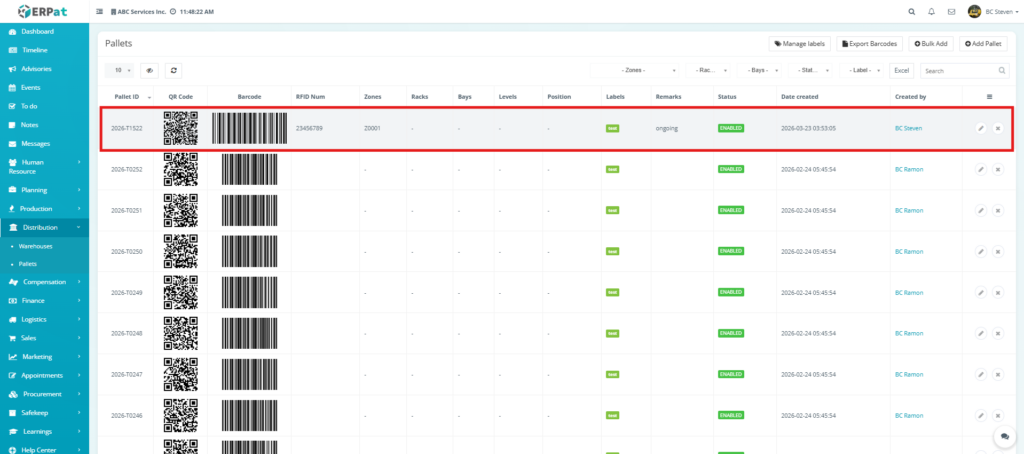
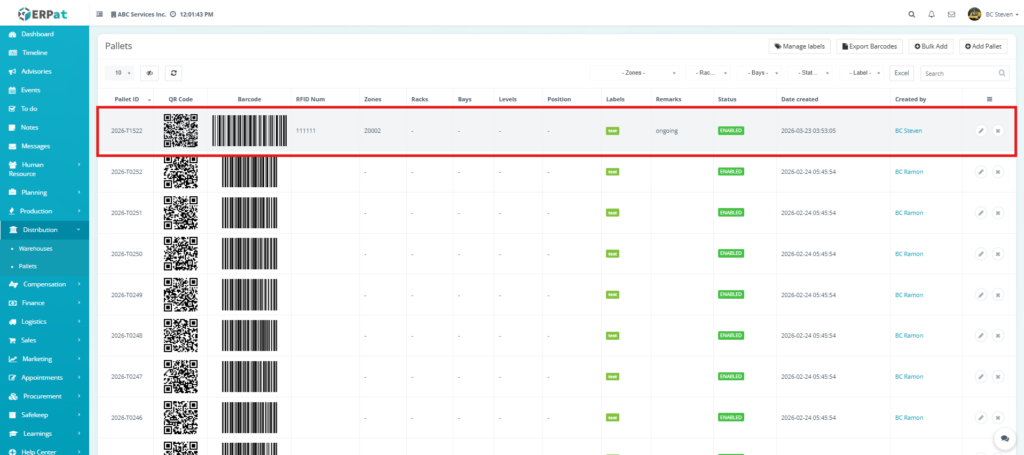
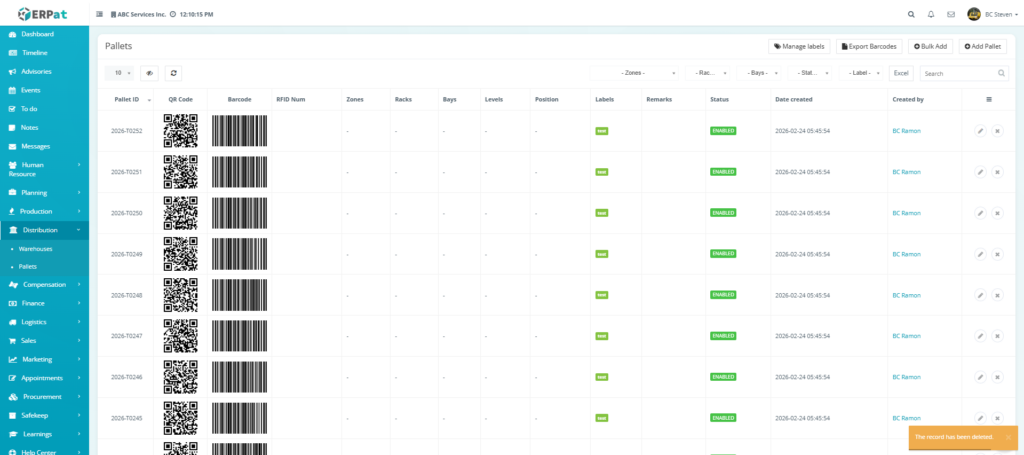
Pallets Listing Pages #
- Pallet ID – The primary unique identifier for the pallet.
- QR Code & Barcode – Visual representations of the Pallet ID used for physical scanning via mobile devices or handheld scanners.
- RFID Num – The digital tag number used for radio-frequency identification, allowing for contactless tracking.
- Location Hierarchy (Zones, Racks, Bays, Levels, Position) – These five columns define exactly where the pallet is stored within the warehouse.
- Labels – Custom categorical tags applied to the pallet for easy filtering and grouping.
- Remarks – Internal notes or descriptions regarding the pallet’s contents or handling requirements.
- Status – Indicates the operational state of the pallet. ENABLED (green) means the pallet is active and available for movement or allocation.
- Date created – The exact timestamp when the pallet record was first registered in the ERPat system.
- Created by – The name of the user who registered the pallet.
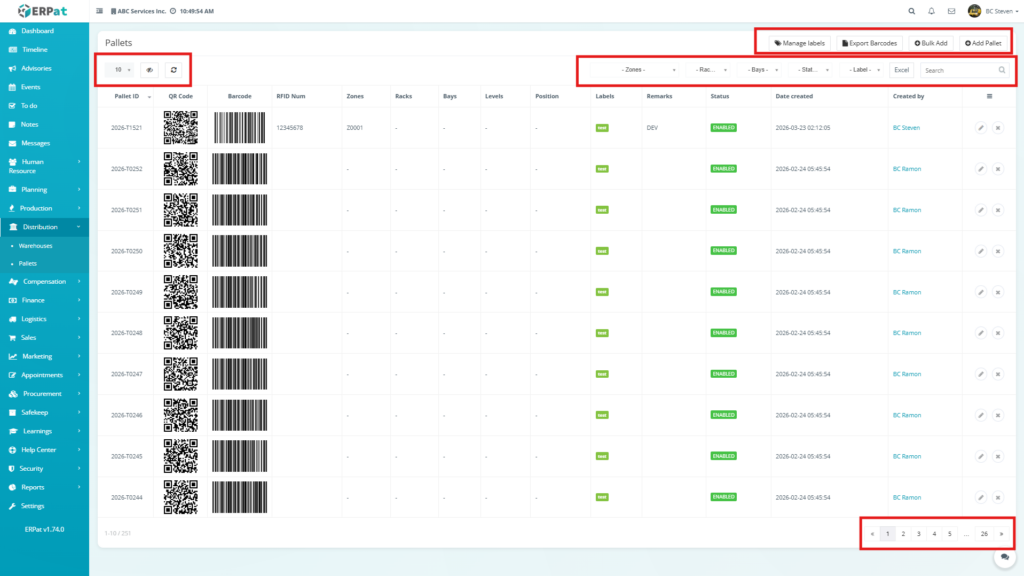
Additional Management Controls & Filtering #
- High-Level Action Buttons – Located at the top-right, these buttons allow for specialized operations:
- Manage Labels: Configure and edit categorical tags.
- Export Barcodes: Generate and download scannable barcode files for physical labeling.
- Bulk Add: Simultaneously register multiple pallets into the system via a template.
- Add Pallet: Manually create a single new pallet record and assign its warehouse location.
- Location & Status Filtering – Use the centralized dropdown menus (Zones, Racks, Bays, Status, and Labels) to narrow down the ledger to specific warehouse sections or operational states.
- Search Bar for Quick Lookup – A real-time text input field on the top-right used to instantaneously filter the list by Pallet ID, RFID Num, or specific Remarks.
- Excel Export – A dedicated button to download the currently filtered view into an Excel spreadsheet for offline reporting and auditing.
- Pagination for Large Datasets – Navigation controls at the bottom-right that allow users to move through multiple pages of records without compromising system performance.
- Refresh and Visibility Controls – Located at the top-left, these tools allow you to:
- Row Display (10 dropdown): Set the number of records visible per page.
- Column Toggle (Eye icon): Hide or show specific metadata columns to customize your workspace.
- Refresh (Circular arrow): Manually reload the table to sync with the latest warehouse updates.
Steps to Add a Pallet #
STEPS
- Navigate to the Distribution module on the sidebar and select Pallets.
- Click the Add Pallet button located at the top-right of the listing page.
- In the Add Pallet modal, configure the following location details:
- Position: Select the specific slot or coordinate within the warehouse hierarchy.
- Zones: Assign the pallet to a specific warehouse zone.
- Input the identification data:
- QR Code: Enter the unique URL or string for the QR identifier.
- Barcode: Input the alphanumeric code for standard scanning.
- RFID Num: Enter the digital tag number if utilizing radio-frequency tracking.
- Provide operational context:
- Remarks: Add any internal notes regarding the pallet’s contents or status.
- Labels: Apply categorical tags to help with filtering.
- Click Save to register the pallet, or click Close to discard the entry.
Result #
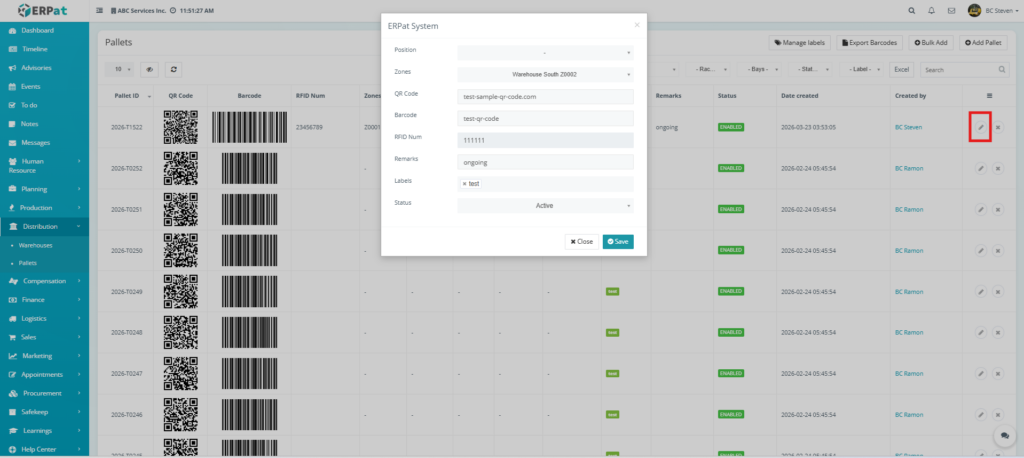
Steps to Edit a Pallet Record #
STEPS
- Navigate to the Distribution module on the sidebar and select Pallets.
- Locate the specific pallet record you wish to modify in the listing table.
- Click the Edit (pencil) icon under the Actions column at the far right of the record row.
- In the ERPat System modal, update the necessary fields:
- Location: Change the Zones or update the Position if the pallet has been moved.
- Identifiers: Revise the QR Code, Barcode, or RFID Num if the physical tag has been replaced.
- Context: Update the Remarks or add/remove Labels to reflect current processing stages.
- Status: Toggle the status between Active or Inactive to manage the pallet’s availability.
- Click Save to apply the changes, or click Close to discard the edits.
Result #
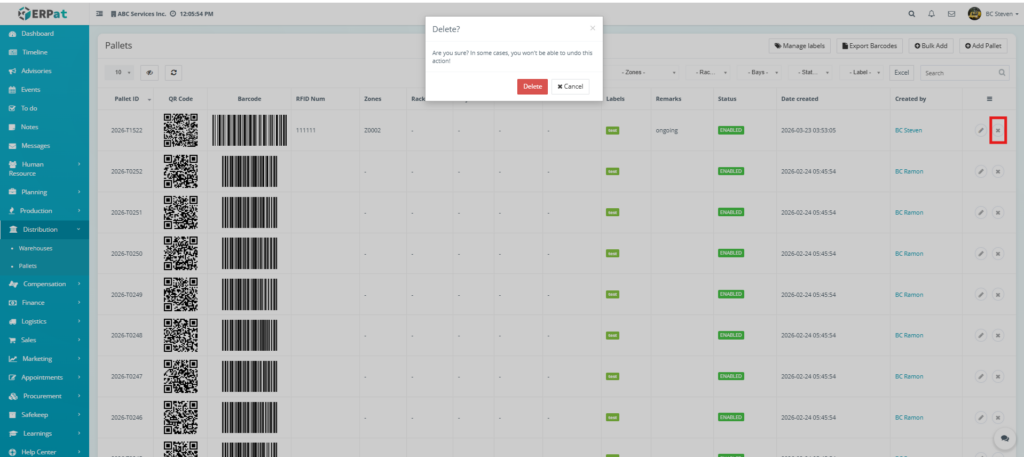
Steps to Delete a Pallet Record #
STEPS
- Navigate to the Distribution module on the sidebar and select Pallets.
- Locate the specific record you wish to remove from the listing table.
- Click the Delete (X icon) located under the Actions column at the far right of the record row.
- A Delete? confirmation modal will appear with the warning: “Are you sure? In some cases, you won’t be able to undo this action!”
- Click the red Delete button to finalize the removal, or click Cancel to keep the record.
- Verify that the pallet is no longer visible in the inventory ledger.
Result #
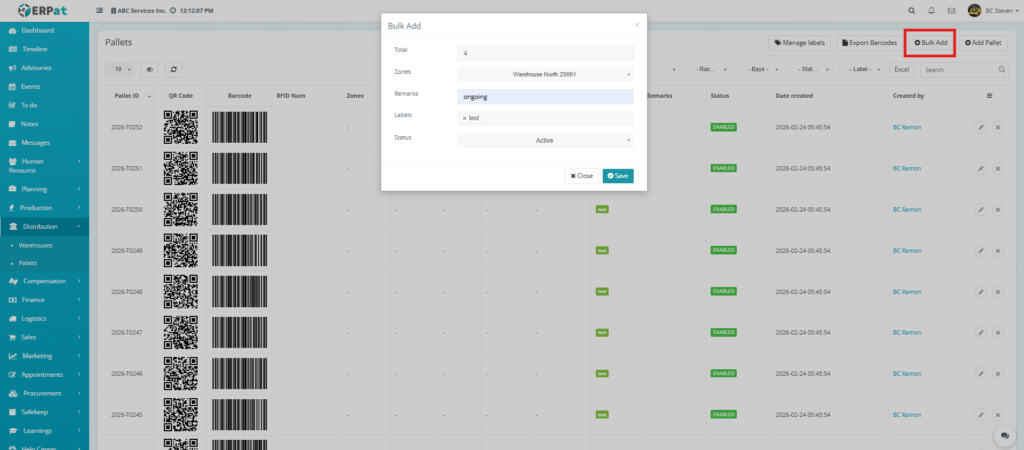
Steps to Bulk Add Pallets #
STEPS
- Navigate to the Distribution module on the sidebar and select Pallets.
- Click the Bulk Add button located at the top-right of the interface.
- In the Bulk Add modal, configure the following parameters:
- Total: Enter the specific number of pallets you wish to generate. The system will automatically create unique Pallet IDs for this quantity.
- Zones: Select the warehouse destination for this batch.
- Remarks: Add a common description for the batch to provide context for the new records.
- Labels: Apply categorical tags that will be attached to every pallet in this bulk entry.
- Status: Set the initial operational state for the batch.
- Click Save to execute the bulk creation.
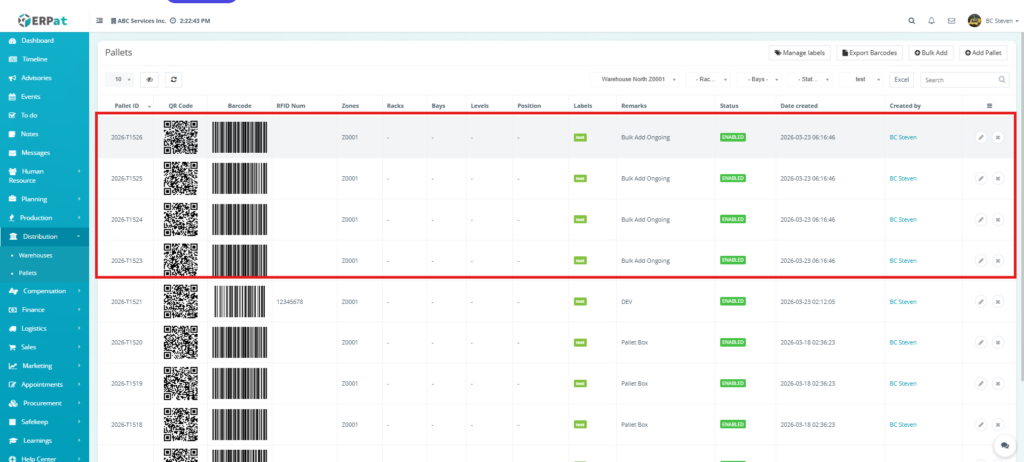
- Verify the update by checking the listing page; the new pallets will appear at the top of the ledger with their auto-generated IDs and assigned parameters.
Result #
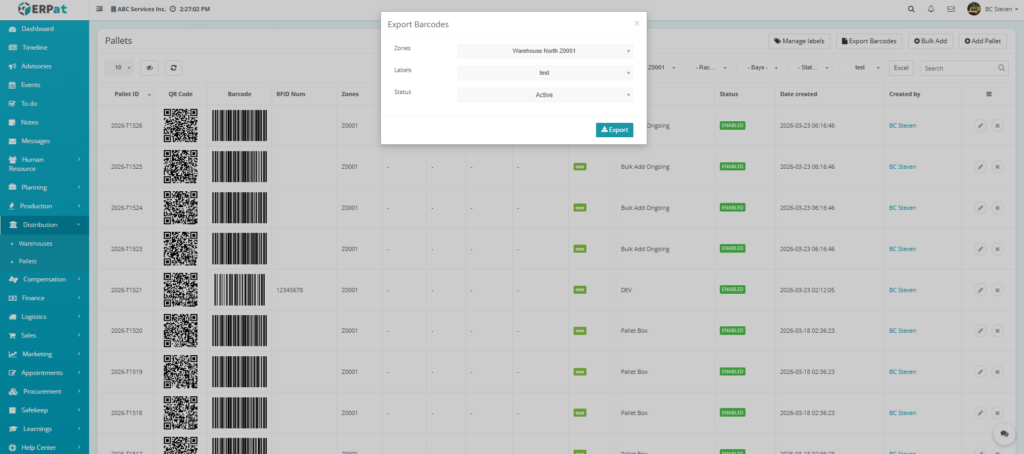
Steps to Export Barcodes #
STEPS
- Navigate to the Distribution module on the sidebar and select Pallets.
- Click the Export Barcodes button located at the top-right of the interface.
- In the Export Barcodes modal, define the parameters for the data you wish to extract:
- Zones: Select the specific warehouse area to export only the pallets located there.
- Labels: Filter by categorical tags to isolate specific groups of inventory.
- Status: Choose the operational state of the pallets you need barcodes for.
- Click the teal Export button to generate the file.
- The system will process the request and provide a downloadable file containing the scannable barcodes and QR codes for the filtered pallet records.
Permissions and Access Control #
- Authorized Roles: Only Warehouse Managers, Logistics Administrators, or System Admins have the permissions required to Add, Edit, Bulk Add, or Delete pallet records.
- View-Only Access: Supervisory roles or external auditors may be granted “View-Only” access. This allows them to monitor inventory levels, check pallet statuses, and export reports without the ability to modify warehouse locations or identifiers.
Best Practices #
- Standardized Naming & IDs: Use a consistent alphanumeric format for Pallet IDs to ensure they are easily searchable and logically organized in the ledger.
- Accurate Location Mapping: Always ensure the Zones, Racks, and Bays are updated immediately upon the physical movement of a pallet to maintain a “Live” warehouse map.
- Unique Identifiers: Before saving a new record, verify that the Barcode and QR Code strings are unique to prevent scanning conflicts during inventory audits.
- Avoid Deleting Active Pallets: Never delete a pallet record that is currently holding stock or is in transit. If a pallet is damaged or out of rotation, update its status to Inactive or Disabled instead.
- Regular Barcode Audits: Periodically use the Export Barcodes feature to replace worn or damaged physical labels, ensuring scanners can always read the tags accurately.
Audit & Logs #
- Real-time Traceability: All critical actions including the creation of new pallets, location updates, and deletions are instantaneously logged within the ERPat System.
- Accountability: Every log entry captures the Timestamp, the specific Action Taken, and the Identity of the User, providing a transparent trail for operational reviews and compliance audits.
Last Updated: [March 23, 2026]
Module Owner: Distribution IS – ERPat System


