Overview #
The De Minimis Benefits Module is a specialized payroll tool designed to track and manage small-value, tax-exempt benefits provided to employees. It ensures that the company remains compliant with tax regulations by providing a chronological record of benefits issued—such as rice subsidies, clothing allowances, or laundry allowances—without these being factored into taxable income.
By using a visual timeline, the module allows payroll administrators to quickly audit benefit distribution across different months and ensure that no individual exceeds the annual tax-exempt ceilings.
Key Features #
- Chronological Timeline: A visual horizontal scroll to navigate through benefits by specific months.
- Centralized Tracking: Monitor which employees received specific benefit categories and the exact amounts issued.
- Tax Compliance: Maintain a digital paper trail for audit purposes, ensuring all “De Minimis” entries are logged and timestamped.
- Audit History: Track who created the entry and when it was last modified.
Accessing the De Minimis Module #
- Log in to the ERPat System.
- Navigate to Payroll from the main sidebar.
- Select De Minimis Benefits.
- By default, you will be directed to the Timeline tab.
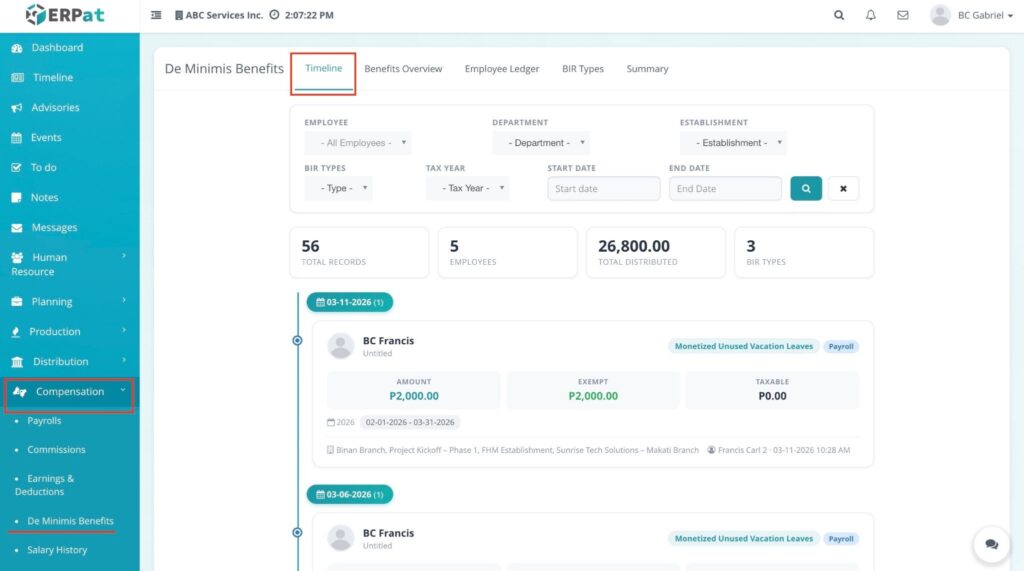
Filtering & Search Controls #
The top section of the Timeline dashboard is the command center for data retrieval. It allows you to generate precise reports by combining date ranges with multi-layered organizational filters.
1. Date Range & Global Search #
To pull data into the table, you must define a timeframe:
- Start Date & End Date: Click these fields to select a specific calendar range. This ensures you only see benefit distributions relevant to that period.
- Search Button: Once your dates and filters are set, click this to execute the query. The system will refresh the list based on your criteria.
- X (Reset) Button: Clicking the X next to the search button will instantly clear all selected filters and dates, returning the dashboard to its default state.
2. Advance Filtering #
The Advance Filter button expands a menu that allows you to narrow down results by specific organizational and tax categories:
- Employee: Select a specific individual from the dropdown to audit their personal benefit history.
- Department: Filter by a specific functional team, such as Admin, Accounting, Sales, or IT.
- Establishment: Select a specific office branch or physical site location to view regional benefit distributions.
- BIR Types: Choose from the recognized tax-exempt categories, including:
- Rice Subsidy
- Uniform & Clothing Allowance
- Actual Medical Assistance
- Medical Cash (Dependents)
- Laundry Allowance
- Employee Achievement Awards
- Christmas & Anniversary Gifts
- Daily Meal Allowance
- Tax Yr: Quickly isolate all records belonging to a specific fiscal year (e.g., 2026).
De Minimis Benefits: Understanding Search Results #
Once you have configured your Date Range and Advance Filters, clicking the Search button generates a real-time summary in the blue analytics box. This allows you to verify totals before diving into the individual table rows.
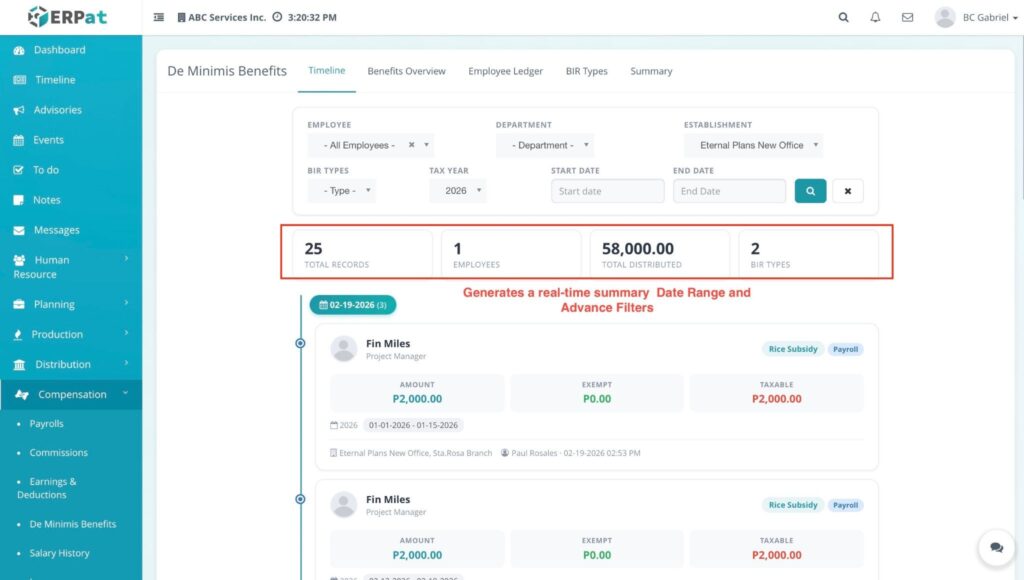
1. Total Records Found #
This indicates the total number of entries that match your current filter.
- Example: If you filter for the “Sales” department for March, and the system shows “15,” it means there are 15 individual benefit transactions logged for that team during that month.
2. Total Employee #
This displays how many unique employees are currently shown in the results based on your filters.
- Example: If your “Total Records” is 20 but your “Total Employee” is 10, it means 10 unique people are being displayed, with each person receiving an average of two benefit types.
3. Total Distributed #
This is the grand total monetary value of all benefits currently visible in the table.
- Function: This provides an immediate sum for payroll reconciliation, helping you ensure the total cash outflow for benefits matches your financial records for that period.
4. BIR Types
This section shows how many different types of BIR-recognized benefits were detected in your search results.
- Function: It acts as a category count. If the system shows “BIR Types: 3,” it means that among all the records found, only 3 specific categories (e.g., Rice Subsidy, Clothing Allowance, and Laundry Allowance) were used. It also provides a breakdown of how many entries exist for each detected type.
Individual Benefit Entry Details #
When you look at a specific record in the results, it is broken down into these key sections:
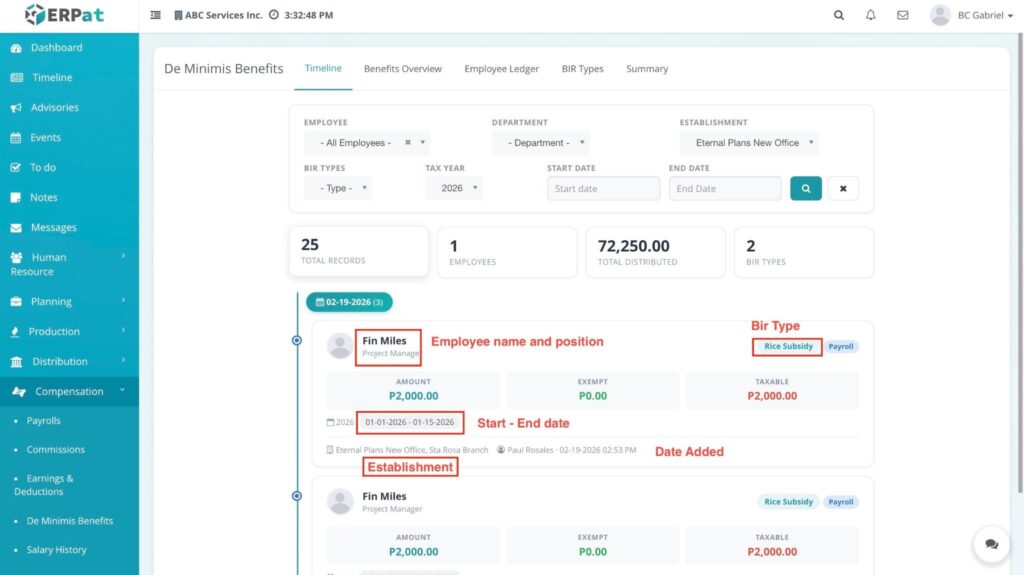
- Employee Name and Position: Displays the full name of the recipient and their current job title (e.g., “Fin Miles – Project Manager”).
- BIR Type: Located in the top-right corner of the entry, this specifies the benefit category, such as Rice Subsidy.
- Amount Breakdown: This provides a clear view of the financial split for that entry:
- Amount: The total cash value issued (e.g., ₱2,000.00).
- Exempt: The portion of the amount that is tax-free.
- Taxable: Any portion that exceeds the BIR ceiling and is subject to tax.
- Start – End Date: Displays the specific coverage period for which the benefit was given (e.g., 01-01-2026 to 01-15-2026).
- Establishment: Lists the specific office branch or site location assigned to that employee.
- Date Added: A timestamp showing exactly when the record was encoded and by which user (e.g., Paul Rosales on 02-19-2026).
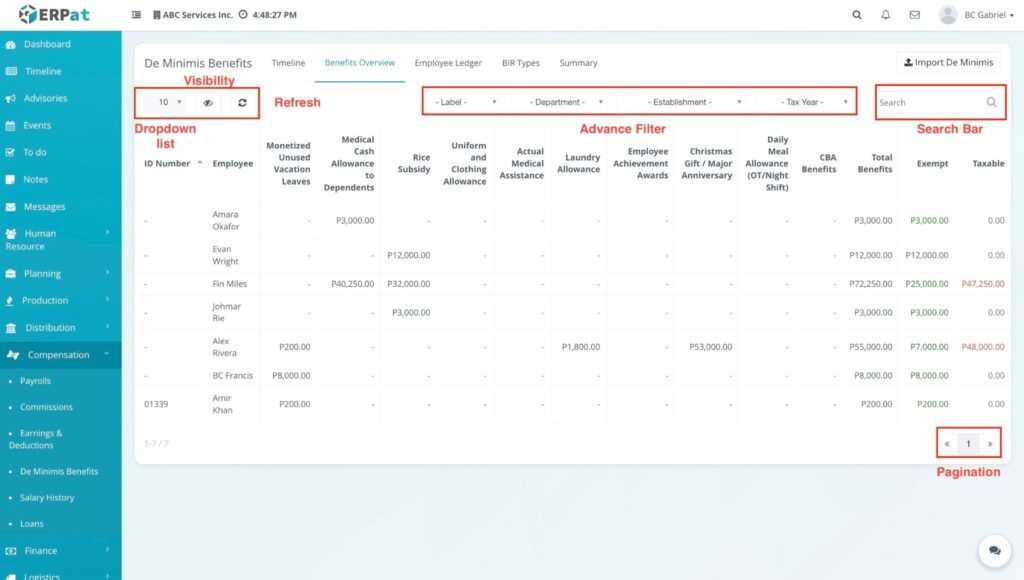
Accessing the Benefits Overview #
- Log in to the ERPat System.
- Navigate to Compensation from the main sidebar.
- Select De Minimis Benefits.
- Click on the Benefits Overview tab to view the comprehensive summary of employee benefits.
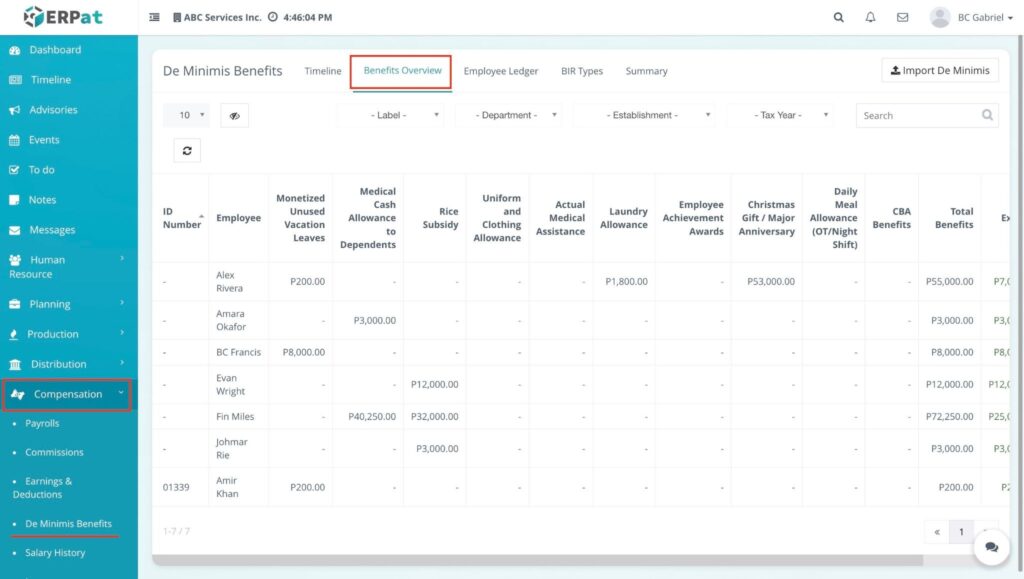
Benefits Overview Page #
The overview page provides a detailed matrix of all distributed de minimis benefits with the following information:
- ID Number: The unique system identification assigned to the benefit record.
- Employee: The name of the employee receiving the benefits.
- Benefit Categories: Columns showing specific distributions for:
- Monetized Unused Vacation Leaves
- Medical Cash Allowance to Dependents
- Rice Subsidy
- Uniform and Clothing Allowance
- Actual Medical Assistance
- Laundry Allowance
- Employee Achievement Awards
- Christmas Gift / Major Anniversary
- Daily Meal Allowance (OT/Night Shift)
- CBA Benefits
- Total Benefits: The combined sum of all de minimis items for that employee.
- Exempt: The total amount that remains non-taxable under BIR law.
- Taxable: The amount exceeding the legal ceiling that is subject to tax.
Additional Controls #
- Advance Filter: Dropdown menus to sift through records based on specific Labels, Departments, Establishments, or Tax Years.
- Search Bar: Real-time lookup by employee name or specific record details.
- Import De Minimis: A dedicated button to bulk-upload benefit data into the system.
- Visibility (👁️ icon): Toggle specific columns to customize your table view.
- Refresh (🔄 icon): Reload the table to reflect the most recent data updates.
- Dropdown List (Record Count): Choose how many records to display per page (e.g., 10, 25, 50, 100).
- Pagination: Use the arrow controls at the bottom right to navigate through the multi-page database.
Steps to Import De Minimis Benefits #
STEPS #
- Navigate to the De Minimis Benefits module and select the Benefits Overview tab.
- Click the Import De Minimis button located at the top-right of the dashboard.
- In the Import de minimis modal, perform the following:
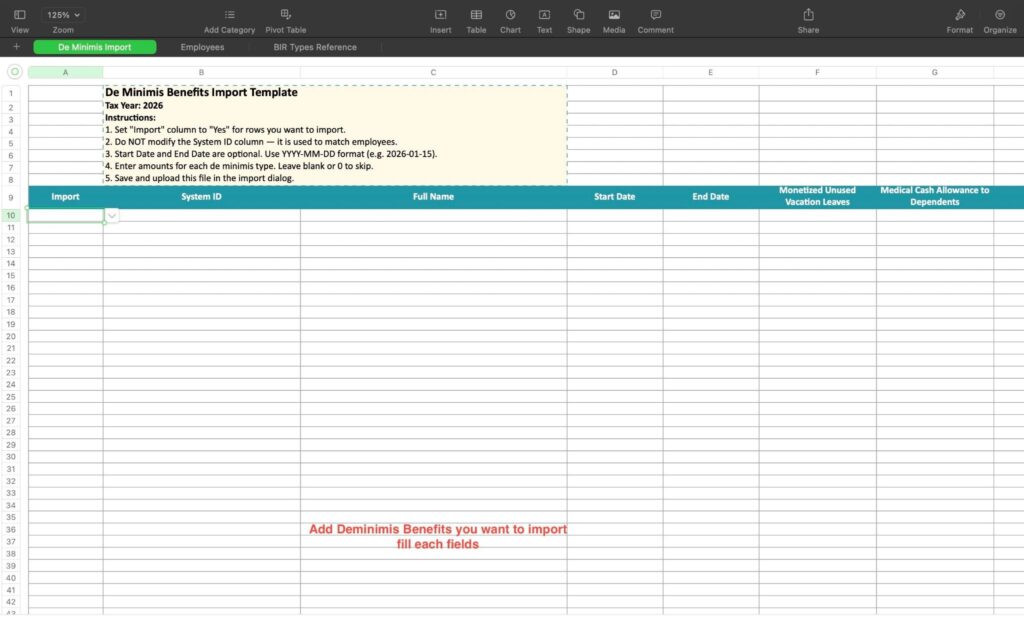
- Download Template: Click the Download sample file link to get the correctly formatted Excel template.
- Prepare Data: Fill out the Excel file with the required employee benefit information.
- Upload File: Click the Choose File button (or drag and drop) to select your completed Excel file.
- Once the file name appears in the field, click the Import button.
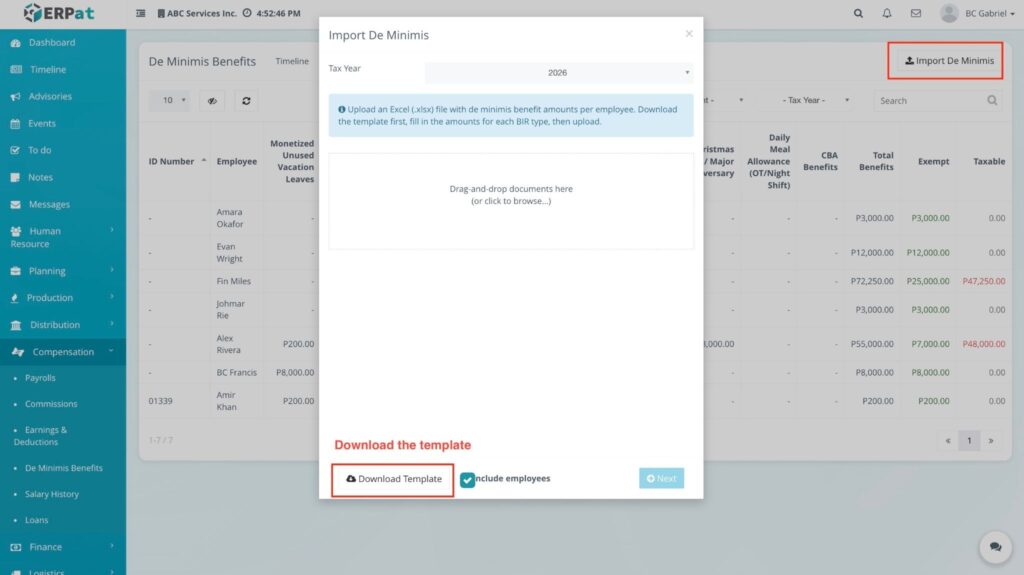
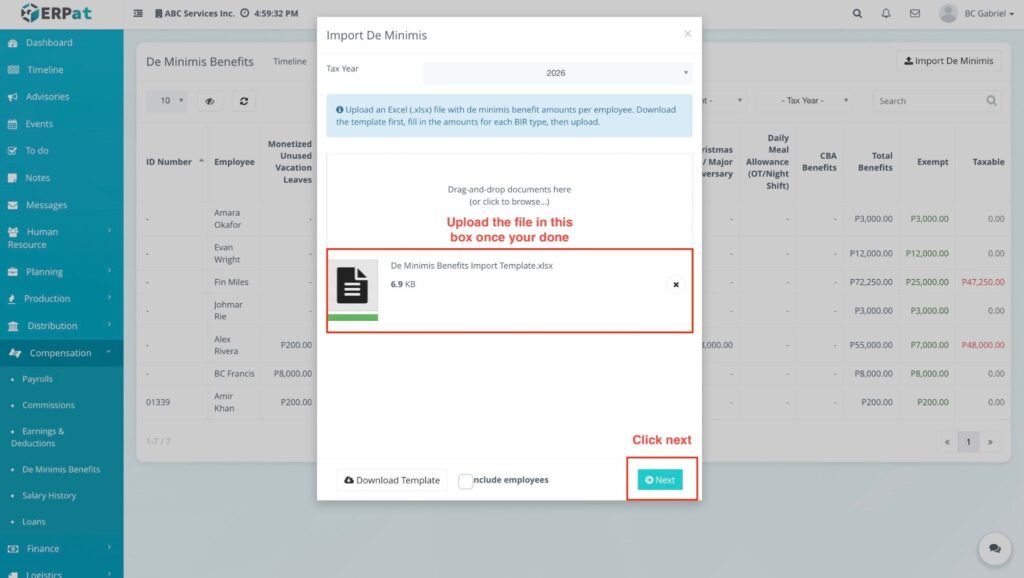
Result #
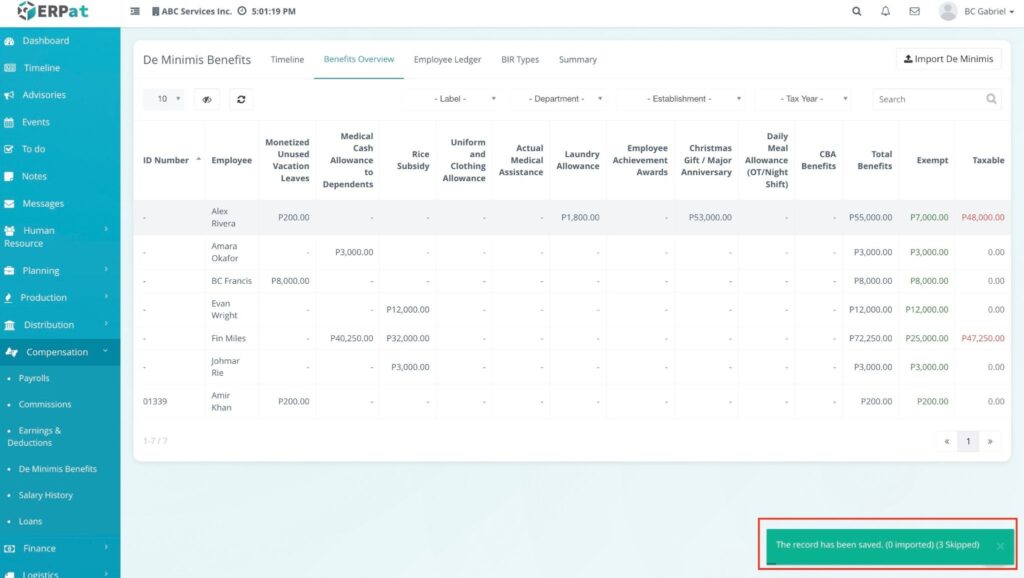
The system processes the file, and the new benefit records are automatically populated into the Benefits Overview and Timeline sections.
Accessing the Employee Ledger #
- Log in to the ERPat System.
- Navigate to Compensation from the main sidebar.
- Select De Minimis Benefits.
- Click on the Employee Ledger tab to view the individual benefit history for each employee.
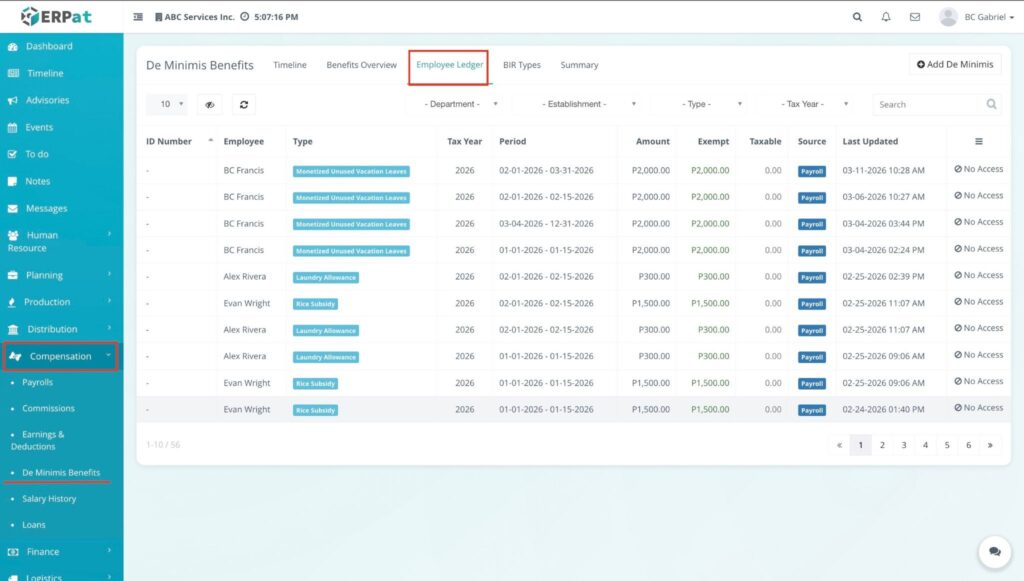
Employee Ledger Listing Page #
The listing page provides a granular view of benefit distribution per employee, featuring:
- Identification: The unique system ID or Employee ID assigned to the individual.
- Employee: The full name of the employee.
- Position: The current job title or role (e.g., Project Manager, Accountant).
- Department: The specific functional team the employee belongs to.
- Establishment: The branch or site location where the employee is deployed.
- Total Benefits: The cumulative sum of all de minimis benefits received by the employee within the selected period.
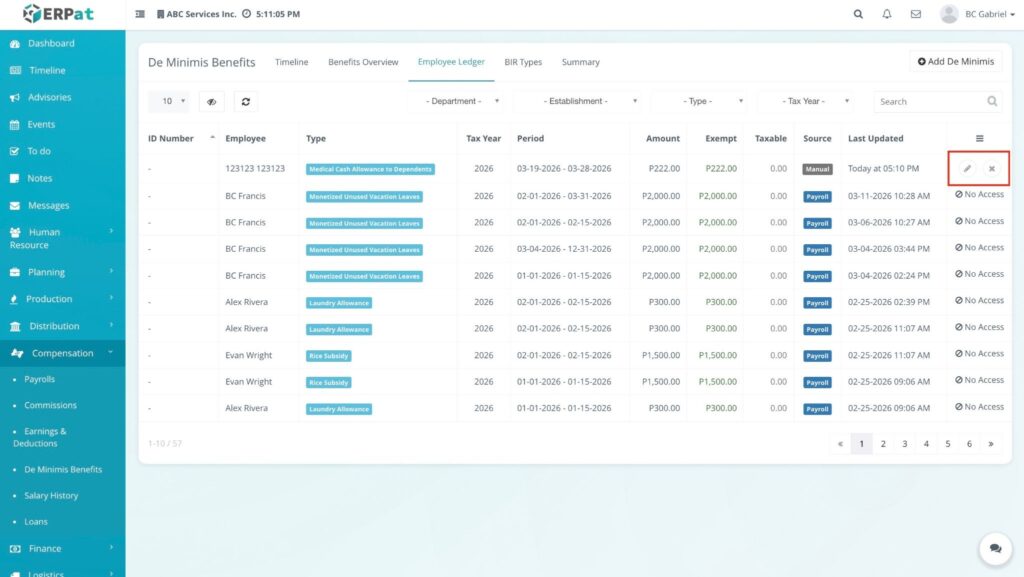
- Actions:
- View (👁️ icon): Open the detailed ledger to see the specific breakdown of every benefit received and the remaining tax-exempt balance.
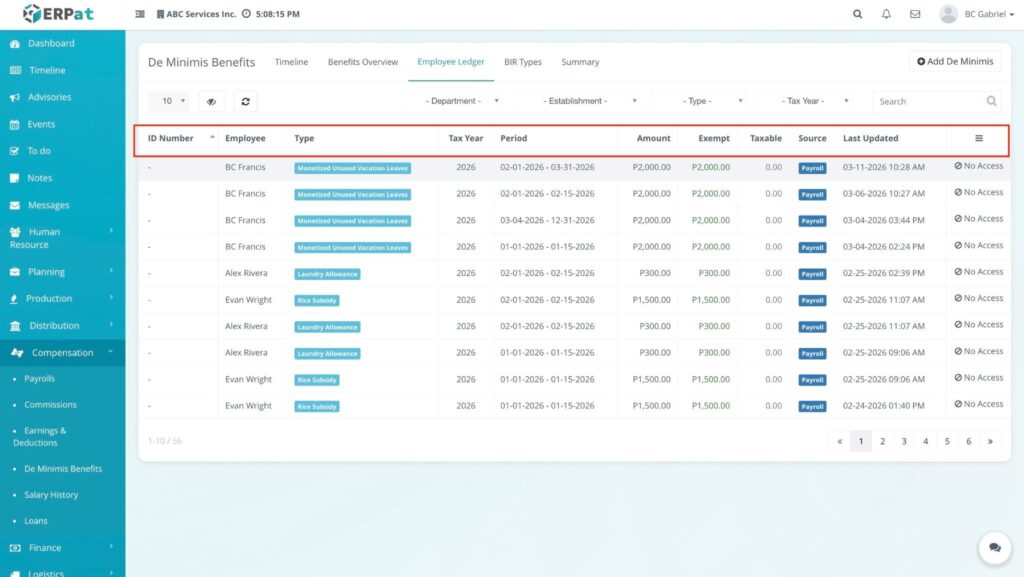
Additional Controls #
The following tools are available to help you manage and navigate the Employee Ledger database:
- Advance Filter: A dropdown menu allowing you to filter the list by Label, Department, Establishment, or Tax Year.
- Search Bar: A real-time lookup field to find a specific employee by Name or Identification ID.
- Visibility (👁️ icon): Click this to choose which columns (e.g., Position, Department) are visible in your current table view.
- Refresh (🔄 icon): Reload the table to ensure you are viewing the most up-to-date entries.
- Record Count Dropdown: Select how many rows to display per page (10, 25, 50, or 100).
- Pagination: Use the arrow controls at the bottom right to navigate through multiple pages of employee records.
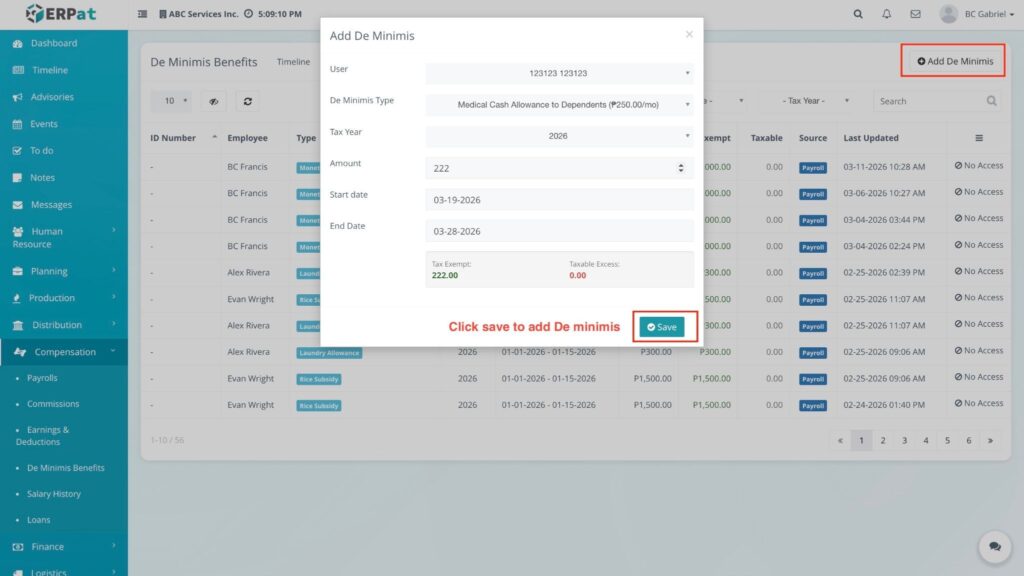
Steps to Add De Minimis Benefits (Manual Entry) #
STEPS
- Navigate to the Timeline tab and click the + Add de minimis button.
- In the modal, fill in the following:
- Employee: Select the recipient from the dropdown.
- BIR Type: Choose the benefit category (e.g., Rice Subsidy).
- Amount: Enter the total value. The system will automatically calculate the Exempt and Taxable portions based on current BIR limits.
- Month/Year: Set the payroll period.
- Coverage Date: Select the Start and End dates for the benefit.
- Click Save.
Result:
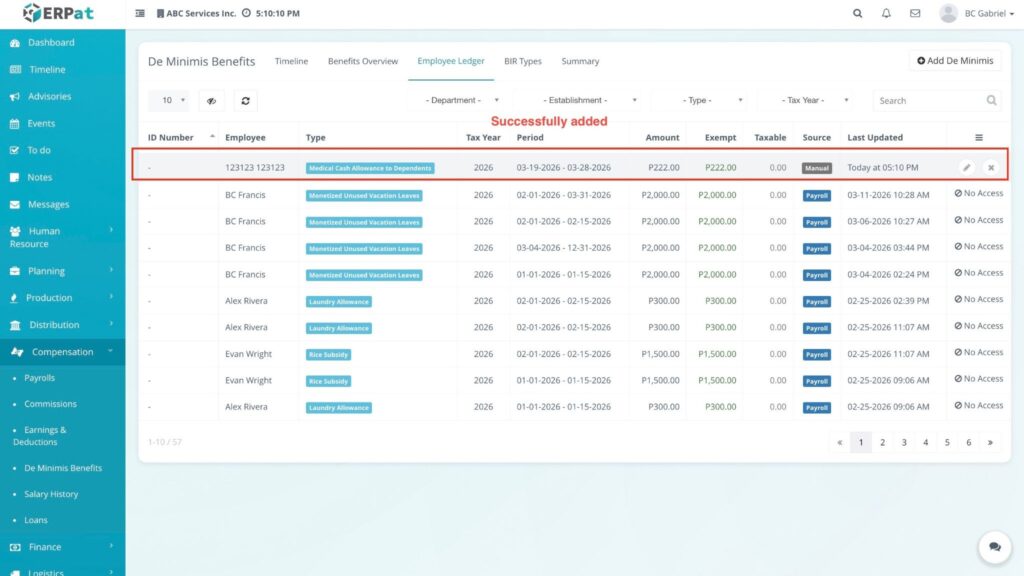
The entry appears in the Timeline and updates the Employee Ledger.
Steps to Edit De Minimis Benefits #
STEPS #
- Locate the record in the Timeline or Employee Ledger.
- Click the Edit (🖊️) icon under the Actions column.
- Modify the necessary fields (Amount, Dates, or Category) in the Edit de minimis modal.
- Click Save.
Result: #
Steps to Delete De Minimis Benefits #
The record is updated, and the Exempt/Taxable calculations are refreshed.
STEPS #
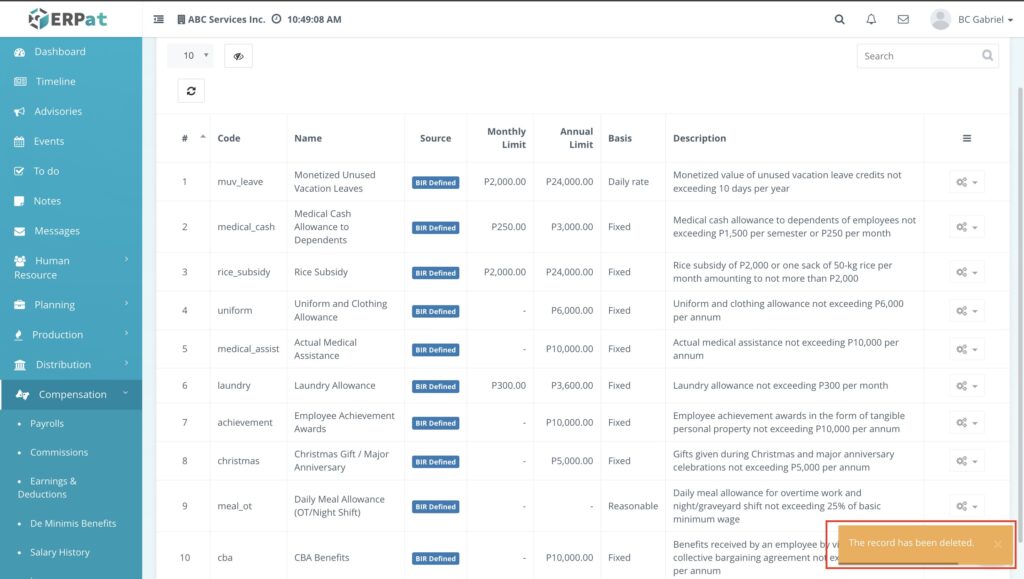
- Click the Delete (✖) icon on the specific record you wish to remove.
- Confirm the action in the Delete? popup by clicking Delete.

Result: #
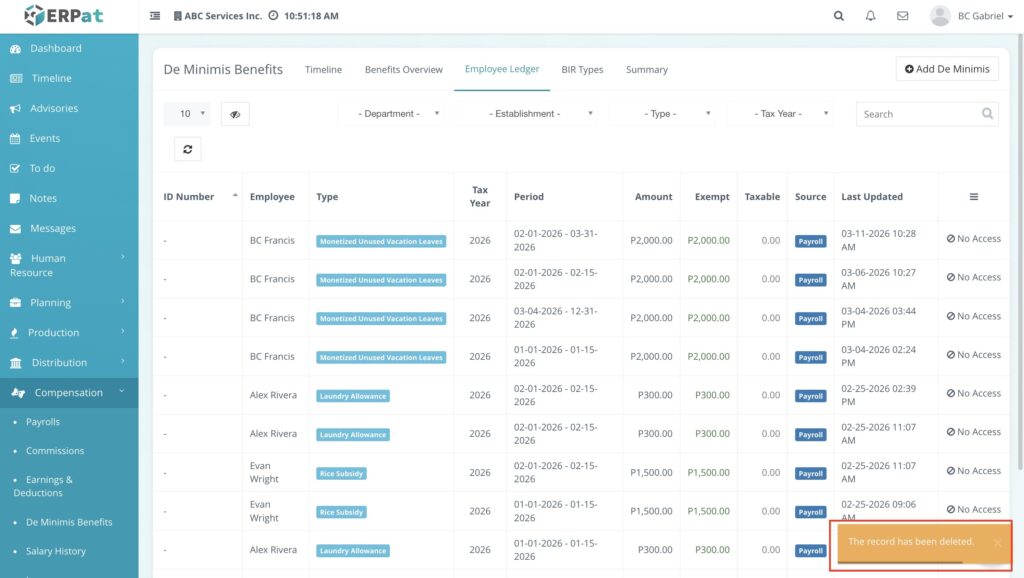
The record is removed, and a “The record has been deleted” notification appears.
Accessing BIR Types #
- Log in to the ERPat System.
- Navigate to Compensation from the main sidebar.
- Select De Minimis Benefits.
- Click on the BIR Types tab. This section serves as the configuration center for all benefit categories and their tax-exempt ceilings.
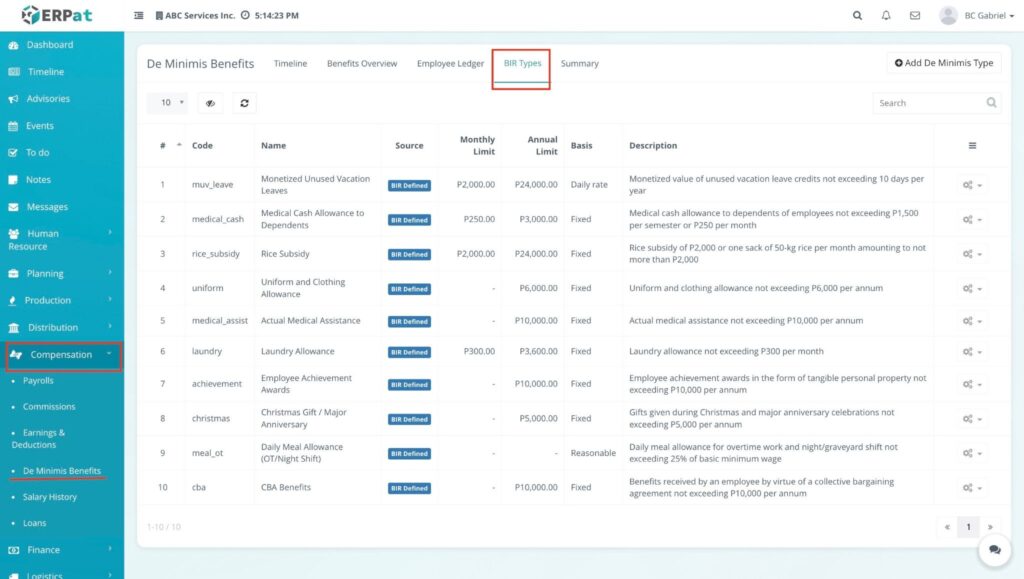
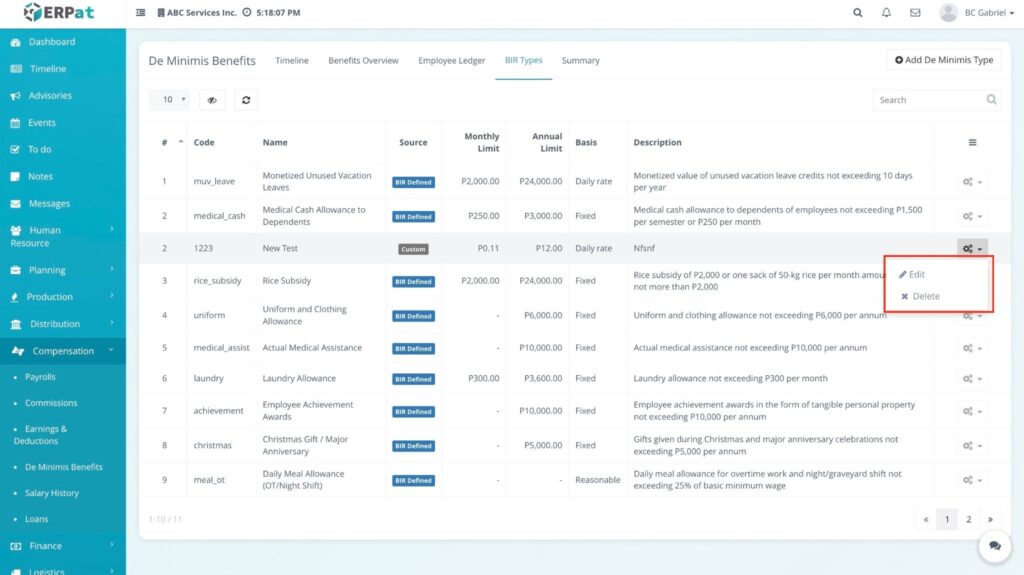
BIR Types Listing Page #
The listing page displays the defined benefit categories used across the system:
- Identification: The system-generated ID for each benefit type.
- Title: The official name of the benefit (e.g., Rice Subsidy, Laundry Allowance).
- Ceiling (Annual): The maximum tax-exempt amount allowed per year for that category.
- Date Created / Last Updated: Timestamps showing when the type was first added or modified.
- Created by: The user responsible for setting up the category.
- Actions:
- Edit (🖊️ icon): Update the title or ceiling amount.
- Delete (✖ icon): Remove a benefit type from the system.
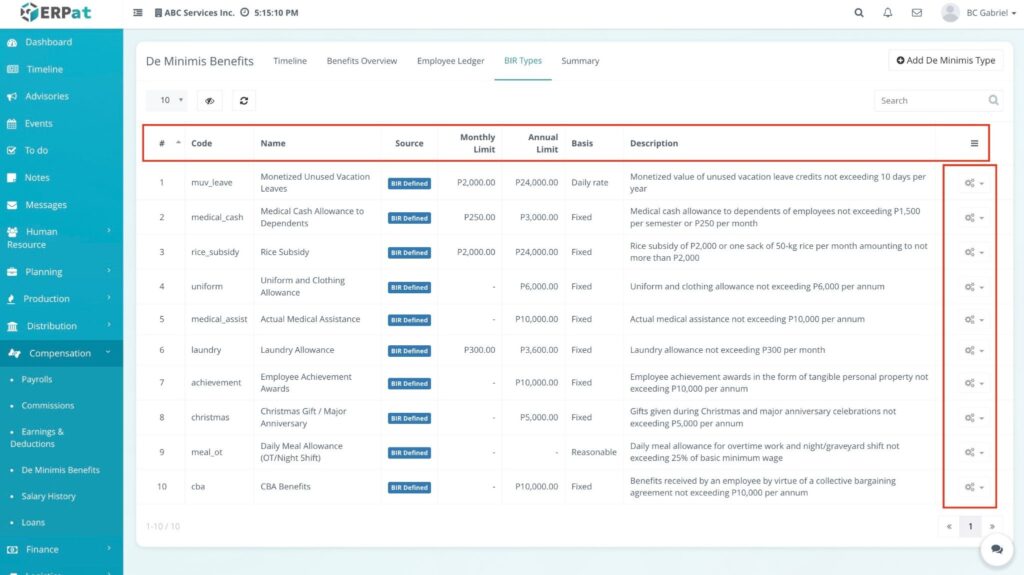
Additional Controls #
- Search Bar: Quickly find a specific BIR type by name or ID.
- Refresh (🔄 icon): Instantly update the list to show the most recent changes.
- Record Count Dropdown: Choose to view 10, 25, 50, or 100 types per page.
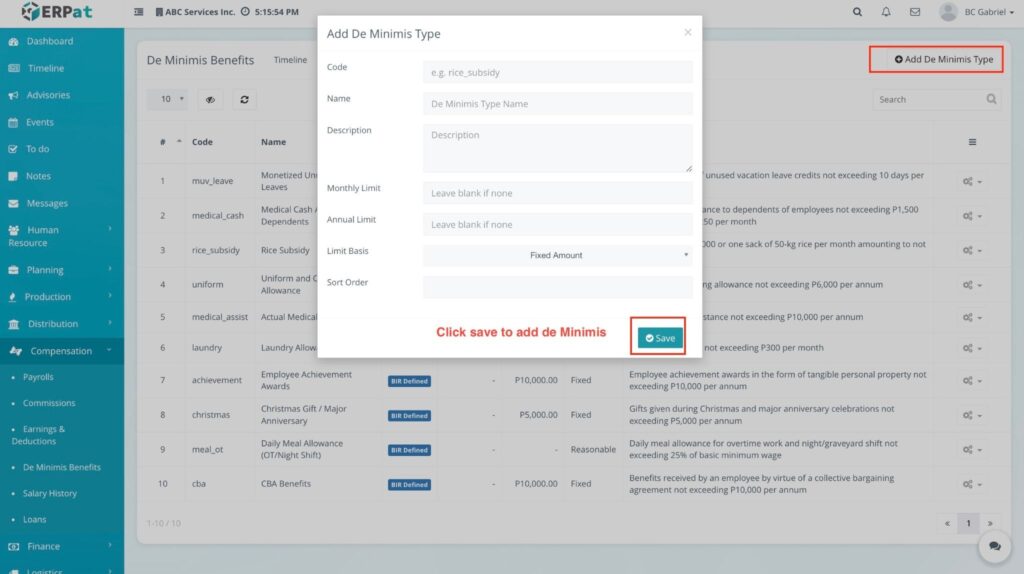
Steps to Add De Minimis Types #
STEPS #
- On the BIR Types tab, click the + Add de minimis types button.
- In the modal, enter the following:
- Title: The name of the benefit (e.g., “Actual Medical Assistance”).
- Ceiling: The annual tax-exempt limit for 2026 (e.g., ₱12,000.00).
- Click Save.
Result: #
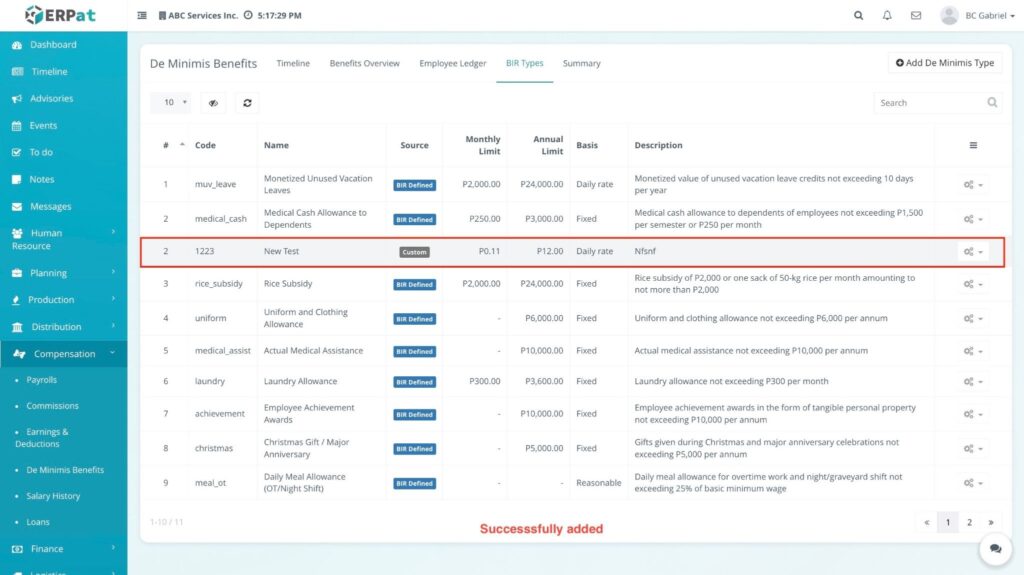
The new category is now available for selection when adding benefits in the Timeline or via Import.
Steps to Edit De Minimis Types #
STEPS #
- Find the category you want to change in the listing.
- Click the Edit (🖊️) icon.
- Update the Title or Ceiling amount to reflect new company policies or BIR updates.
- Click Save.
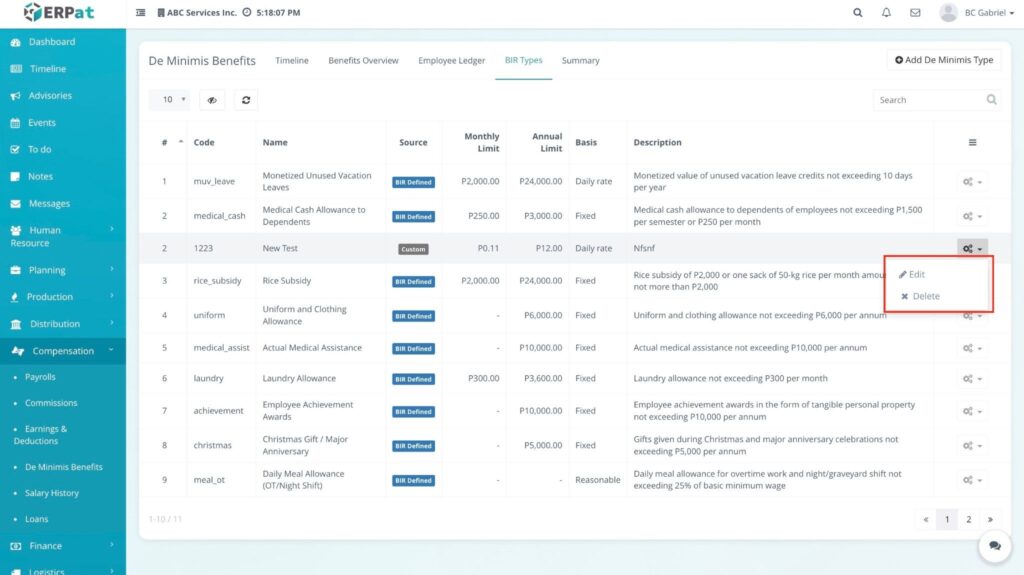
Result: #
Existing records using this type will remain, but the new ceiling will apply to all future tax calculations.
Steps to Delete De Minimis Types #
STEPS #
- Click the Delete (✖) icon on the specific benefit type.
- Confirm the action in the Delete? popup.
Result: #
The category is removed from the list.
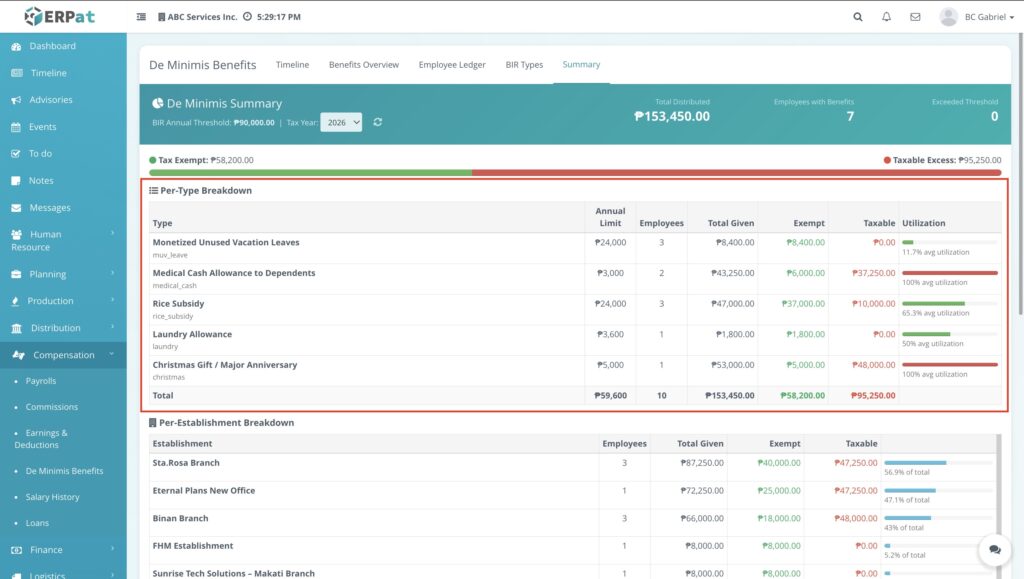
Accessing the Summary Tab #
- Log in to the ERPat System.
- Navigate to Compensation from the main sidebar.
- Select De Minimis Benefits.
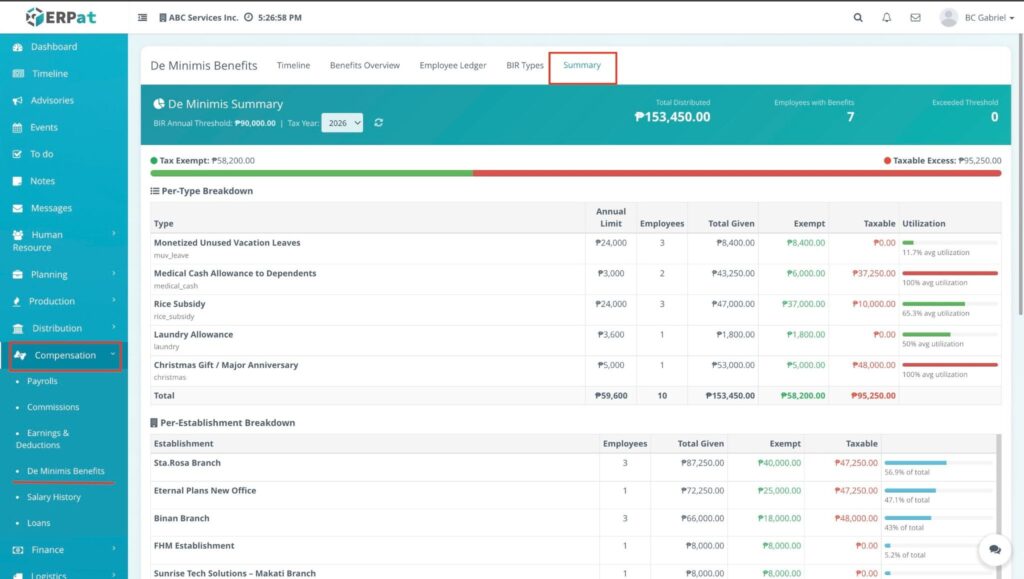
- Click on the Summary tab. This dashboard provides a high-level analytical view of your company’s benefit distributions and tax compliance.
Summary Controls #
- Advance Filter & Search: Use these to narrow the summary down to a specific Department, Establishment, or Tax Year.
Understanding the Summary Dashboard Boxecs #
The Summary tab uses color-coded cards to give you an instant snapshot of your payroll data. These numbers update automatically based on the Date Range and Advance Filters you apply.
1. Total De Minimis Benefits (Blue Box) #
This box displays the gross total value of all benefits issued. It is the sum of every single benefit record currently being filtered. It represents the total financial investment the company has made in employee benefits before any tax splitting.

2. Total Exempted (Green Box) #
This reflects the total amount of benefits that are 100% tax-free. These are the amounts that fall within the legal BIR ceilings (e.g., the first ₱2,500 of a rice subsidy). This is a critical number for verifying tax savings for both the company and the employees.
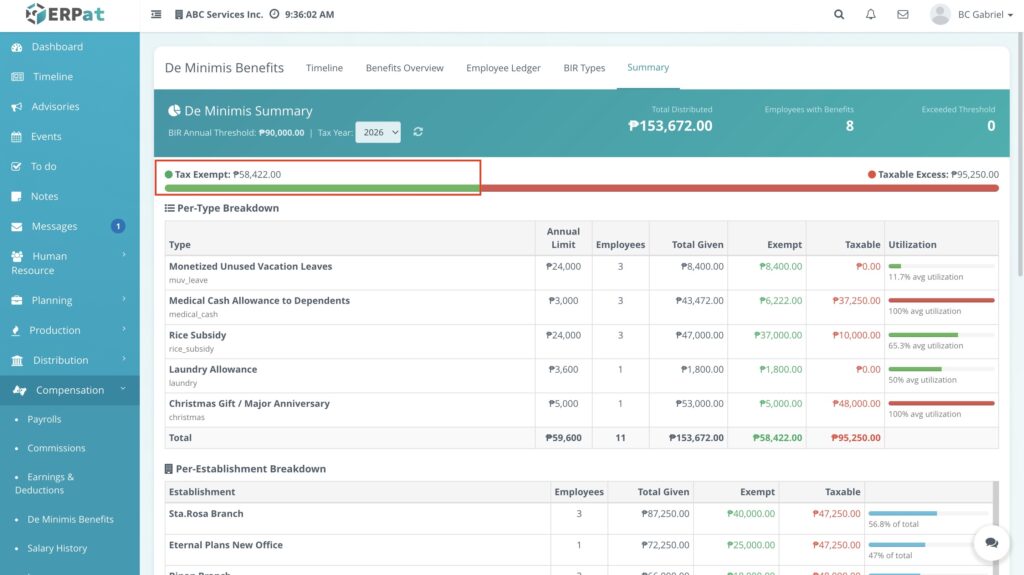
3. Total Taxable (Red Box) #
This identifies the total amount that has exceeded the BIR ceilings. Any value in this box will be added to the employees’ taxable income (subject to the ₱90,000 “Other Benefits” rule). This helps payroll managers flag potential tax impacts for high-value distributions.

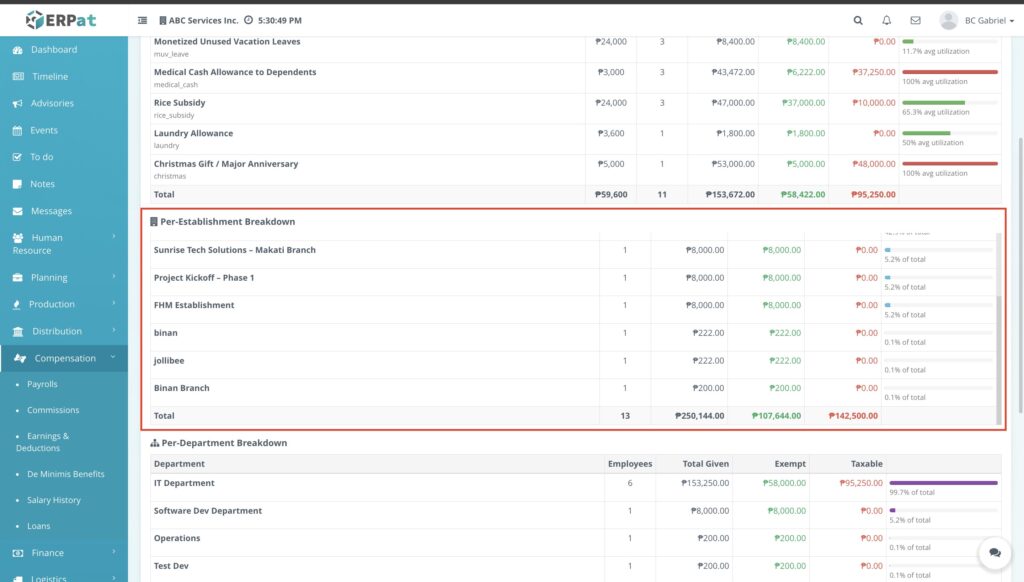
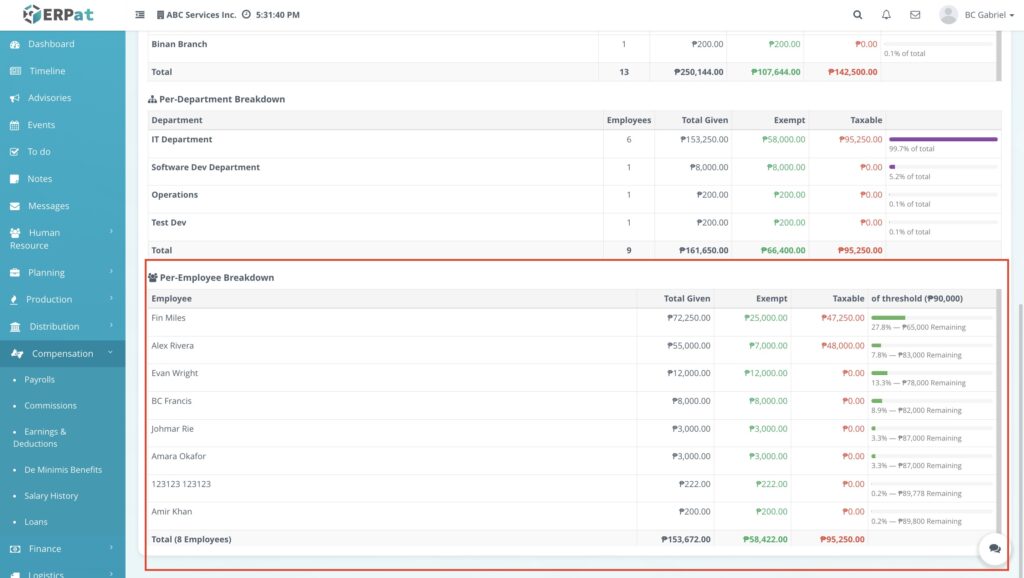
Detailed Breakdowns #
Below the summary cards, the system provides four specific tables to analyze data from different perspectives:
Per-Type Breakdown #
Lists every BIR Type currently being utilized to show which categories are costing the most and how much of each has exceeded the tax ceiling.
Per-Establishment Breakdown #
Organizes benefit distribution by Branch or Office Location to help management track spending across different sites.
Per-Department Breakdown #
Groups data by Functional Departments (e.g., IT, Sales, HR) to monitor departmental budget consumption and compliance.
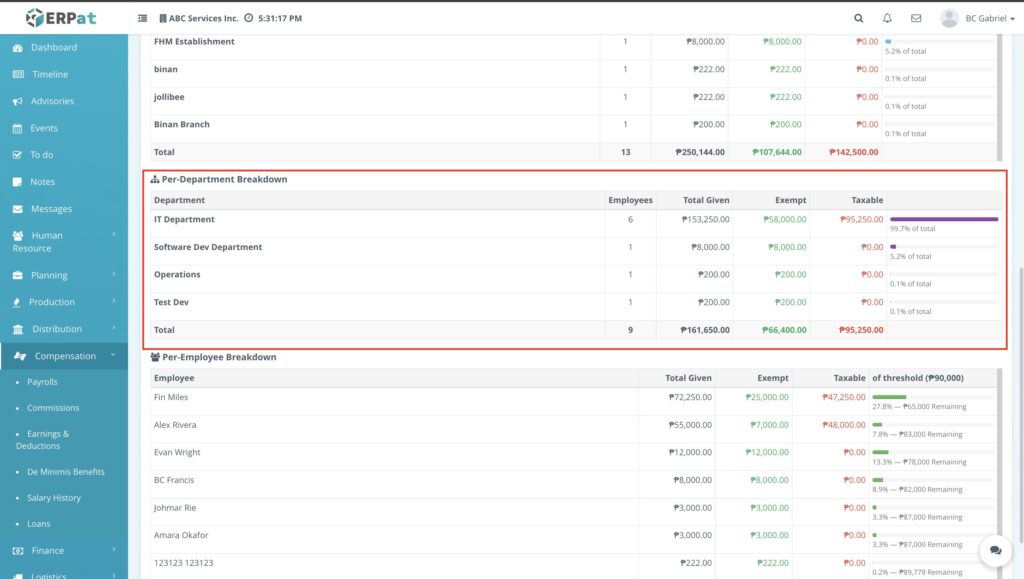
Per-Employee Breakdown #
The most granular view, listing every individual recipient to verify their personal total benefit package and specific tax status.
Permissions and Access Control #
- Payroll or Admin Roles: Only authorized Payroll or Admin roles can generate summaries, modify benefit categories, and manage employee benefit records.
- Accounting or Audit Roles: View-only access may be granted to accounting or audit roles for monitoring the Summary dashboard to ensure tax compliance and financial accuracy.
Best Practices #
- Data Integrity: Regularly check the Total Taxable box to identify any benefit distributions that have exceeded BIR ceilings before finalizing payroll.
- Filter Precision: Use the Advance Filter to generate department-specific or establishment-specific summaries for more localized reporting.
- Visual Analysis: Periodically review the Benefits vs Total Exempted chart to visualize the company’s tax-exempt efficiency and adjust benefit policies if needed.
Audit & Logs #
All generation of summaries, updates to benefit records, and changes to BIR types are logged for audit and compliance purposes within the ERPat System to ensure a clear trail for BIR inspections.
Last Updated: March 18, 2026 Module Owner: Payroll – ERPat System


