Overview #
The Event Pass Browse Tab is used to manage and monitor all generated event passes within the ERPat system. It provides a centralized interface where administrators can view, search, filter, and manage ePass records associated with events.
This module allows users to assign seats, send event pass notifications via email, create manual overrides, and generate new event passes. It supports efficient event access management by maintaining organized records of attendees, seat requests, and seat assignments.
The Browse tab also includes administrative tools for bulk operations such as seat allocation and email distribution to registered users.
Key Features #
- Centralized listing of all event passes
- Seat request and seat assignment monitoring
- Bulk email notification through Email Blast
- Automated seat allocation management
- Manual attendee override creation
- ePass record creation and management
- Search and filtering functionality
- Excel export for reporting
- Pagination and record management tools
- Secure role-based access for event administrators
Accessing the Event Pass Browse Tab
#
- Navigate to the left sidebar menu.
- Click Marketing.
- Select Event Pass.
The system will open the Browse tab displaying the list of ePass records.
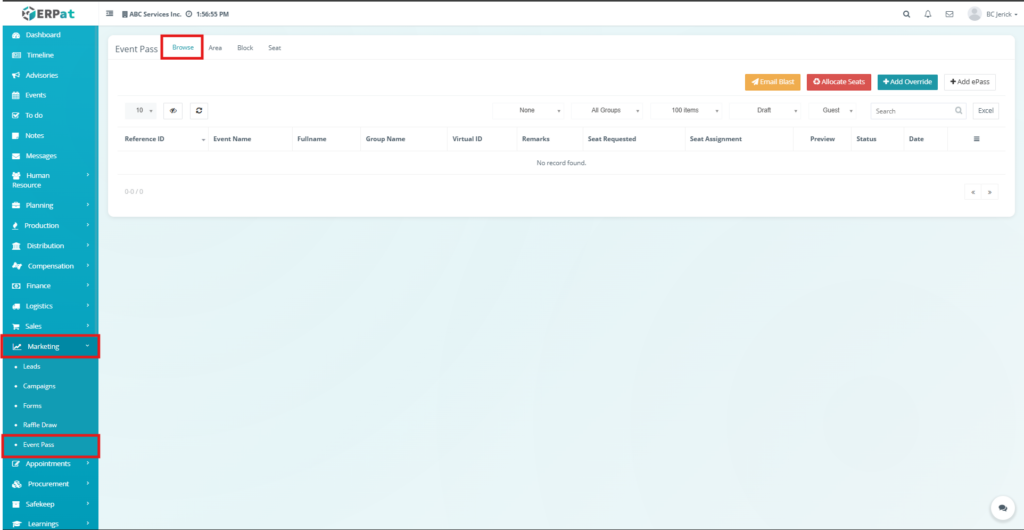
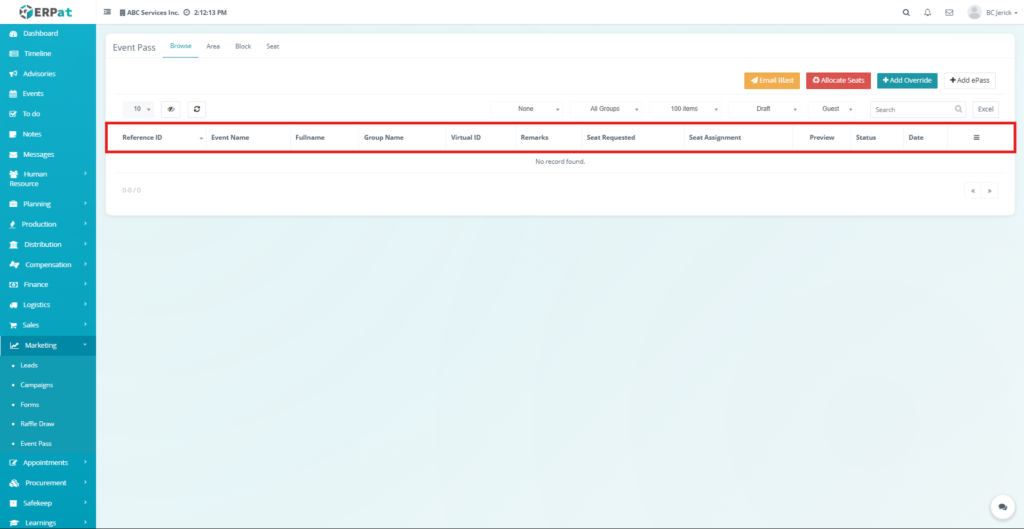
Browse Listing Page #
The Browse page provides an overview of all created event passes and their associated event information.
- Each record displays the following information:
- Reference ID – Unique identifier of the event pass
- Event Name – Name of the associated event
- Full Name – Name of the attendee
- Group Name – Assigned user group
- Virtual ID – Generated event pass identifier
- Remarks – Additional notes or comments
- Seat Requested – Number of seats requested
- Seat Assignment – Assigned seat details
- Preview – View event pass preview
- Status – Current ePass status
- Date – Date of record creation
- Actions – Additional system controls
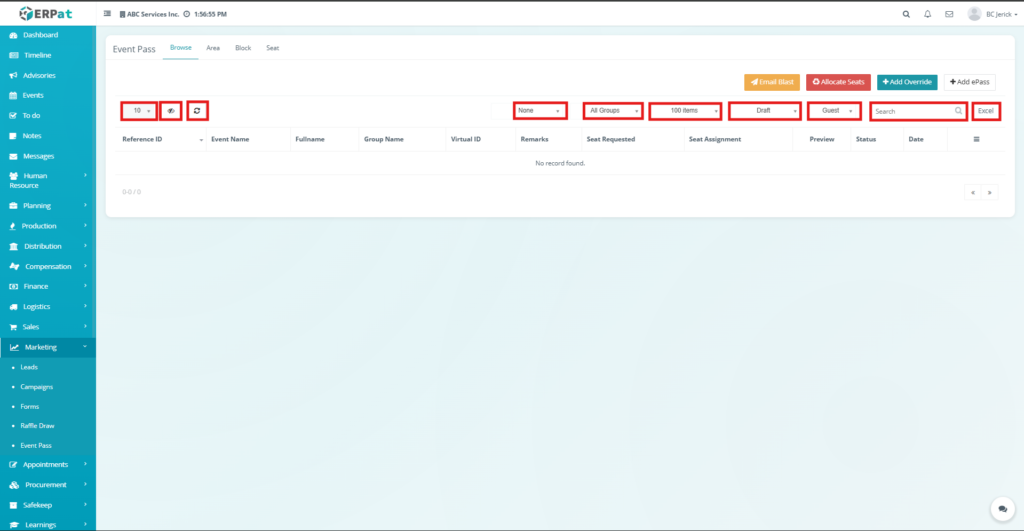
Additional Controls #
- Rows per page selector for record display
- Reload button to refresh records
- Group filtering options
- Status filtering options
- User type filtering (e.g., Guest)
- Search bar for quick ePass lookup
- Excel export for downloading reports
- Pagination controls for navigating multiple records
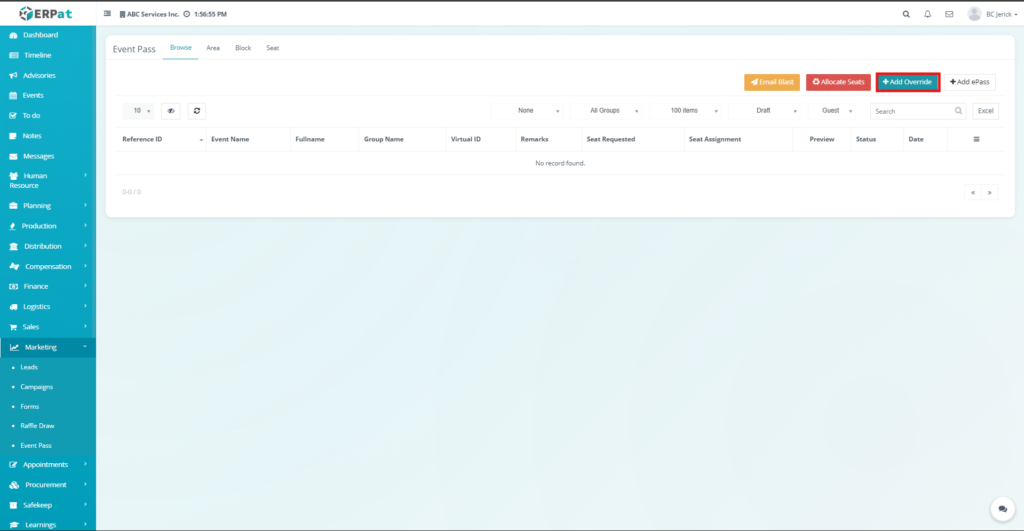
Administrative action buttons available on the page include:
- Email Blast – Send ePass notifications to registered users
- Allocate Seats – Automatically assign seats to attendees
- Add Override – Manually create a special attendee record
- Add ePass – Create a new event pass record
Steps for Sending Email Blast #
STEPS #
- Click the Email Blast button.
- The Email Blast popup window will appear.
- Review the console summary showing:
- Total number of ePass records
- Total number of seats
- Total number of ePass records
- Select an action from the Action dropdown.
Available options include:
- Render All
- Email Blast
- Bulk Resend
- Click Execute to perform the selected action.
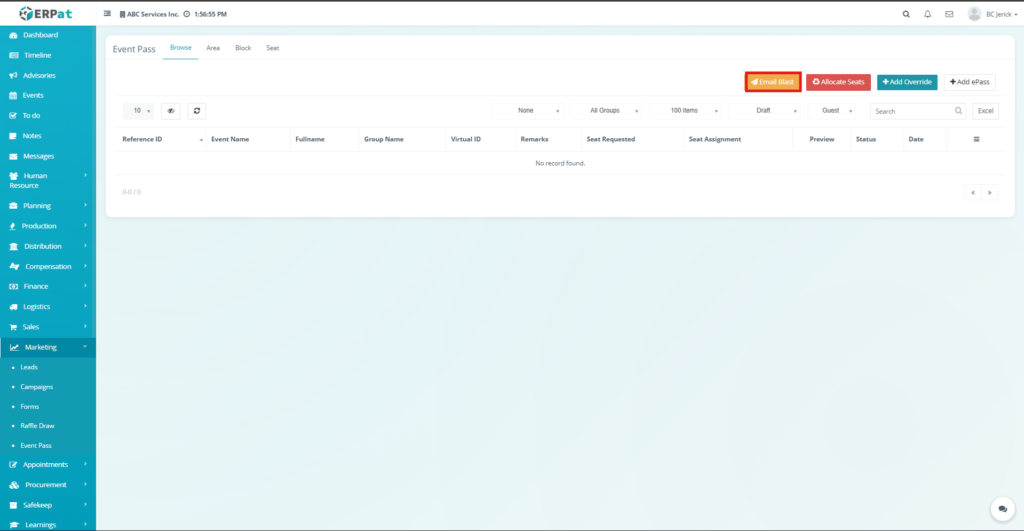
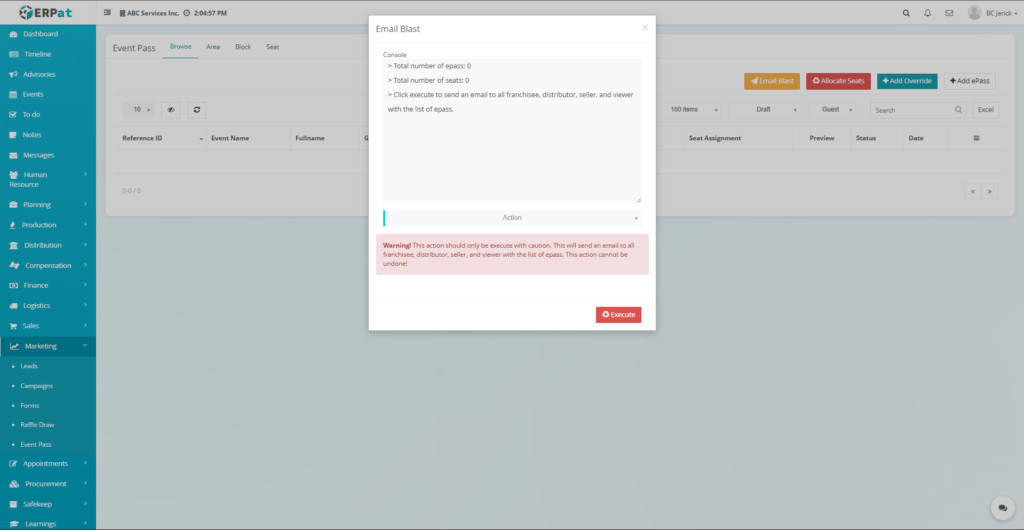

Result #
The system will send event pass information via email to all relevant users including franchisees, distributors, sellers, and viewers.
Notes: #
- This action should be executed with caution since email notifications will be sent to multiple recipients and cannot be undone.
Steps for Allocating Seats #
STEPS #
- Click the Allocate Seats button.
- The Allocate Seats popup window will appear.
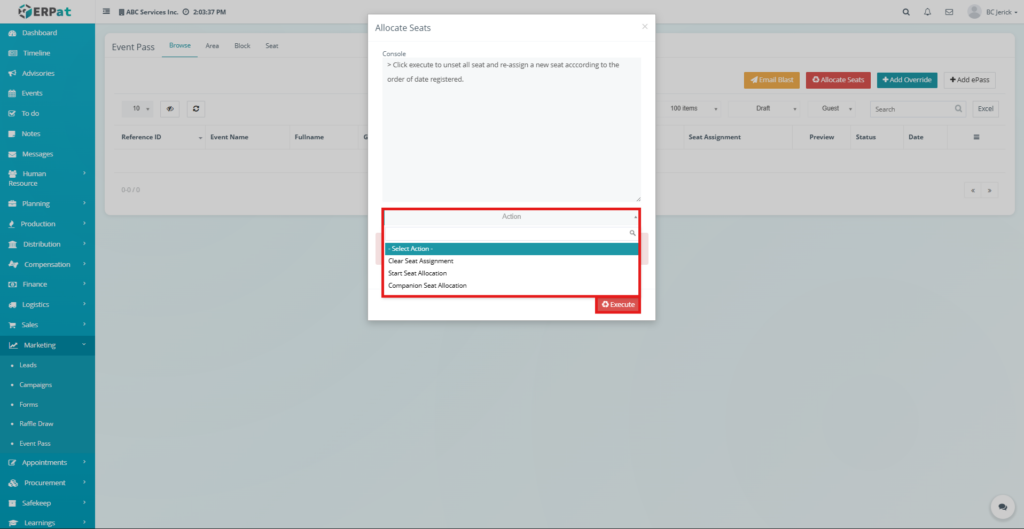
- Select the desired Action from the dropdown list.
Available options include:
- Clear Seat Assignment – Removes all current seat allocations
- Start Seat Allocation – Automatically assigns seats based on registration order
- Companion Seat Allocation – Assigns seats for companion attendees
- Click Execute to run the seat allocation process.

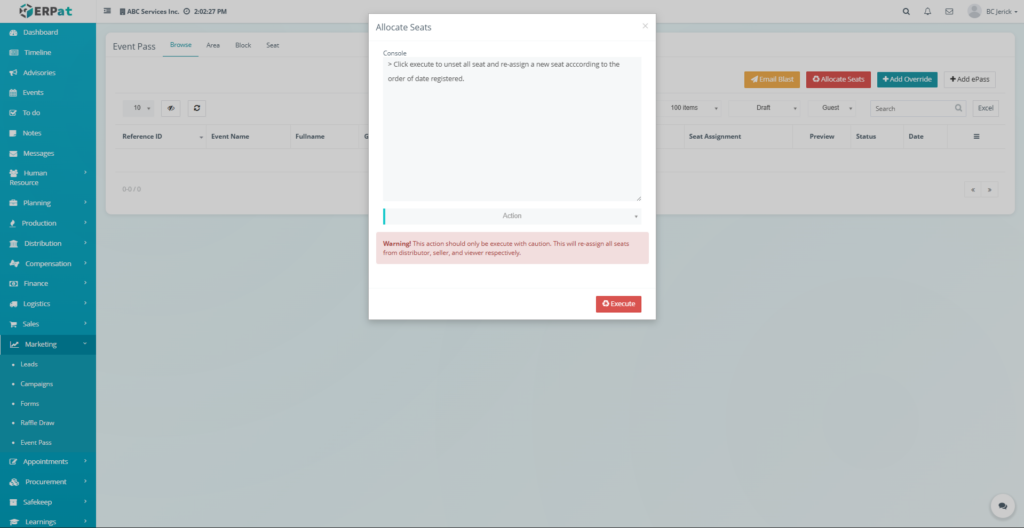
Result #
Seat assignments will be updated according to the selected allocation method.
Warning #
Executing seat allocation will reassign all seats and may override existing seat assignments
Steps for Adding an Override #
STEPS #
- Click the Add Override button.
- The Add Override popup window will appear.
- Enter the First Name of the attendee.
- Enter the Last Name of the attendee.
- Click Save.
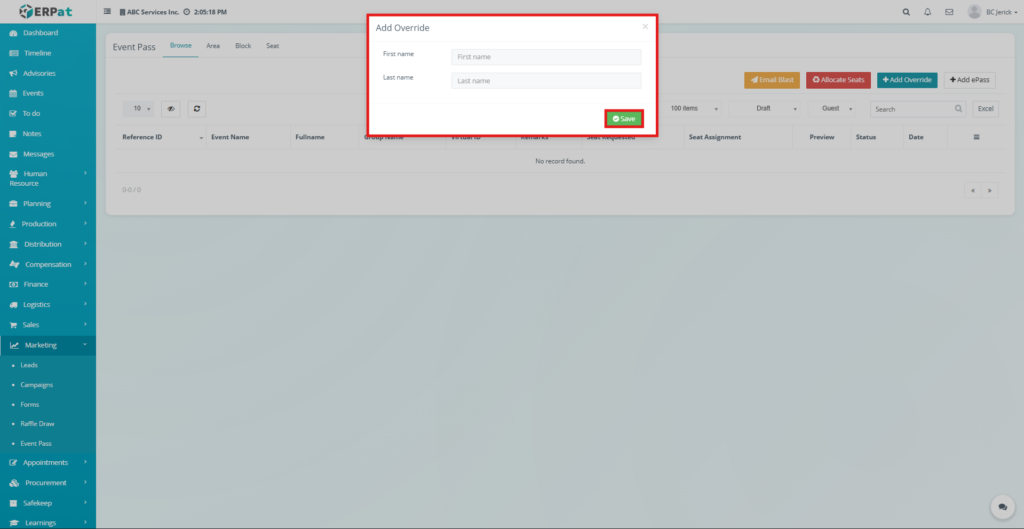
Result #
The system will create a manually added attendee record that can be processed for event pass generation.
Steps for Adding a New ePass #
STEPS #
- Click the Add ePass button.
- The Add ePass popup window will appear.
- Select the Event Name.
- Choose the Event Area.
- Select the Event Block.
- Enter the Number of Seats Requested.
- Add Remarks if necessary.
- Click Save.

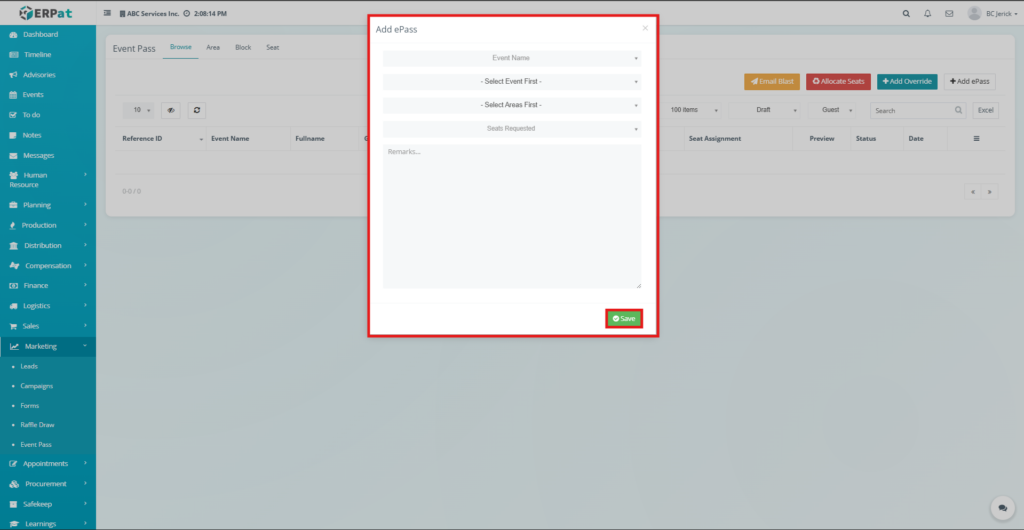
Result #
The new event pass record will be added to the Browse listing page and will be available for seat allocation and email notification.
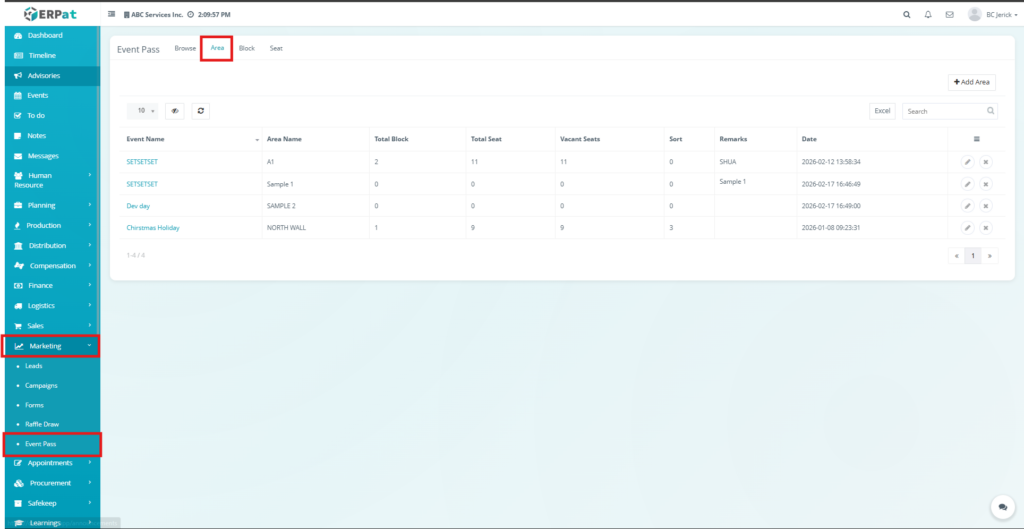
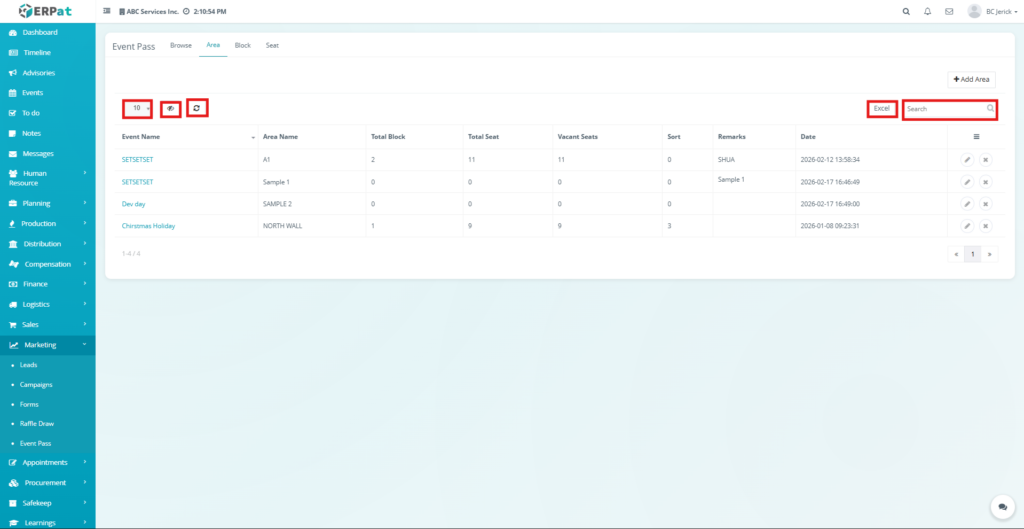
Event Pass – Area Tab #
The Event Pass Area Tab is used to configure and manage seating areas associated with events within the ERPat system. It allows administrators to define different seating zones or sections where event attendees can be allocated seats.
Each area represents a specific location within an event venue and can contain multiple seat blocks and individual seats. This module helps organizers structure the seating layout of an event and monitor seat availability within each area.
The Area tab provides tools to create, edit, and delete event seating areas while displaying summarized seat statistics such as total blocks, total seats, and remaining vacant seats.
Accessing the Event Pass Area Tab
#
- Navigate to the left sidebar menu.
- Click Marketing.
- Select Event Pass.
- Click the Area tab located at the top of the Event Pass module.
The system will display the list of configured event areas.
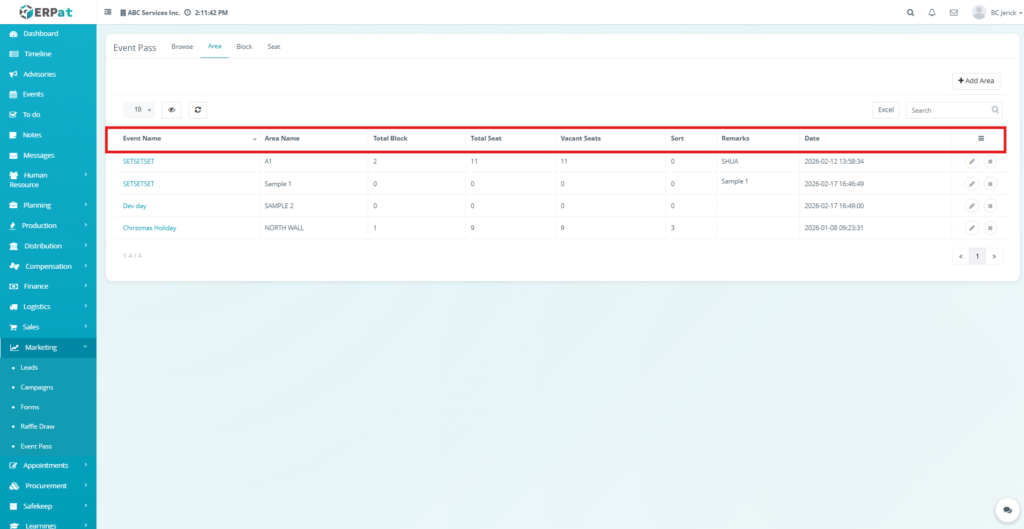
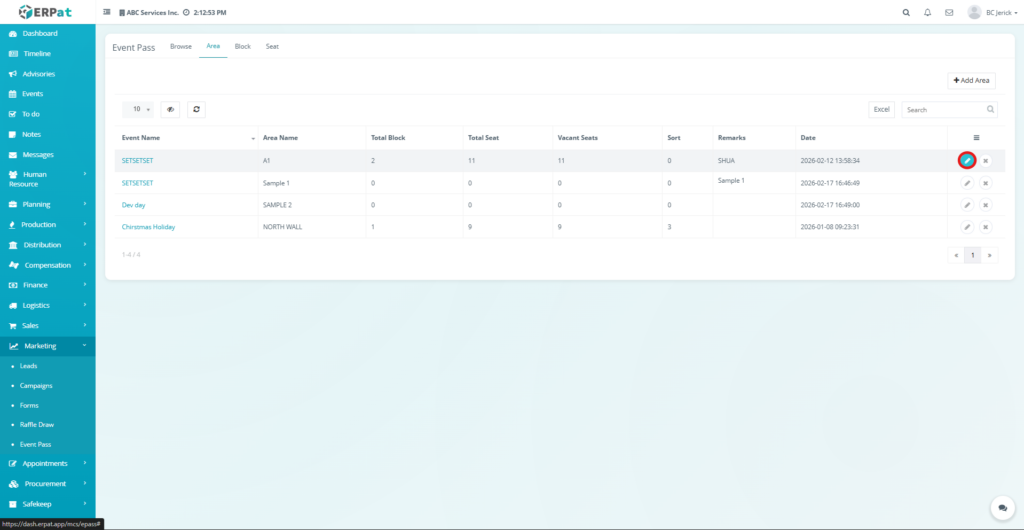
Area Listing Page #
The Area listing page displays all configured seating areas for events.
Each record includes the following information:
- Event Name – The event associated with the seating area
- Area Name – Name of the seating section or zone
- Total Block – Total number of seat blocks within the area
- Total Seat – Total seats available in the area
- Vacant Seats – Number of seats currently unassigned
- Sort – Sorting order used for area display
- Remarks – Additional notes or description
- Date – Date when the area record was created
- Actions – Edit or Delete controls
Additional Controls #
Although labeled as Excel, the export button downloads the report as a PDF file.
- Rows per page selector for record display
- Reload button to refresh the list of areas
- Excel button to download the area report
- Search bar for locating specific records
- Pagination controls for navigating multiple records
Notes: #
- Although labeled as Excel, the export button downloads the report as a PDF file.
Steps to View Event Details #
- The system will display the Event Details Popup window.
- Navigate to any Event Pass tab in the ERPat system (Browse, Area, Block, or Seat).
- Locate the Event Pass listing table.
- Click the Event Name link of the event you want to view.
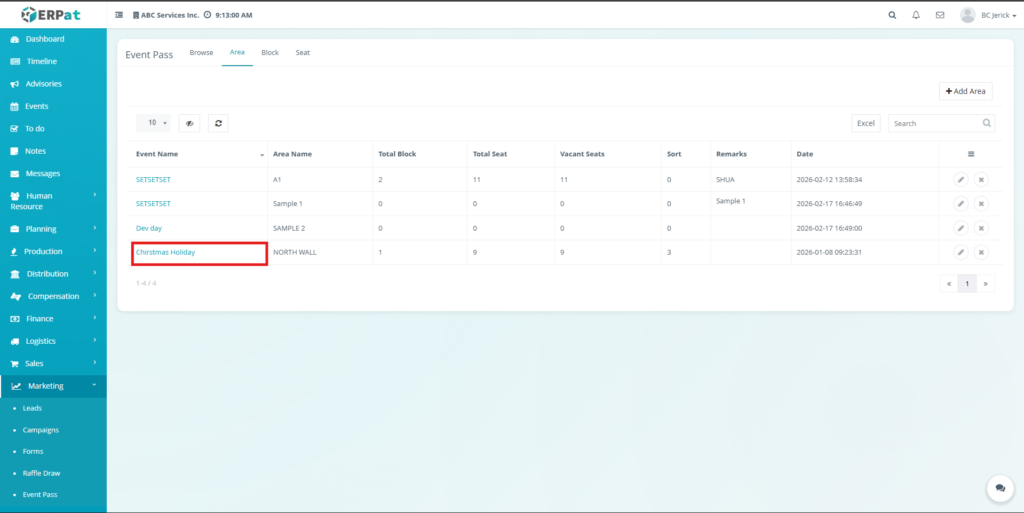
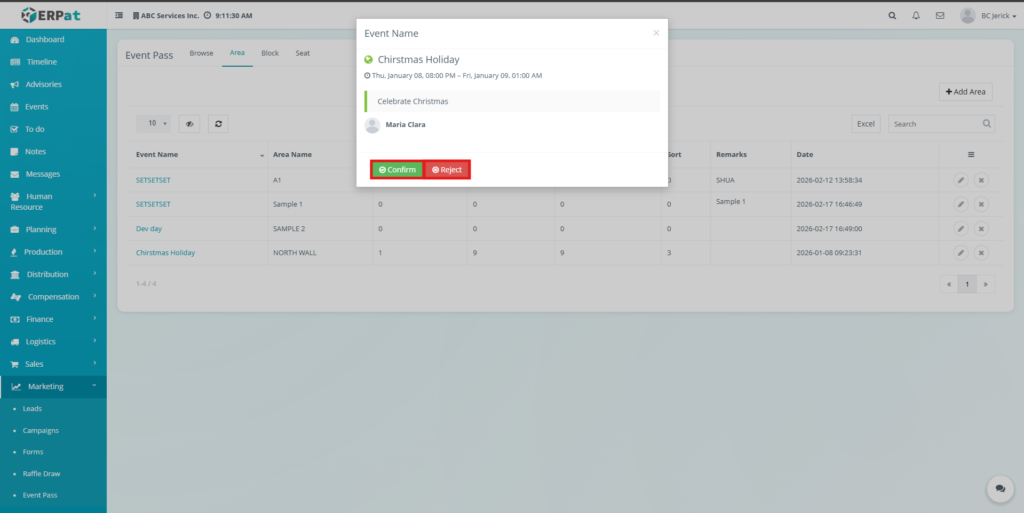
Event Details Information #
The popup window displays the following information:
- Created By (User who created the event)
- Event Name
- Event Schedule (Start and End Date and Time)
- Event Description
Event Confirmation and Rejection #
Administrators can perform the following actions:
- Reject – Declines the event request and records the decision in the system.
- Confirm – Approves the event and allows it to be used for seat configuration, event pass generation, and attendee management.
Completing the Action #
- After selecting Confirm or Reject, the popup window closes and the user is returned to the current Event Pass page.
Notes: #
- The Event Details Popup is accessible from all Event Pass tabs and provides a convenient way to review event information directly from listing pages. The confirmation and rejection controls are available only to users who have the appropriate administrative permissions within the ERPat system. This feature helps ensure that event information is reviewed and validated before it is used in seat allocation and event pass management processes.
Steps for Adding a New Area #
STEPS #
- Click the Add Area button located at the top-right of the Area page.
- The Add Area popup window will appear.
- Select the Event where the area will belong.
- Enter the Area Name.
- Specify the Sort Order to control the display sequence of areas.
- Enter Remarks if necessary to describe the area.
- Click Save.
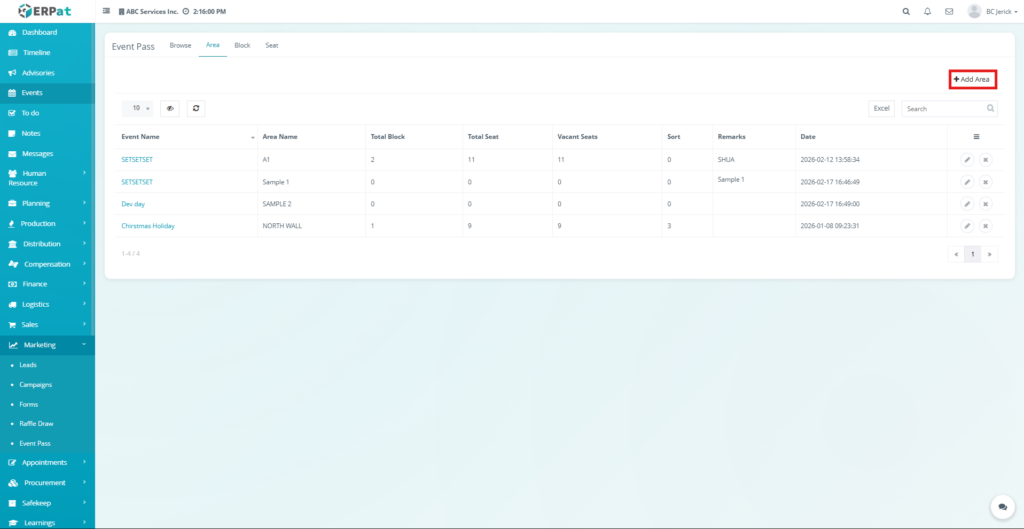
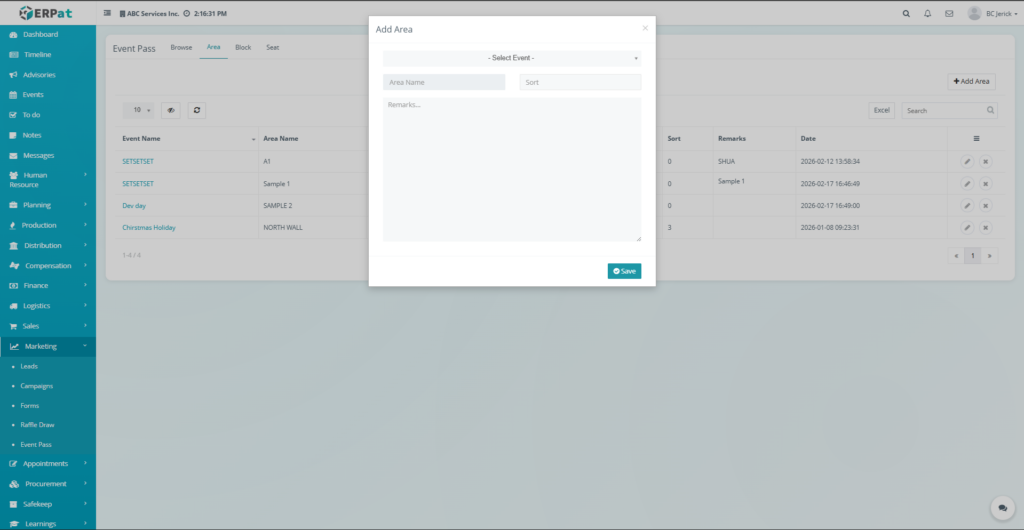
Result #
The newly created area will be added to the Area listing table and will be available for block and seat configuration.
Steps for Editing an Area #
STEPS #
- Locate the area record in the listing table.
- Click the Edit (✏️) icon under the Actions column.
- Modify the necessary area information.
- Click Save to apply the changes.
Notes: #
- Updating the area information will not affect existing seat assignments but may change display ordering depending on the sort value.
Steps for Deleting an Area #
STEPS #
- Locate the area record in the listing table.
- Click the Delete (✖) icon under the Actions column.
- Confirm the deletion when prompted.
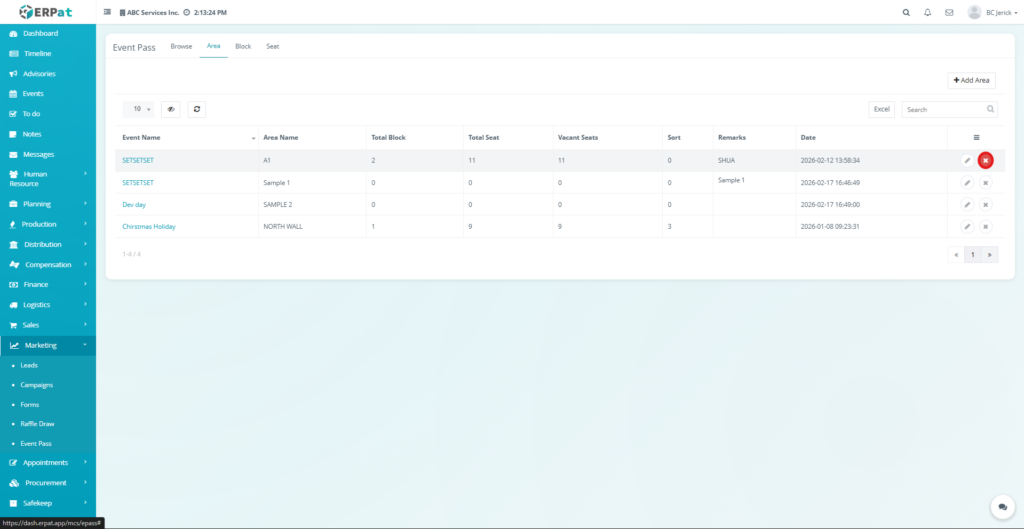
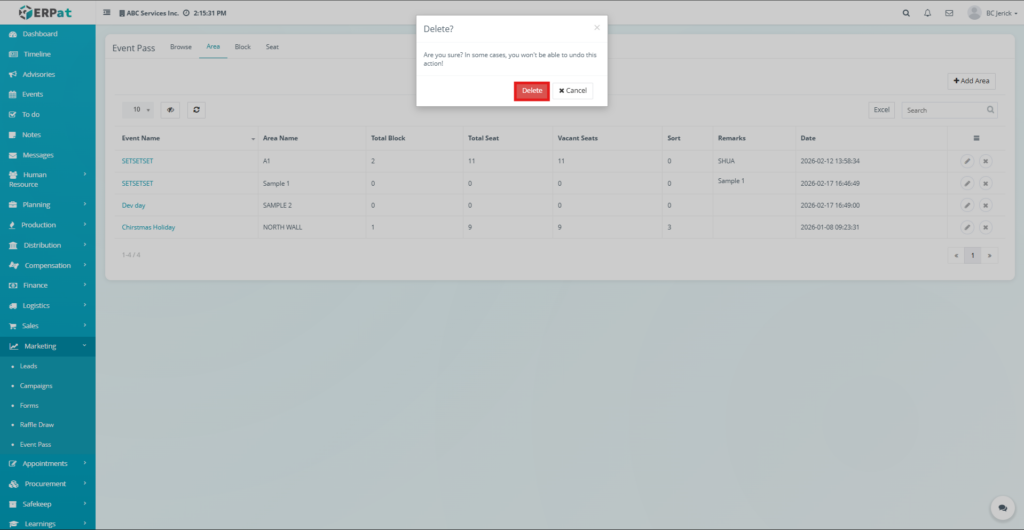
The selected area will be permanently removed from the system.
Notes: #
If the area contains seat blocks or seat assignments, deletion may be restricted depending on system configuration.
Event Pass – Block Tab #
The Event Pass Block Tab is used to configure and manage seating blocks within a specific event area in the ERPat system. Blocks represent subdivisions of seating areas and help organize seats into manageable sections for event seat allocation.
Each block belongs to a specific event and area, allowing administrators to structure the venue layout in multiple layers: Event → Area → Block → Seat. This structured setup helps ensure accurate seat assignment and efficient management of attendee seating during events.
The Block tab provides tools for creating, editing, and deleting seat blocks while displaying seat capacity information and organizational details for each block.
Accessing the Event Pass Block Tab #
- Navigate to the left sidebar menu.
- Click Marketing.
- Select Event Pass.
- Click the Block tab located at the top of the Event Pass module.
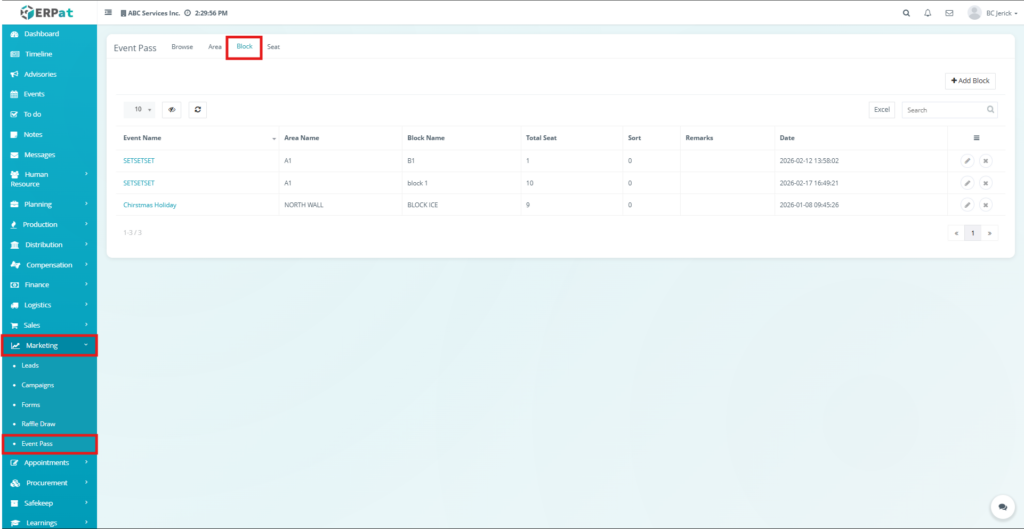
The system will display the list of configured blocks for events
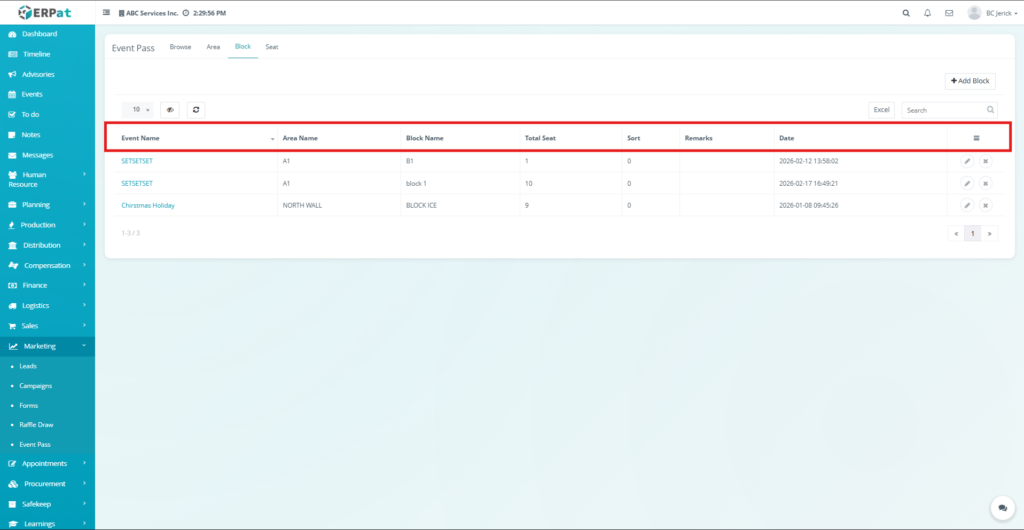
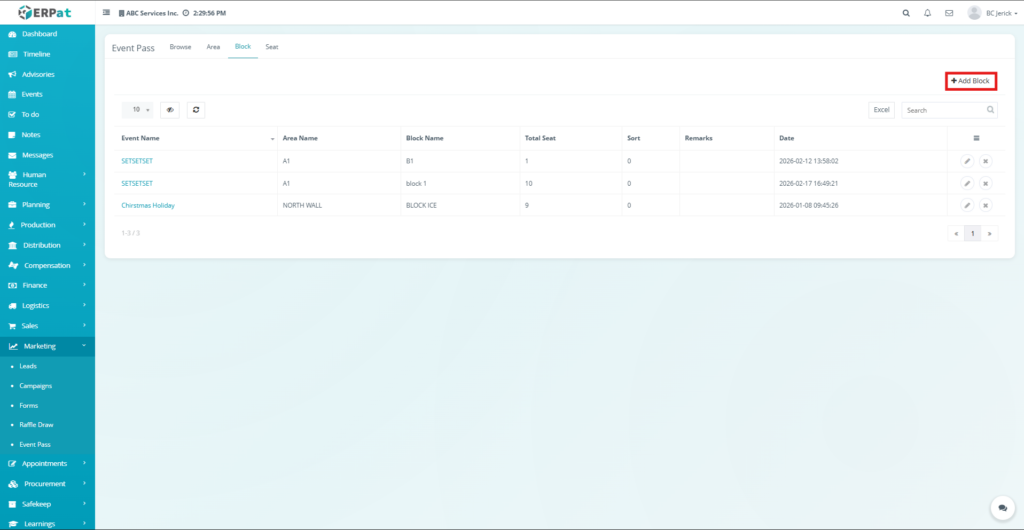
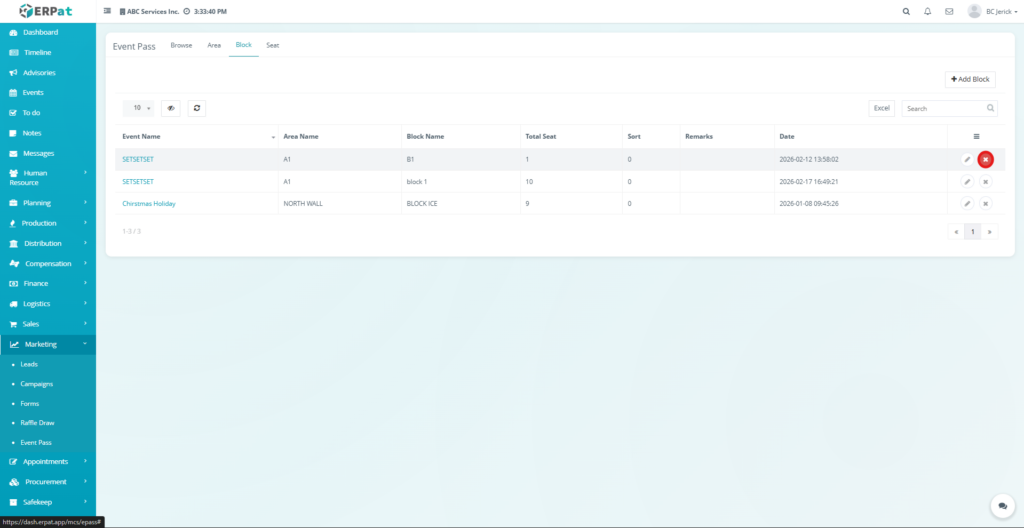
Block Listing Page #
The Block listing page displays all configured seat blocks for events and their associated seating areas.
- Each record includes the following information:
- Event Name – The event associated with the block
- Area Name – The area where the block is located
- Block Name – Name or identifier of the seating block
- Total Seat – Total number of seats configured in the block
- Sort – Sorting order used to organize blocks
- Remarks – Additional notes or block description
- Date – Date when the block record was created
- Actions – Edit or Delete controls
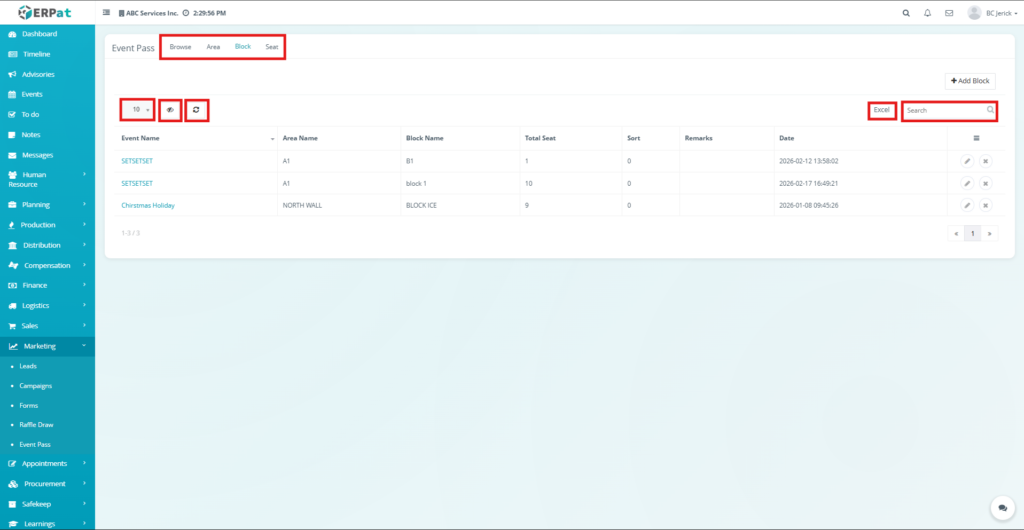
Additional Controls #
- Rows per page selector for record display
- Reload button to refresh the list of blocks
- Excel button to export block records
- Search bar for locating specific block entries
- Pagination controls for navigating multiple records
Notes: #
- Although labeled as Excel, the export button downloads the report as a PDF file.
Steps for Adding a New Block #
STEPS #
- Click the Add Block button located at the top-right of the Block page.
- The Add Block popup window will appear.
- Select the Event where the block will belong.
- Select the Area associated with the event.
- Enter the Block Name.
- Enter the Total Seat value representing the number of seats in the block.
- Enter the Sort Order to control the display sequence of blocks.
- Add Remarks if necessary to describe the block.
- Click Save.
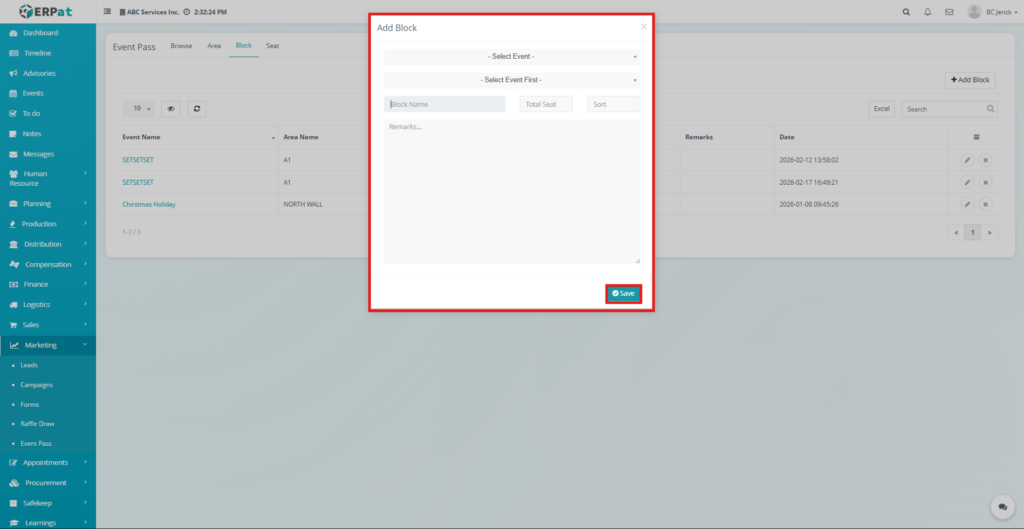
Result #
The newly created block will be added to the Block listing table and will be available for seat configuration.
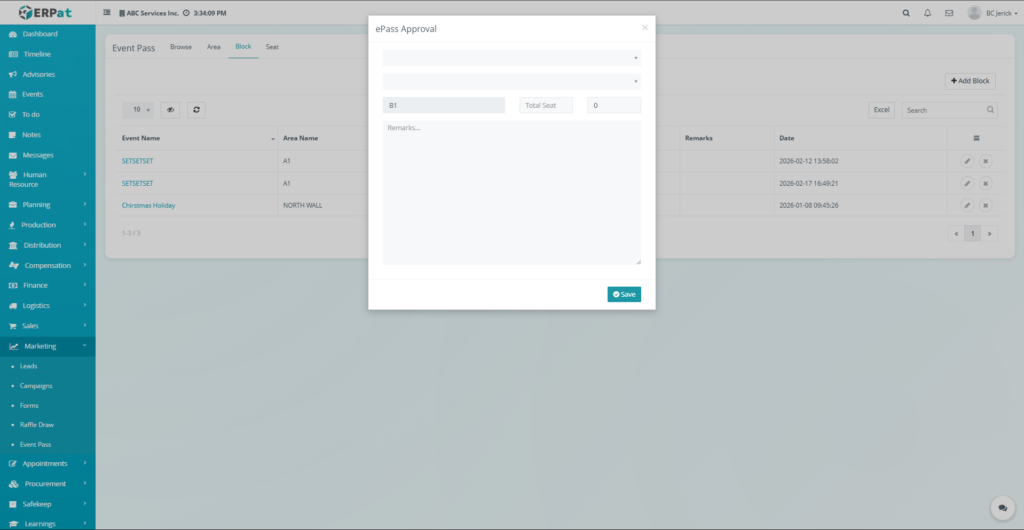
Steps for Editing a Block #
STEPS #
- Locate the block record in the listing table.
- Click the Edit (✏️) icon under the Actions column.
- Modify the necessary block information.
- Click Save to apply the changes.
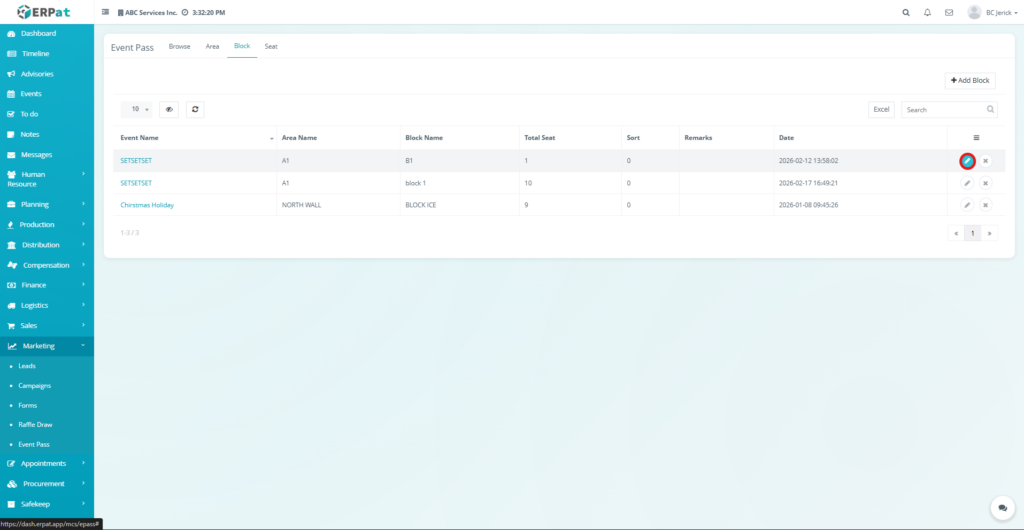
Notes: #
- Editing block details may affect how seats are organized but does not automatically change existing seat assignments.
Steps for Deleting a Block #
STEPS #
- Locate the block record in the listing table.
- Click the Delete (✖) icon under the Actions column.
- Confirm the deletion when prompted.
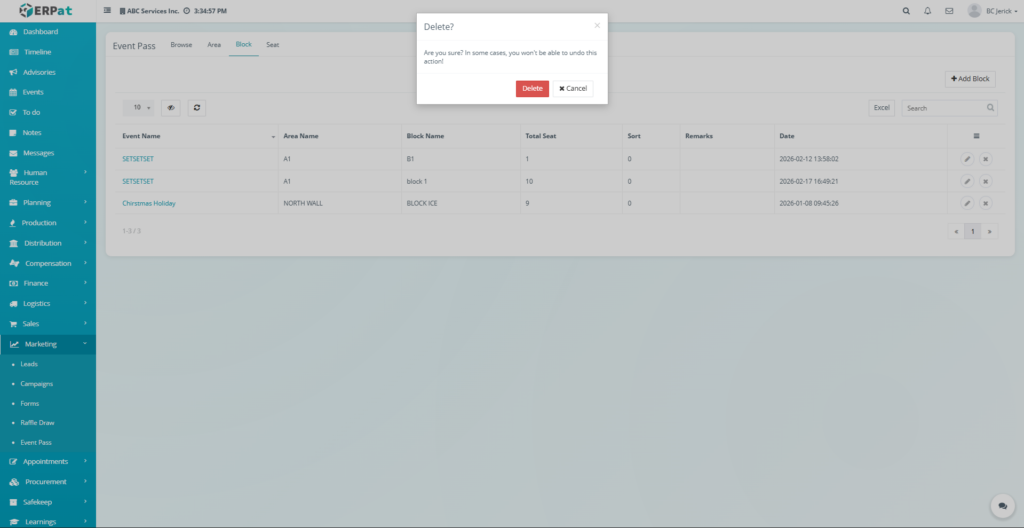
The selected block will be permanently removed from the system.
Notes: #
- Blocks that contain configured seats may be restricted from deletion depending on system rules.
Event Pass – Seat Tab #
The Event Pass Seat Tab is used to configure and manage individual seats associated with seating blocks within the ERPat system. It allows administrators to define specific seats that can be assigned to event attendees during seat allocation.
Each seat belongs to a specific event area and block, forming the final layer of the event seating structure. This setup enables organizers to accurately manage attendee seating by assigning exact seat positions within the venue.
The Seat tab provides tools to create, edit, and delete seat records while displaying seat information such as the associated event, area, block, seat number, and seat status. This module helps ensure that seating arrangements are organized and properly configured for event access management.
Accessing the Seat Tab #
Steps #
- Navigate to the left sidebar menu.
- Click Marketing.
- Select Event Pass.
- Click the Seat Tab located at the top of the Event Pass module.
- The system will display the list of configured seats.
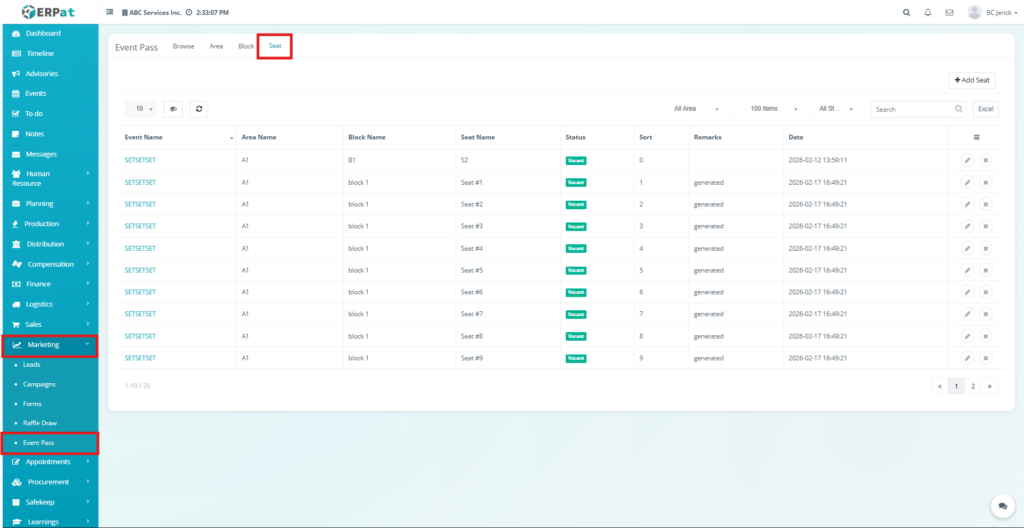
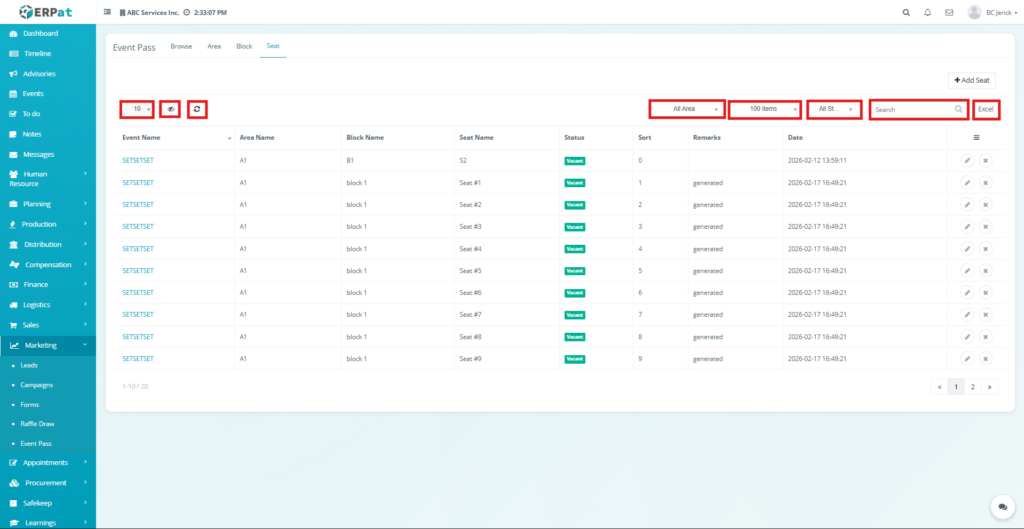
Seat Listing Page #
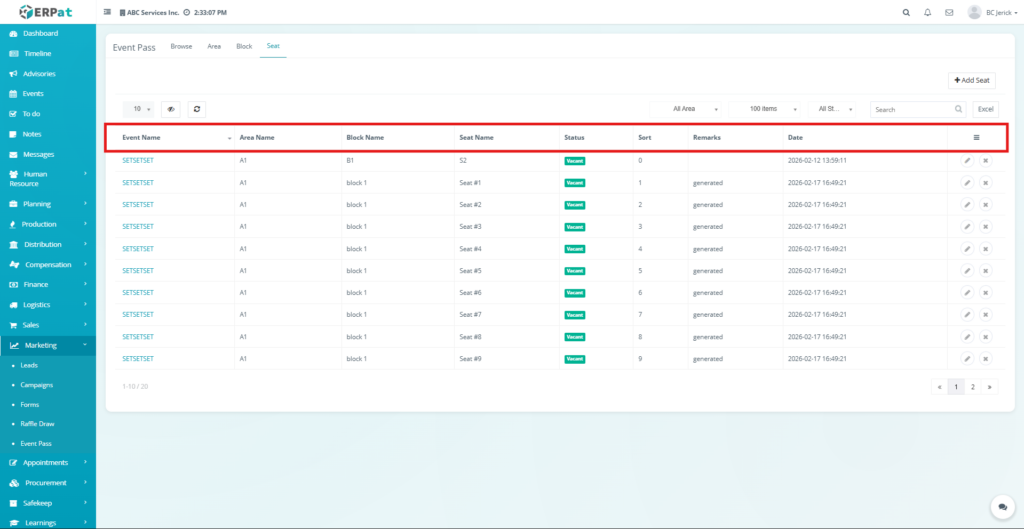
The Seat listing page displays all configured seats and their associated event structure.
Each record displays the following information:
- Event Name – The event associated with the seat
- Area Name – Seating area where the seat belongs
- Block Name – Block where the seat is located
- Seat Number – Unique seat identifier
- Seat Label – Optional seat label or code
- Status – Seat availability status
- Date Created – Date when the seat was created
- Actions – Edit or Delete controls
Additional Controls #
The Seat page includes management tools for navigating and managing seat records.
- Rows per page selector – Controls the number of seats displayed per page
- Reload button – Refreshes the seat listing table
- Excel export – Downloads the seat report
- Search bar – Allows quick lookup of seat records
- Pagination controls – Allows navigation through large seat datasets
Notes: #
- The export button may download the report as PDF even if labeled Excel, depending on system configuration.
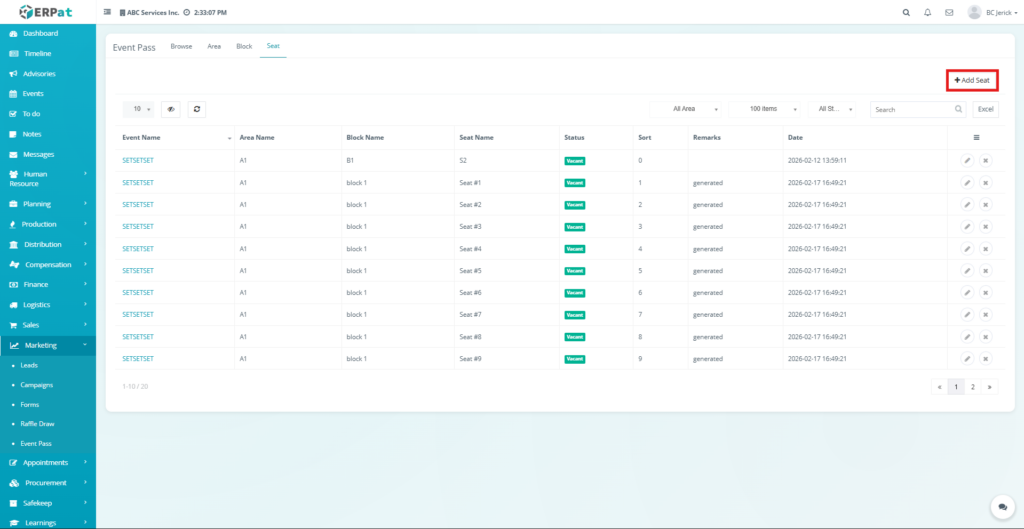
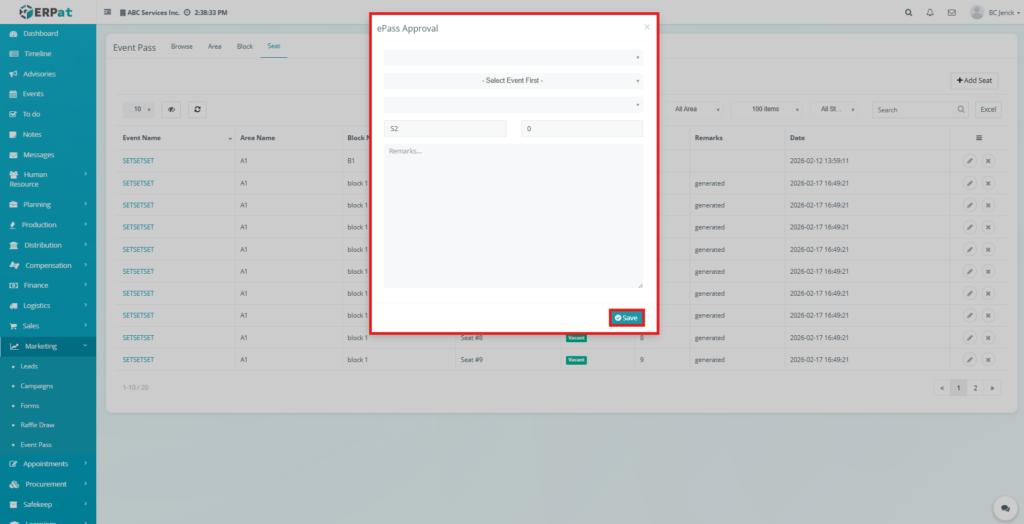
Steps for Adding a New Seat #
Steps #
- Click the Add Seat button located at the top-right of the Seat page.
- The Add Seat popup window will appear.
- Select the Event.
- Select the Area.
- Select the Block.
- Enter the Seat Number.
- Enter the Seat Label if applicable.
- Click Save.
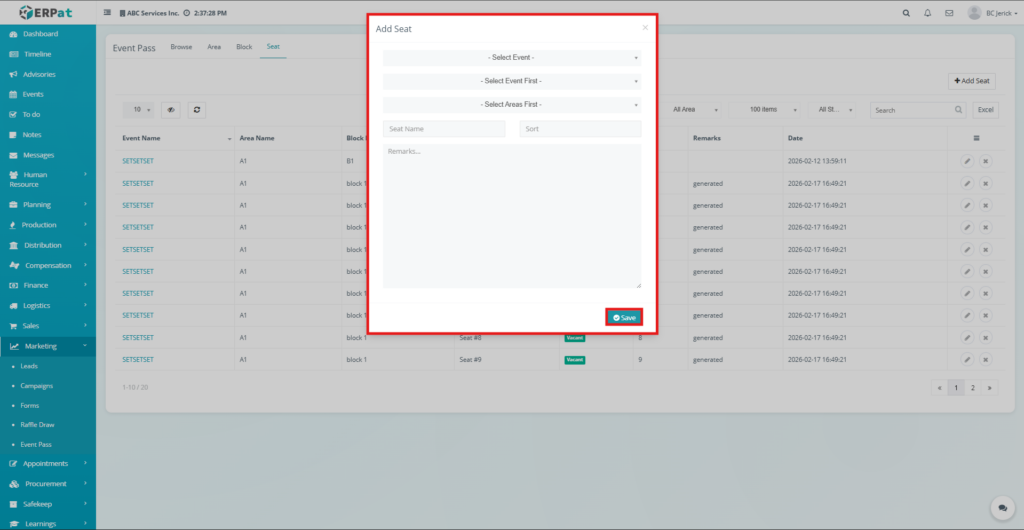
Result #
- The new seat record will be added to the Seat listing page and will be available for event seat allocation.
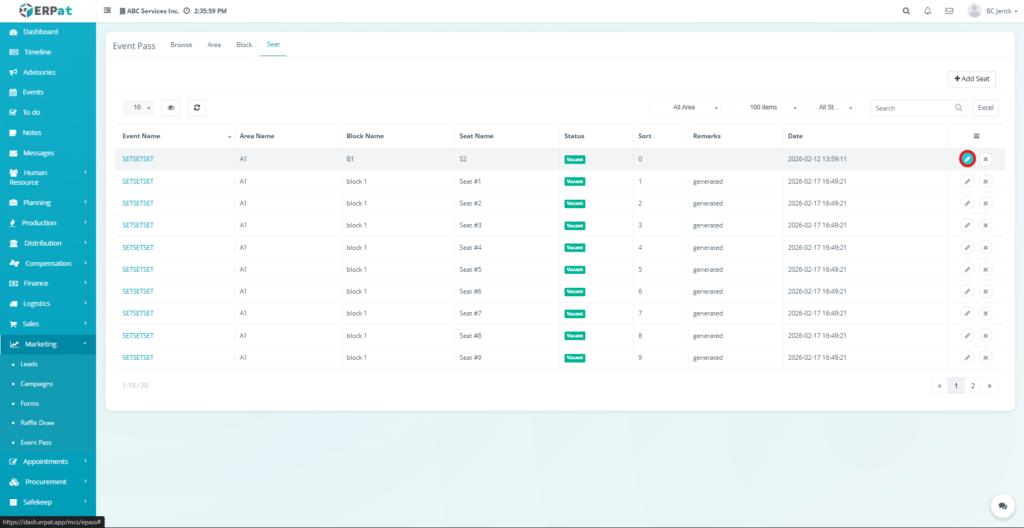
Steps for Editing a Seat #
Steps #
- Locate the seat record in the listing table.
- Click the Edit (✏️) icon under the Actions column.
- Modify the required seat information.
- Click Save to apply the changes.
Notes: #
- Editing seat details may affect how seats are displayed during seat allocation.
- Seat number changes should be performed carefully to maintain seating accuracy.
Steps for Deleting a Seat #
Steps #
- Locate the seat record in the listing table.
- Click the Delete (✖) icon under the Actions column.
- Confirm the deletion when prompted.

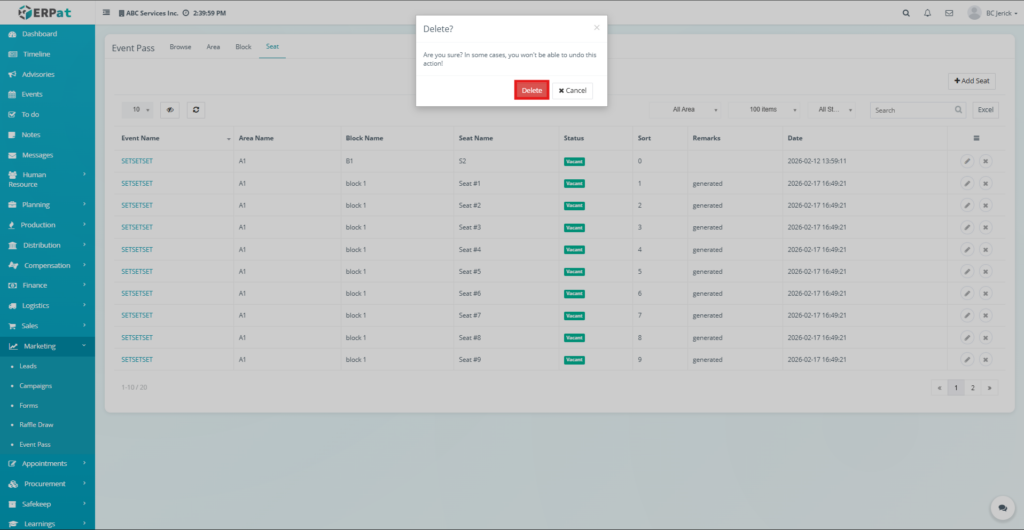
Result #
- The selected seat will be permanently removed from the system.
Warning #
Seats that are already assigned to attendees may not be deleted depending on system rules.
Search and Filtering #
Users can easily locate records within the Event Pass module using the available search and filtering tools. These tools help administrators quickly find event pass information, seating configurations, and attendee records.
Depending on the selected tab, users can search records using the following fields:
- Event Name – Locate records associated with a specific event
- Area Name – Find seating areas configured within the event venue
- Block Name – Identify seat blocks under a specific seating area
- Seat Number – Locate individual seat records
- Seat Label – Search seats using seat labels or codes
- Attendee Name – Find event pass records assigned to specific users
- Reference ID / Virtual ID – Locate event pass records quickly
Additional filtering options may include:
- Group filtering for attendee classifications
- Status filtering for event pass status
- User type filtering for attendee categories
Pagination controls allow efficient navigation through large datasets across all Event Pass records.
Permissions and Access Control #
Access to the Event Pass module depends on the user roles assigned within the ERPat system.
Typical permissions include:
- Users can view event pass records and seating configurations
- Authorized users can create or modify event pass, area, block, and seat records
- Only administrators may delete configuration records such as areas, blocks, or seats
- Administrative roles typically have full control over event pass management and seating configuration
These permissions ensure that event data and seating configurations are maintained securely and only modified by authorized personnel.
Best Practices #
To maintain organized event management and seating configurations, the following practices are recommended:
- Verify event details before generating event passes.
- Configure the seating structure in the correct order: Event → Area → Block → Seat.
- Use clear and consistent naming conventions for areas, blocks, and seats.
- Avoid deleting seating configurations that may already be used for event pass assignments.
- Carefully execute seat allocation operations to prevent seat reassignment conflicts.
- Maintain accurate remarks and notes for special seating or attendee cases.
- Regularly export event pass and seating reports for event monitoring and documentation.
Audit & Logs #
All activities performed within the Event Pass module are recorded within the ERPat system logs to ensure transparency and operational accountability.
Logged activities include:
- Event pass creation and updates
- Seat allocation processes
- Email blast operations
- Creation and modification of seating areas
- Creation and modification of seat blocks
- Seat configuration updates
- Record deletion actions
These logs allow administrators to track system changes and review operational history for event management activities.
Last Updated: March 16, 2026 Module Owner: Event-Pass Module – ERPat System


