Overview #
The Loan Module in the ERPat system is used to manage, track, and monitor employee loans within the organization. It provides a complete solution for handling loan creation, repayment tracking, categorization, and reporting.
The module consists of eight tabs: Timeline, Entries, Transaction, Payments, Fees, Categories, Overview, and Amortization. Each tab supports a specific function to ensure accurate loan lifecycle management.
Key Features #
- Centralized loan management system
- Loan creation and tracking
- Automated amortization schedule
- Payment and transaction monitoring
- Loan categorization and configuration
- Fee management
- Real-time dashboard and analytics
- Search and filtering tools
- Role-based access control
- Audit logging
Accessing the Loan Module #
- Navigate to the left sidebar menu.
- Click Compensation.
- Select Loans.
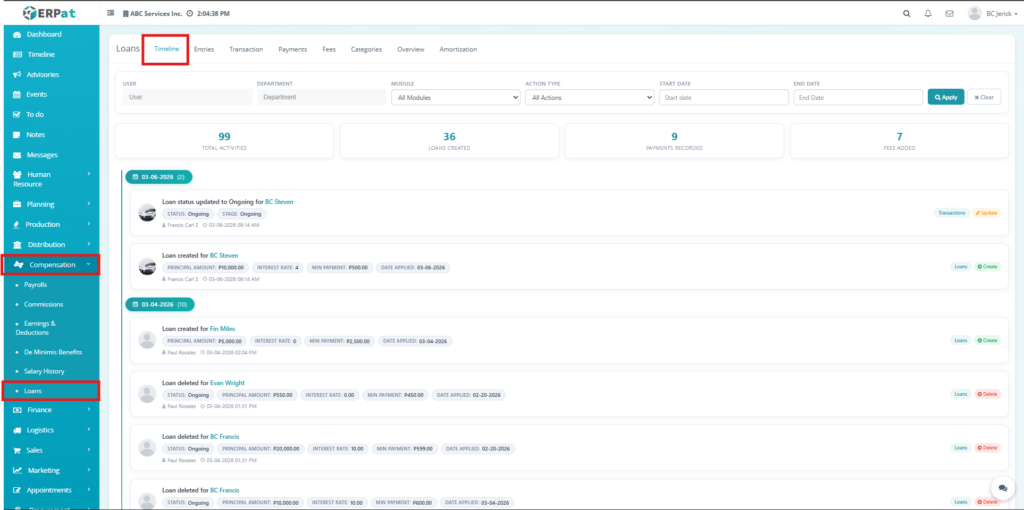
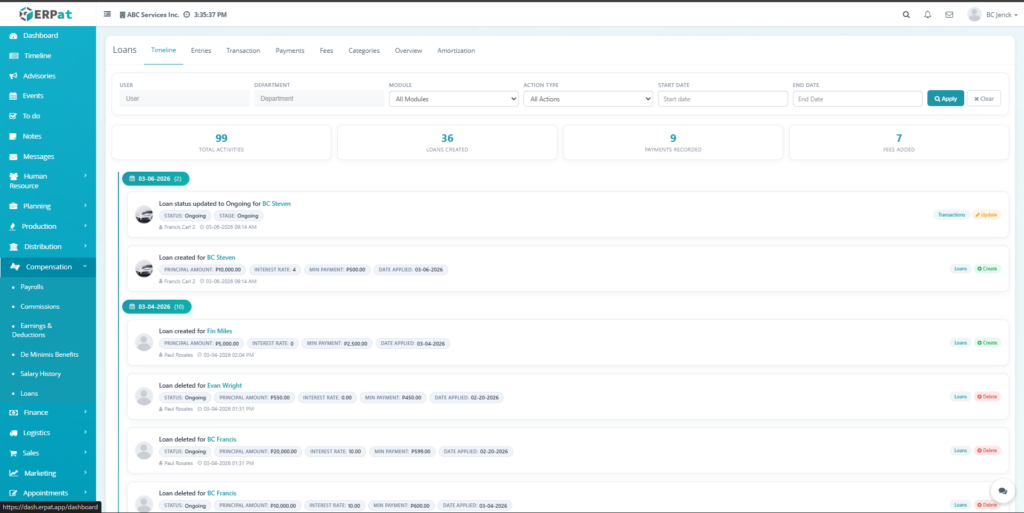
Timeline Tab #
The Timeline Tab provides a chronological view of all loan-related activities, including creation, updates, payments, and status changes. It helps users track system actions, monitor user activity, and review the history of loan transactions for auditing and transparency.
Listing Page #
- The listing page provides a chronological view of activities with the following information:
- Activity Description – Action performed
- User – User who performed the action
- Timestamp – Date and time of activity
- Details – Loan-related information
- Tags – Status indicators
- Action buttons – Contextual buttons
Additional Controls #
- User filtering options
- Department filtering options
- Module filtering options
- Action type filtering options
- Date range filtering options
- Search functionality
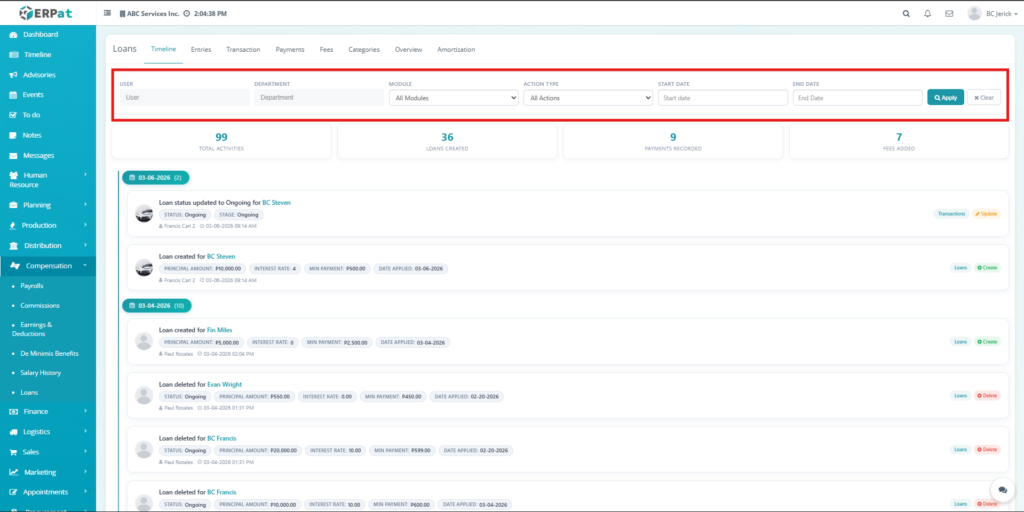
Steps to Apply Filter button #
STEPS #
- Select User, Department, Module, or Action Type.
- Set Start Date and End Date if needed.
- Click Apply.
Step to Clear Filter button #
STEP #
- Click Clear.
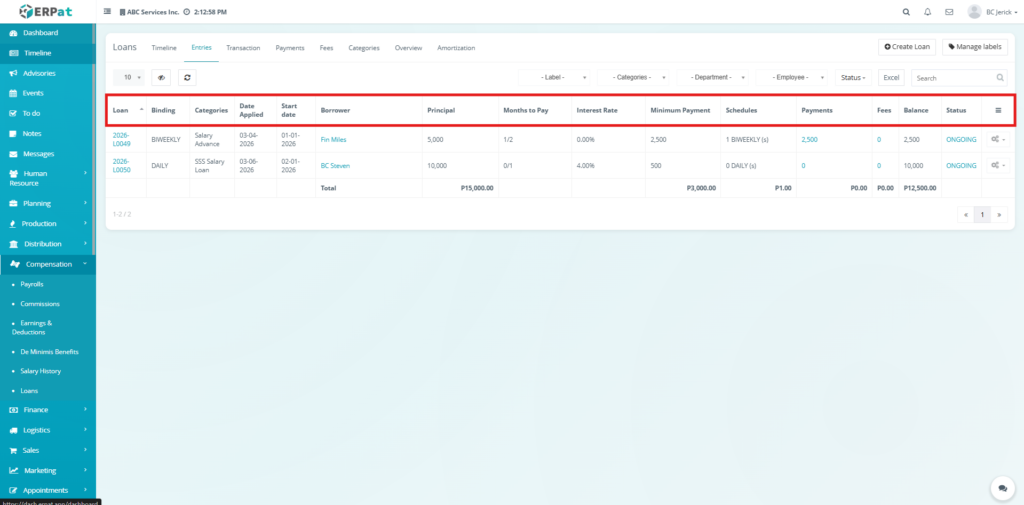
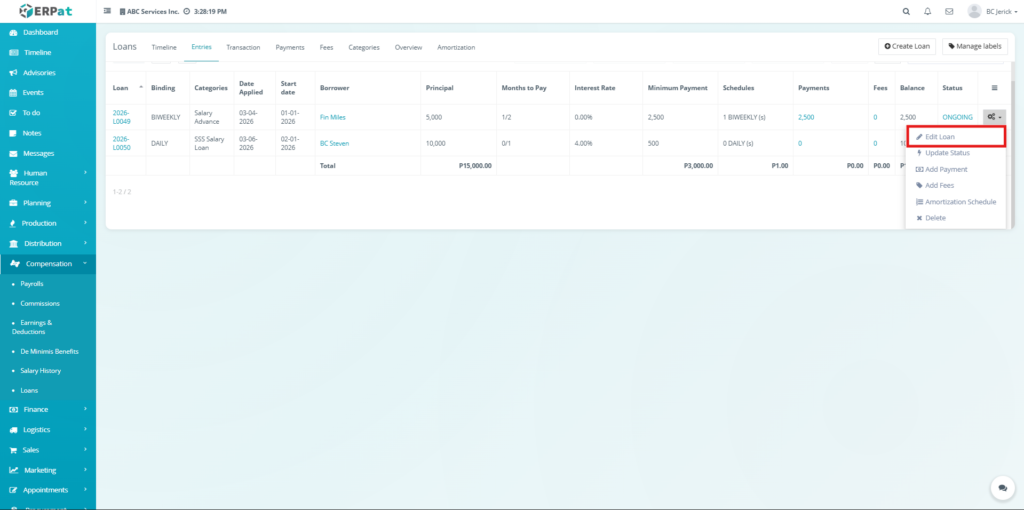
Entries Tab #
The Entries Tab serves as the main workspace for managing loan records. It allows users to create, update, and monitor loans, including borrower details, loan terms, balances, and statuses. It provides a centralized view of all loan information and supports full lifecycle management.
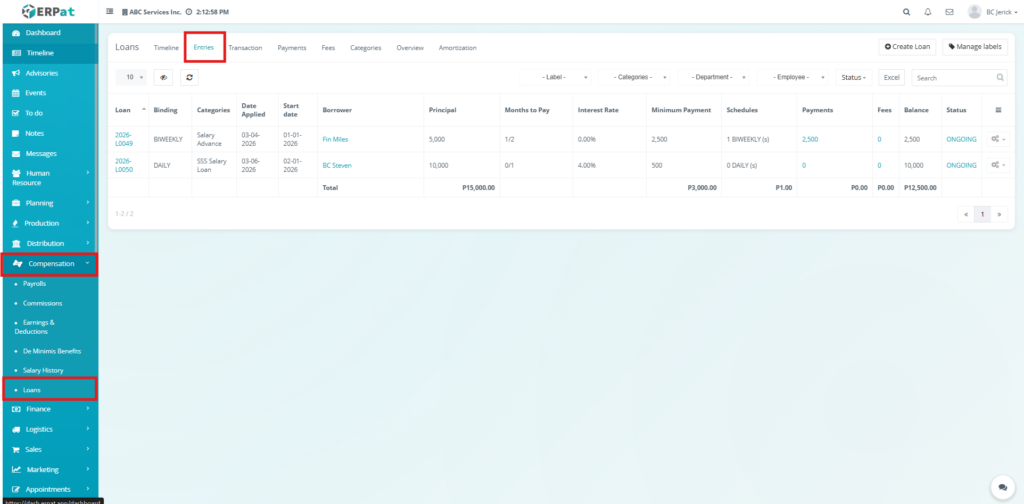
Listing Page #
The listing page provides an overview of all loan records with the following information:
- Loan – Unique loan reference ID
- Binding – Payment frequency
- Categories – Loan classification
- Date Applied – Loan request date
- Start Date – Loan start date
- Borrower – Assigned employee
- Principal – Loan amount
- Months to Pay – Repayment duration
- Interest Rate – Applied interest
- Minimum Payment – Required payment amount
- Schedules – Payment schedule count
- Payments – Total payments made
- Fees – Additional charges
- Balance – Remaining loan balance
- Status – Current loan status
- Action buttons – Edit and delete controls
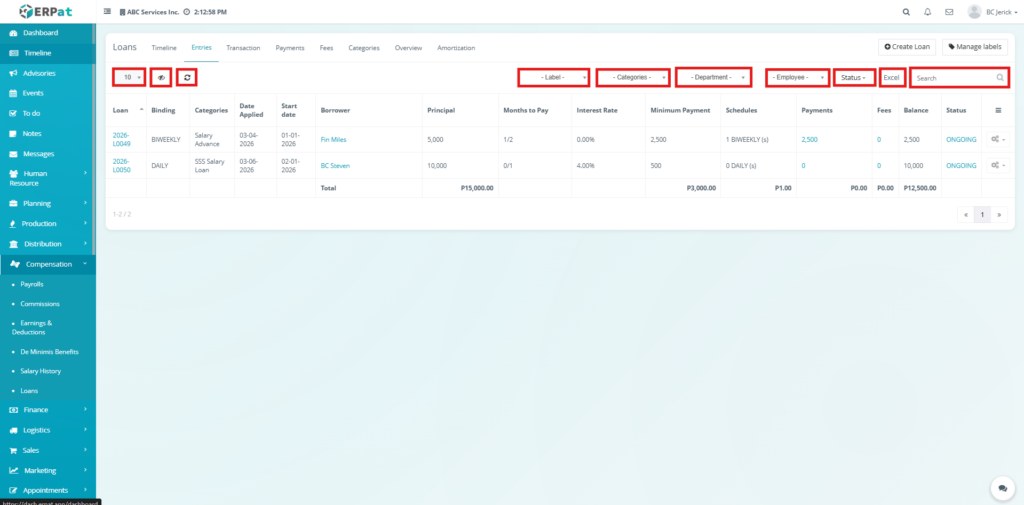
Additional Controls #
- Rows per page selector for record display
- Column visibility toggle
- Reload button to refresh records
- Label filtering options
- Category filtering options
- Department filtering options
- Employee filtering options
- Status filtering options
- Search bar for quick loan lookup
- Excel export for downloading reports
- Pagination controls for navigating multiple records
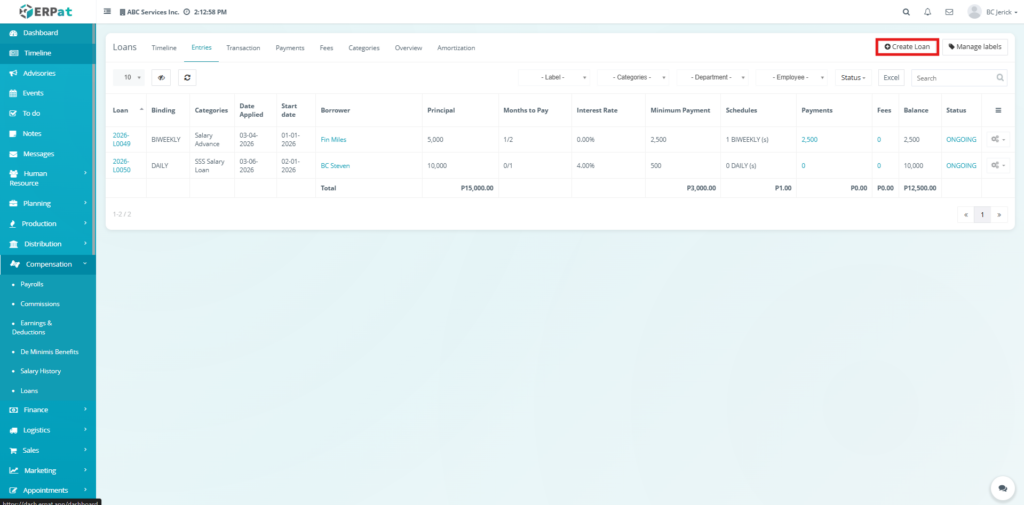
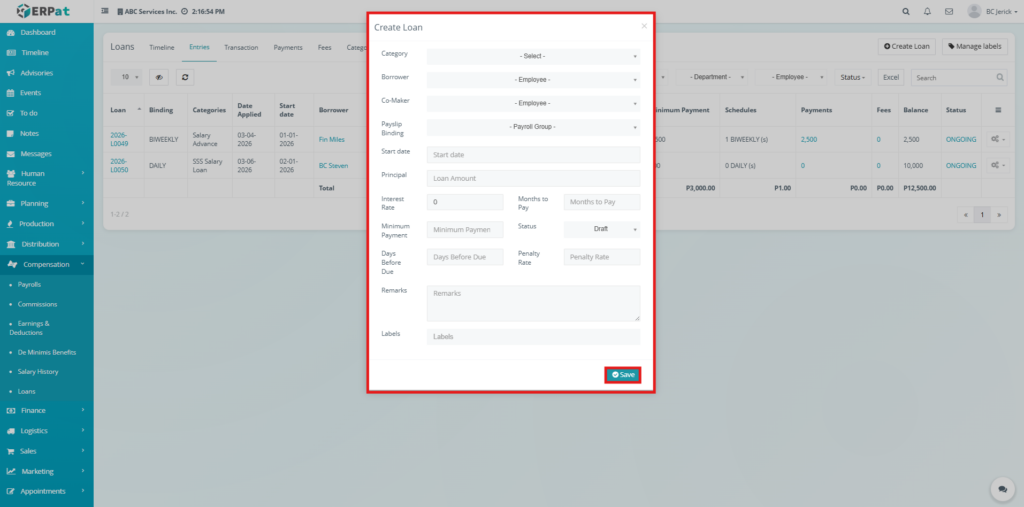
Steps for Creating a Loan #
Steps #
- Click Add Loan.
- Fill in required loan details.
- Click Save.
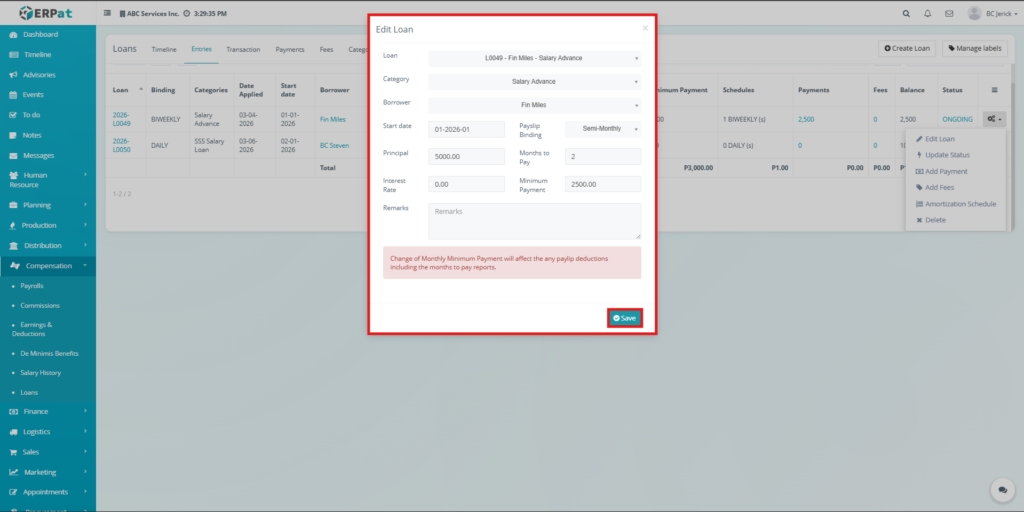
Steps for Editing Loan #
Steps #
- Click the Action dropdown.
- Select Edit Loan.
- Modify loan details.
- Click Save.
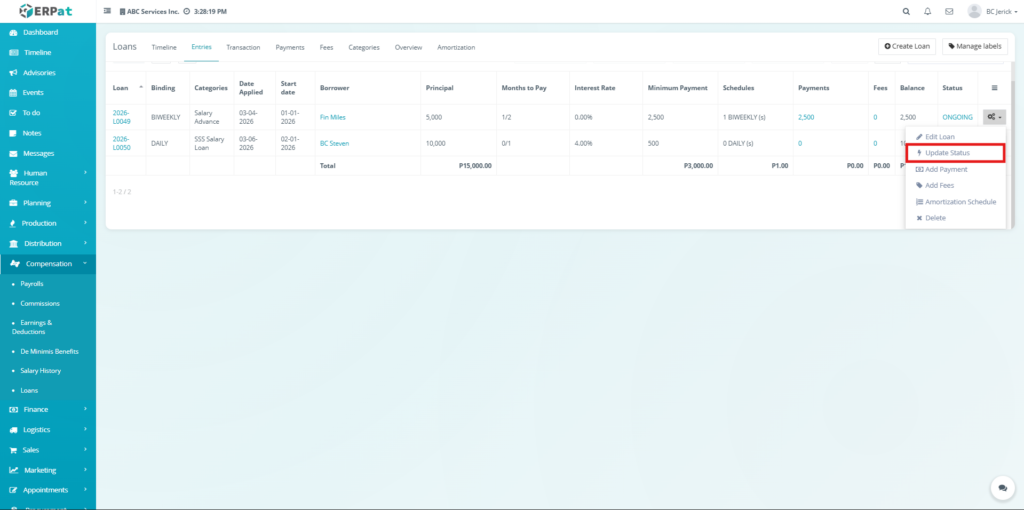
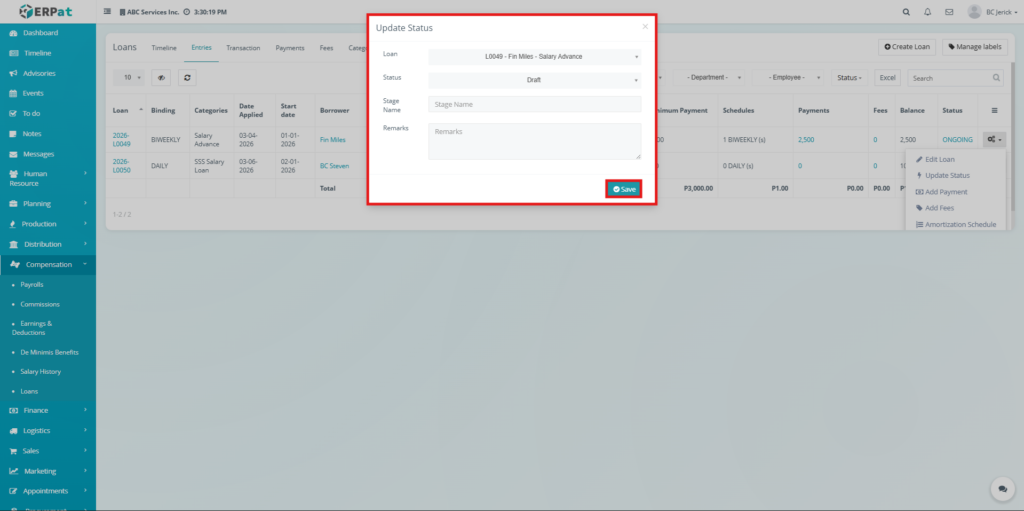
Steps for Updating a Status #
Steps #
- Click the Action dropdown.
- Select Update Status.
- Select new status.
- Enter stage name if required.
- Add remarks if necessary.
- Click Save.
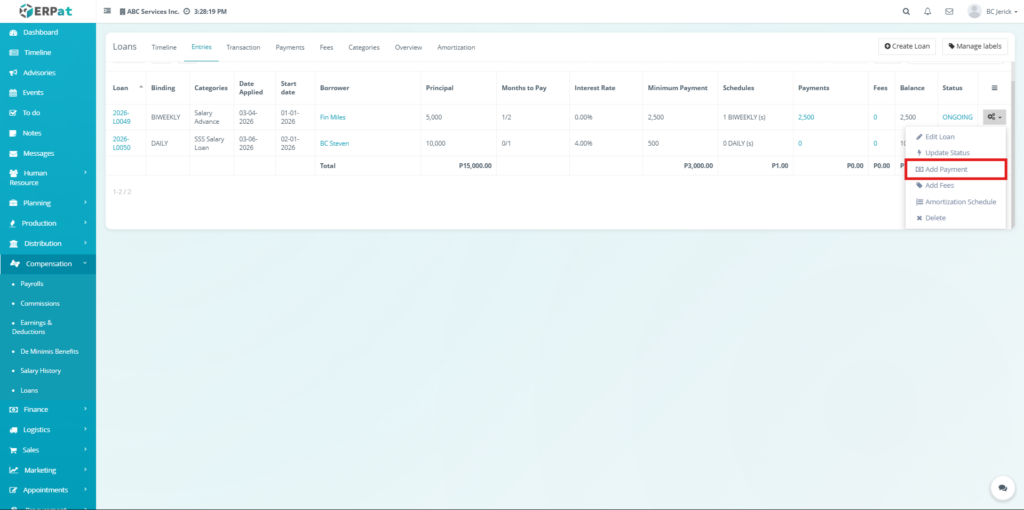
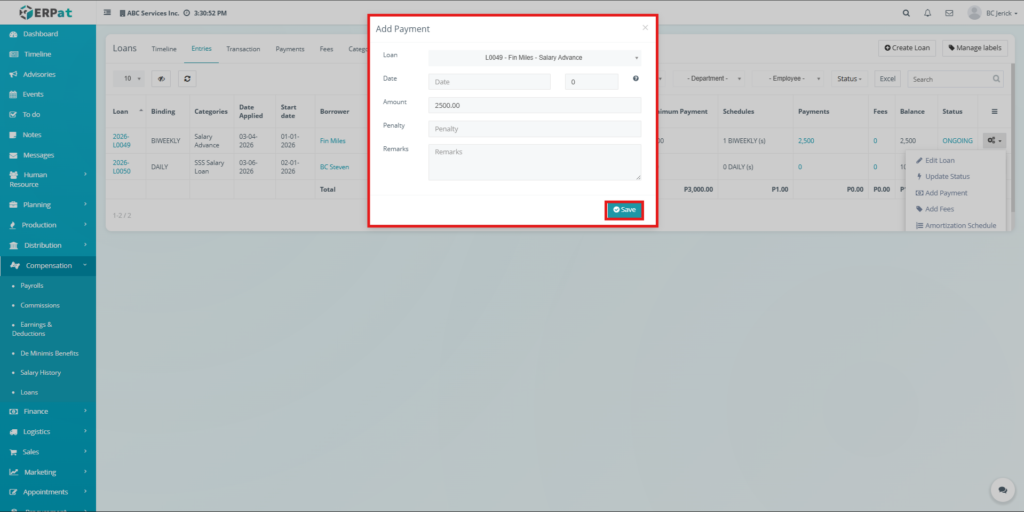
Steps for Adding Payment #
Steps #
- Click the Action dropdown.
- Select Add Payment.
- Enter payment date.
- Enter amount.
- Add penalty if applicable.
- Add remarks if needed.
- Click Save.
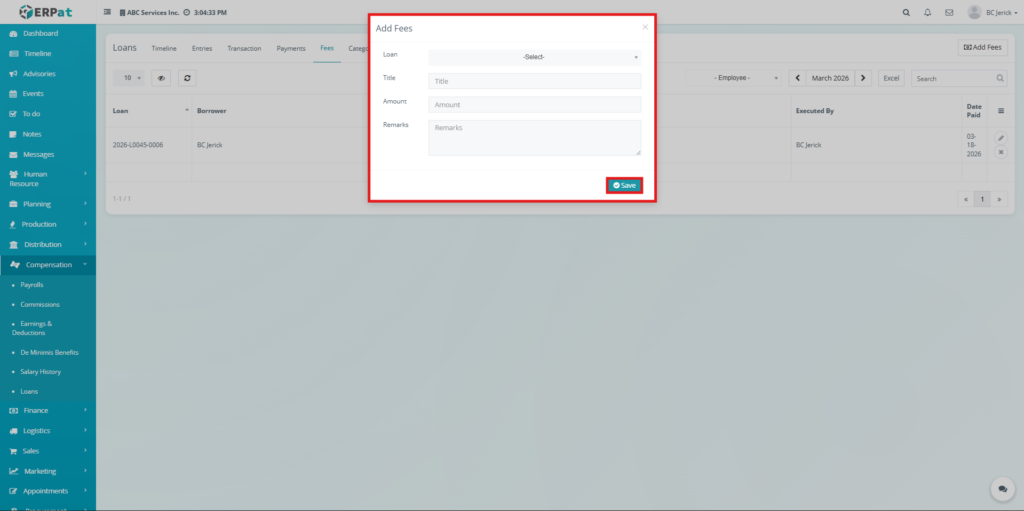
Steps for Adding Fees #
Steps #
- Click the Action dropdown.
- Select Add Fees.
- Enter fee title and amount.
- Add remarks if needed.
- Click Save.


Viewing Amortization Schedule #
Steps #
- Click the Action dropdown.
- Select Amortization Schedule.
- The system will redirect to the amortization schedule of the selected loan.
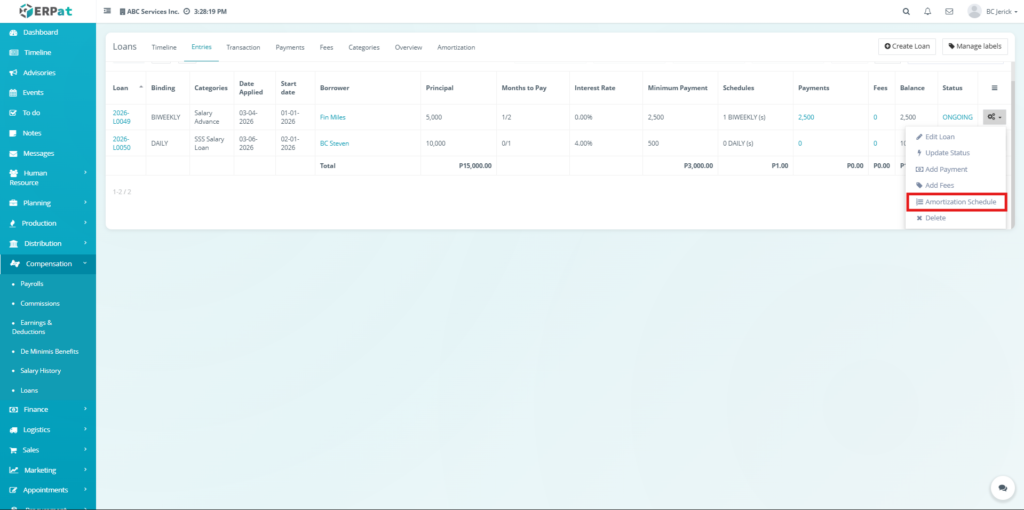
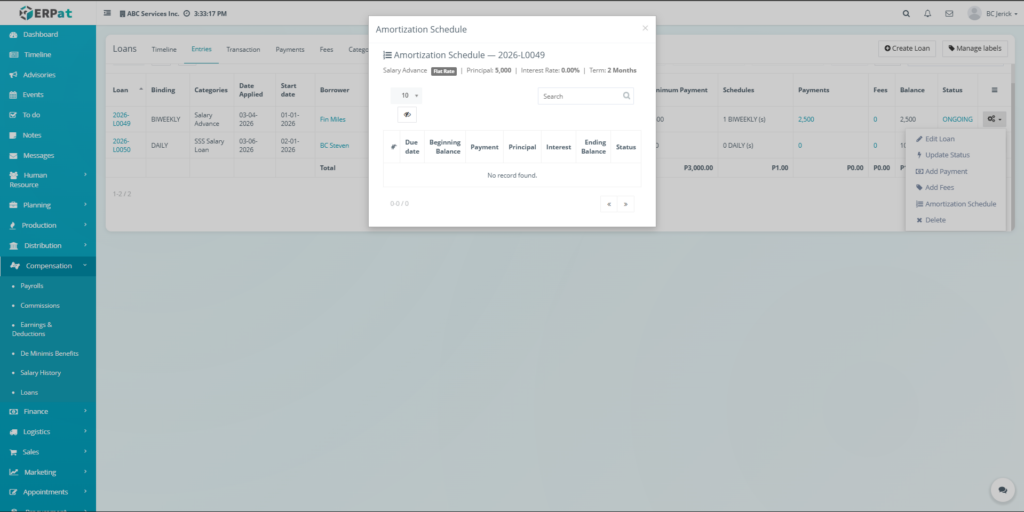
Notes #
The Amortization Schedule popup provides a quick, single-loan view of repayment details within the Entries workflow, while the Amortization Tab offers a full-page, multi-loan interface with extended metrics and enhanced interaction for detailed monitoring and analysis.
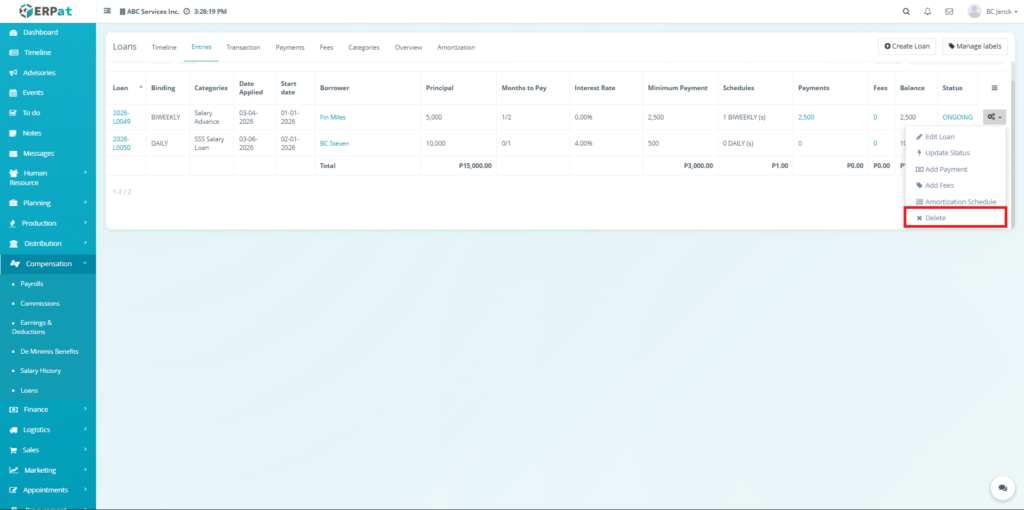
Steps for Deleting a Loan #
Steps #
- Click the Action dropdown.
- Select Delete.
- Confirm deletion.
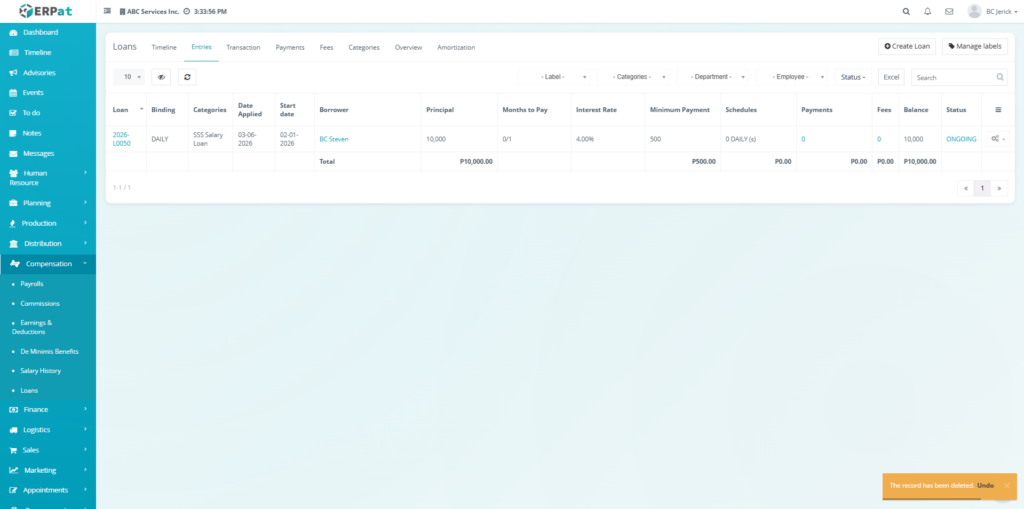
Steps to Undo Deleted Record #
Steps #
- Wait for the undo popup.
- Click Undo.
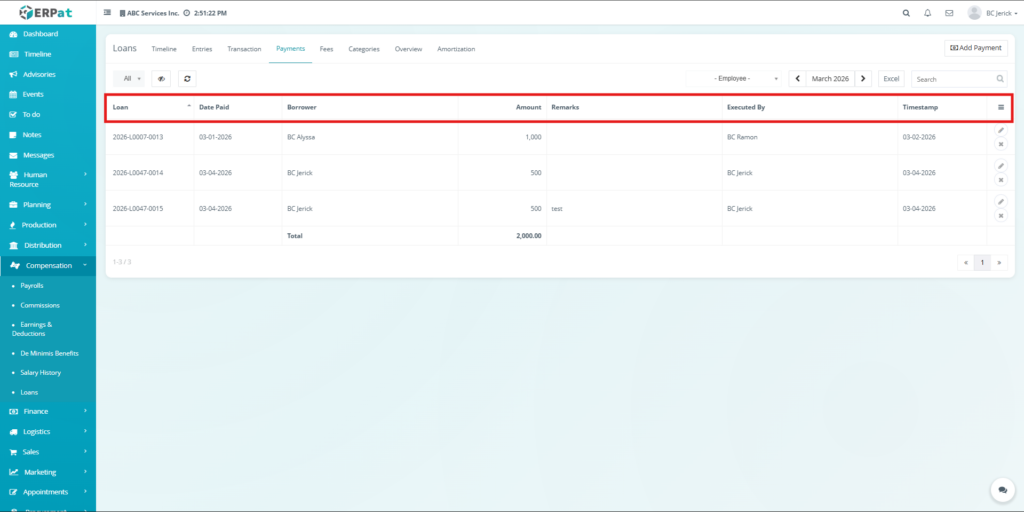
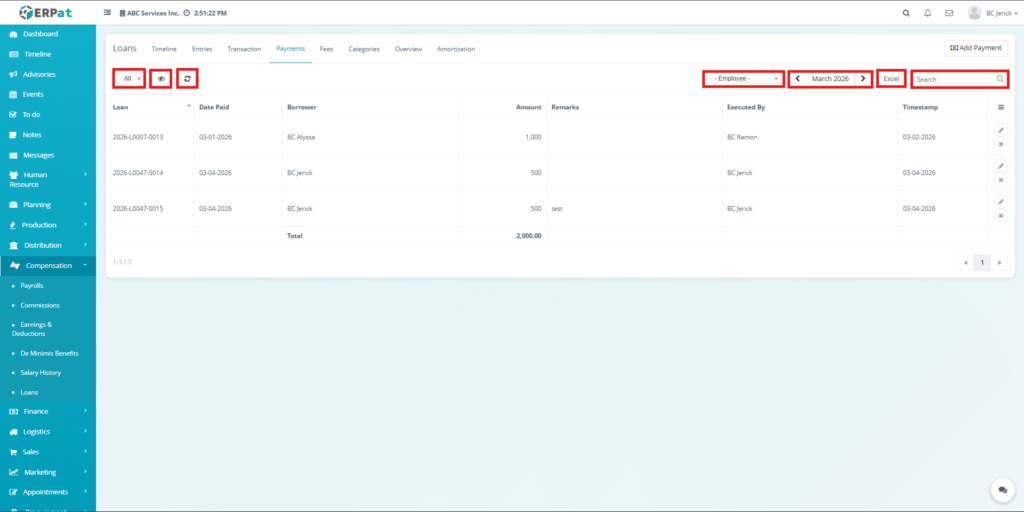
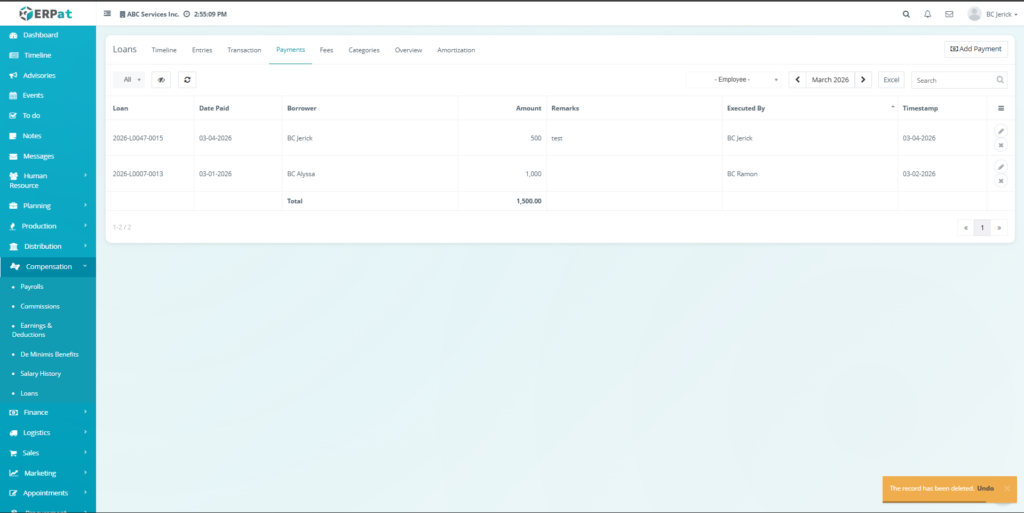
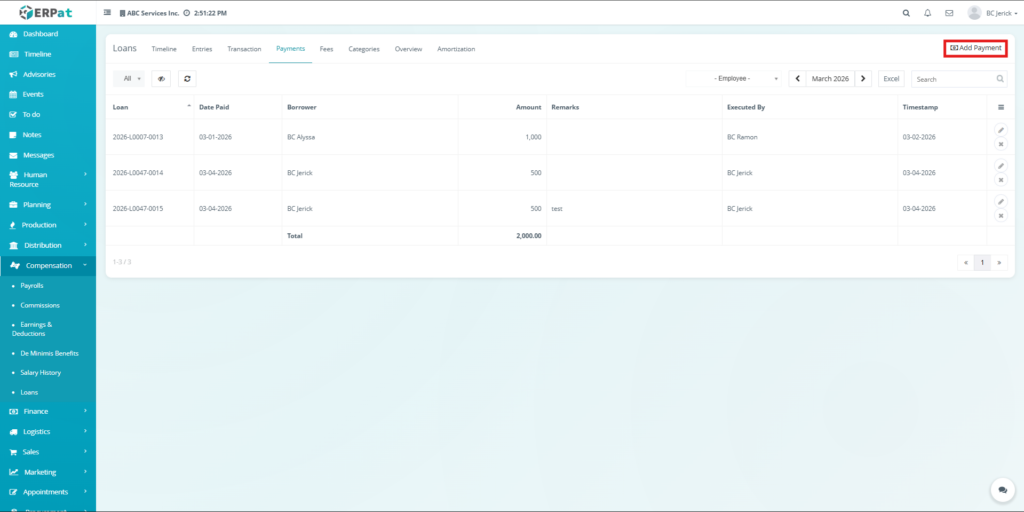
Payments Tab #
The Payments Tab is used to record and track all loan repayments. It ensures accurate updating of loan balances by capturing payment amounts, dates, and penalties, while providing a clear history of all repayment transactions.
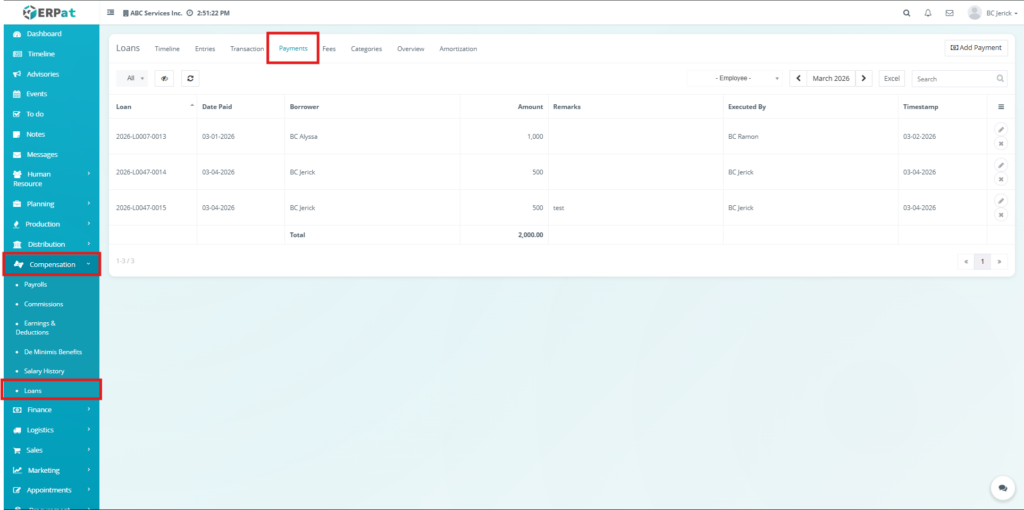
Listing Page #
- Loan – Loan reference ID
- Date Paid – Payment date
- Borrower – Assigned employee
- Amount – Payment amount
- Remarks – Additional notes
- Executed By – User who recorded payment
- Timestamp – Date created
- Action buttons – Dropdown action controls
Additional Controls #
- Status filtering options
- Column visibility toggle
- Reload button to refresh records
- Employee filtering options
- Month filtering options
- Search bar for quick payment lookup
- Excel export for downloading reports
- Pagination controls
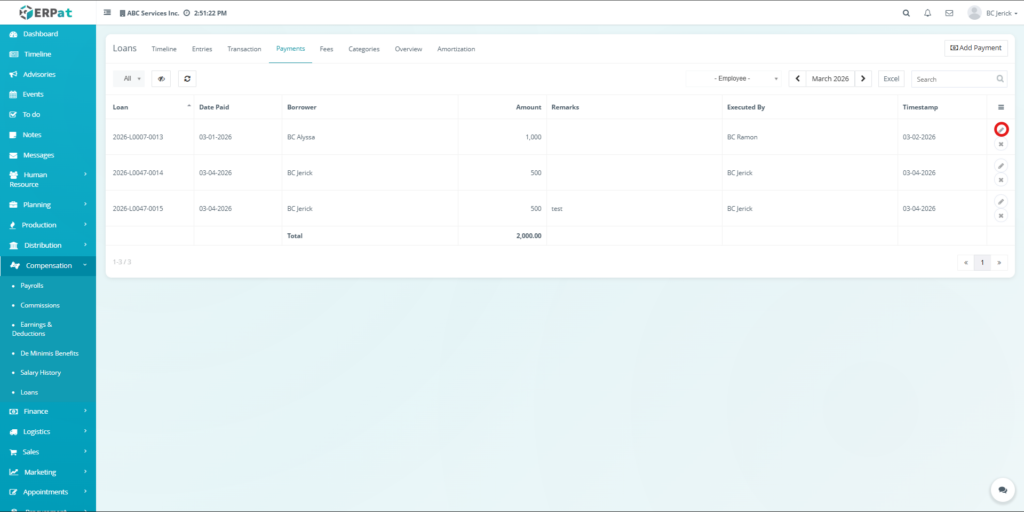
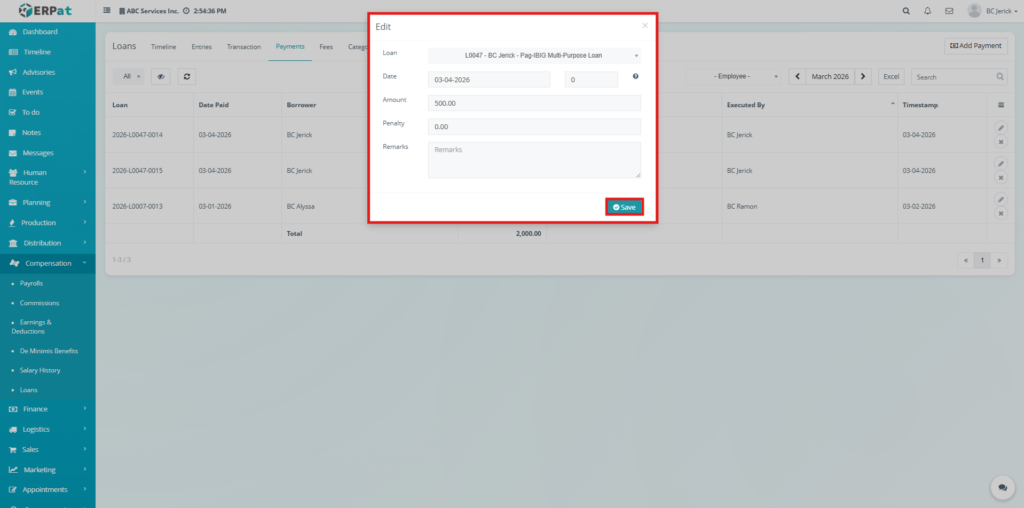
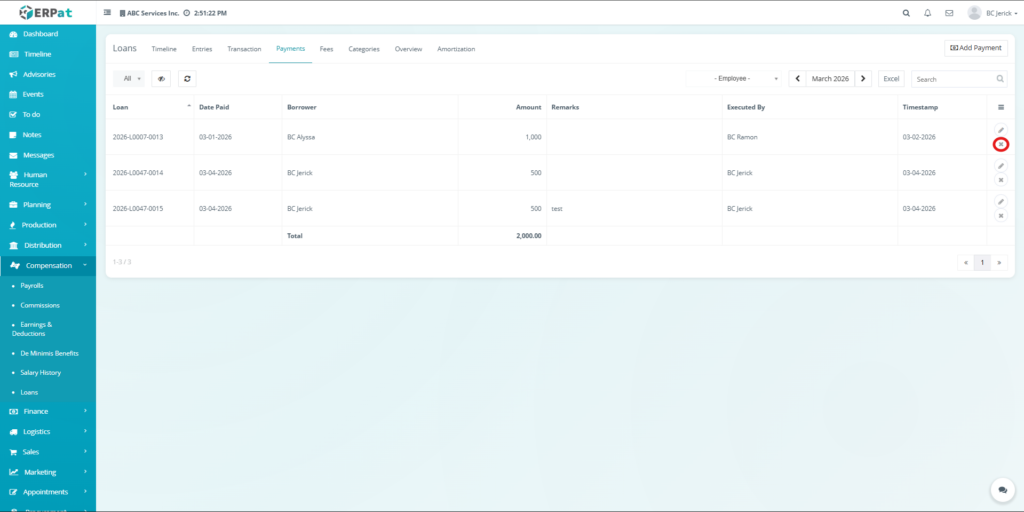
Steps to Edit Payment #
Steps #
- Click the Action dropdown.
- Select Edit Payment.
- Modify payment details.
- Click Save.
Steps to Delete a Payment #
Steps #
- Click the Action dropdown.
- Select Delete.
- Confirm deletion.
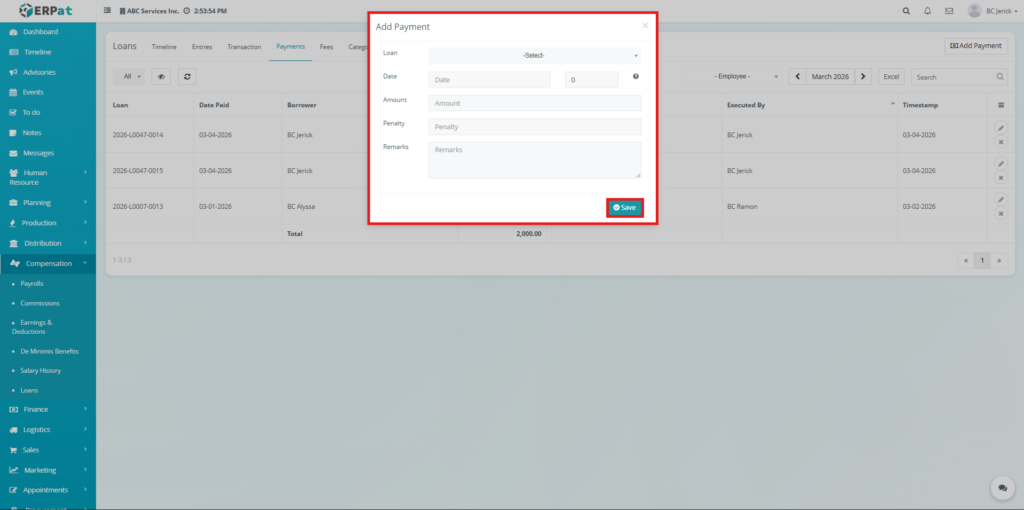
Steps to Add a Payment #
Steps #
- Click Add Payment button.
- Select loan.
- Enter date and amount.
- Add penalty if applicable.
- Add remarks.
- Click Save.
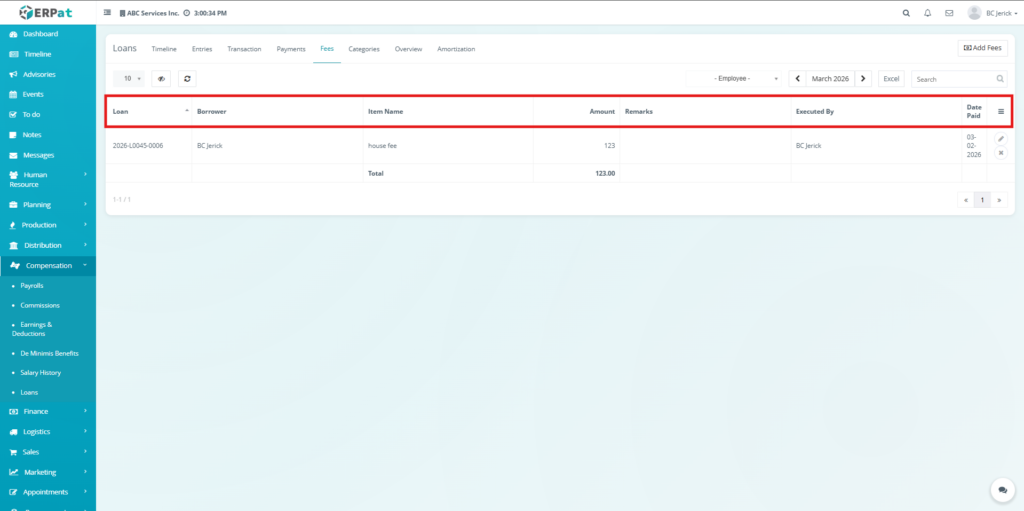
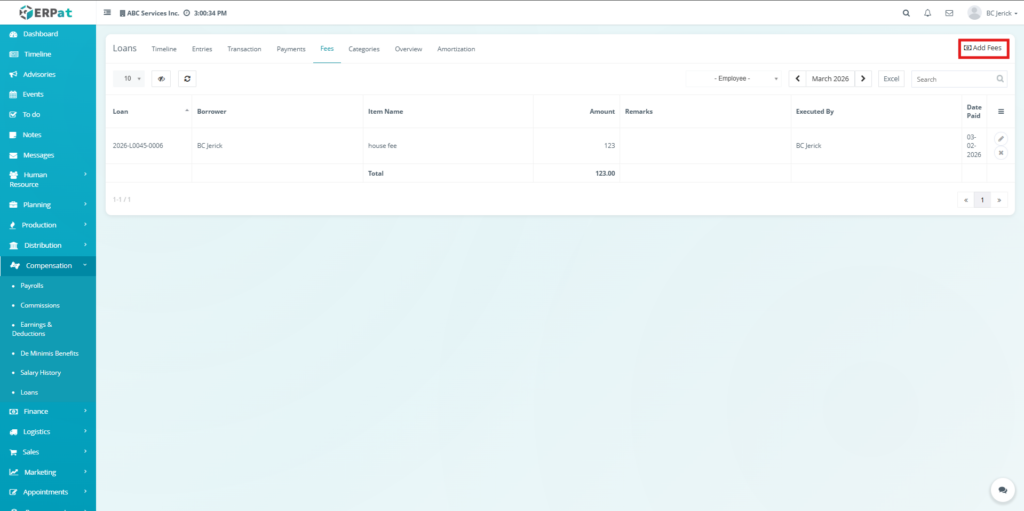
Fees Tab #
The Fees Tab manages additional charges associated with loans, such as penalties or service fees. It allows users to record, update, and monitor fees, ensuring that all extra costs are properly tracked and reflected in loan balances.
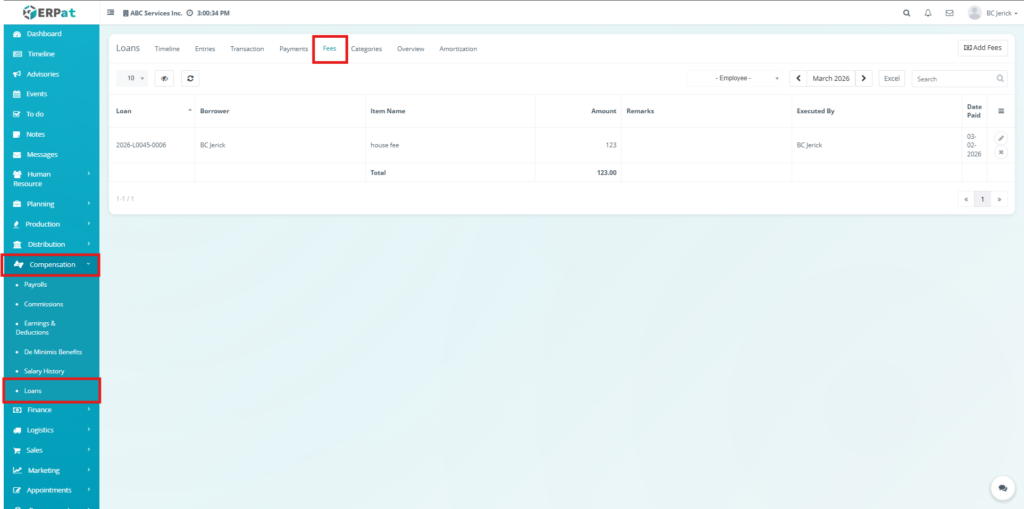
Listing Page #
- Loan – Loan reference
- Borrower – Employee
- Item Name – Fee title
- Amount – Fee amount
- Remarks – Notes
- Executed By – User
- Date Paid – Date recorded
- Action buttons– Dropdown action controls
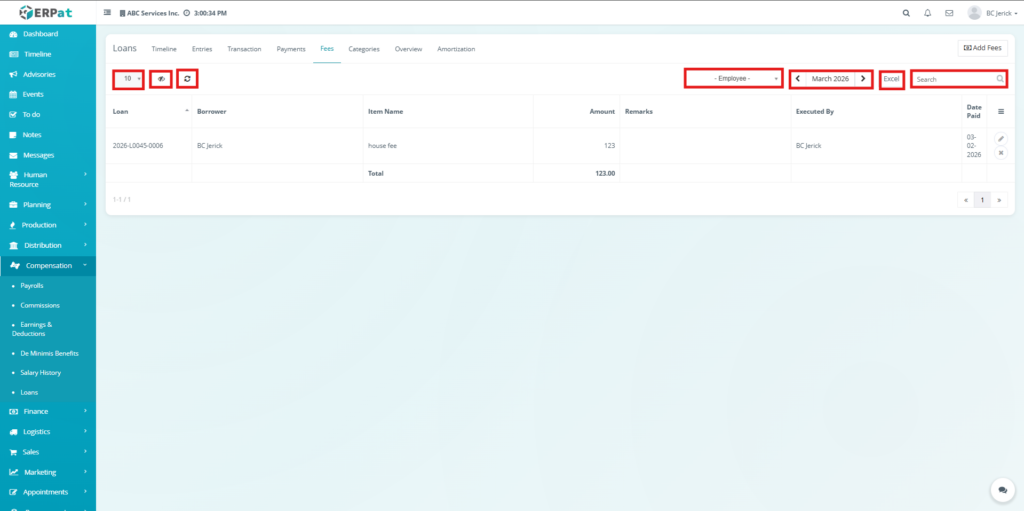
Additional Controls #
- Rows per page selector
- Column visibility toggle
- Reload button
- Employee filtering options
- Month filtering options
- Search bar
- Excel export
- Pagination controls
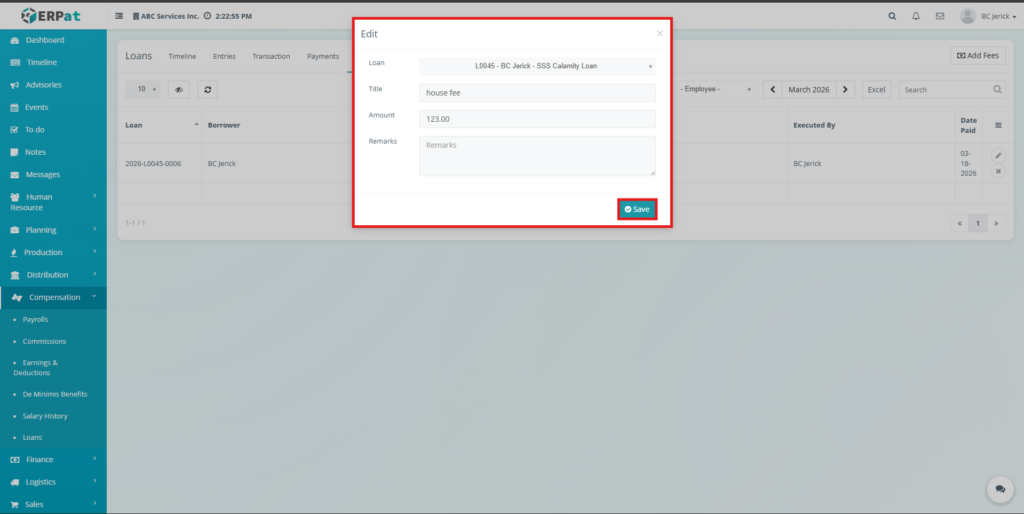
Steps for Editing Fees #
Steps #
- Click the Action dropdown.
- Select Edit Fee.
- Modify fee details.
- Click Save.
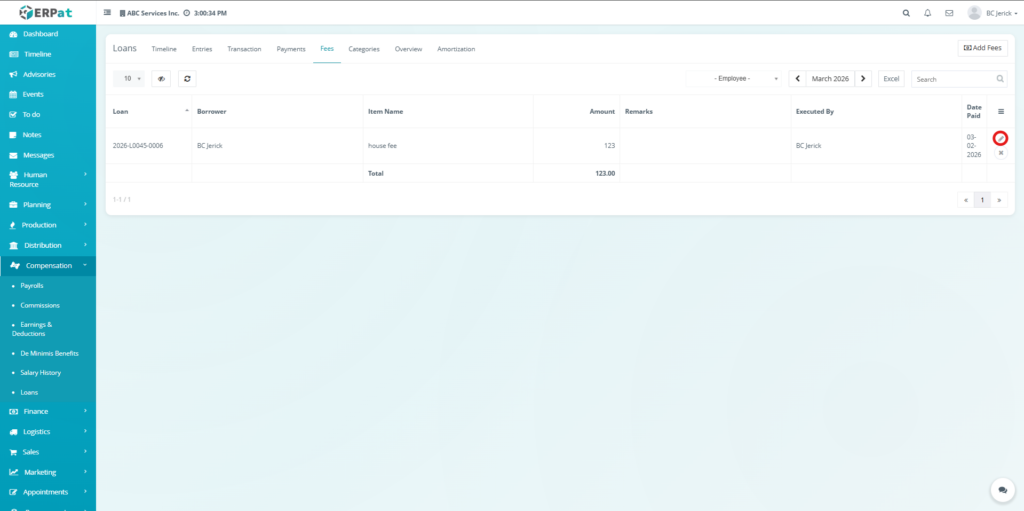
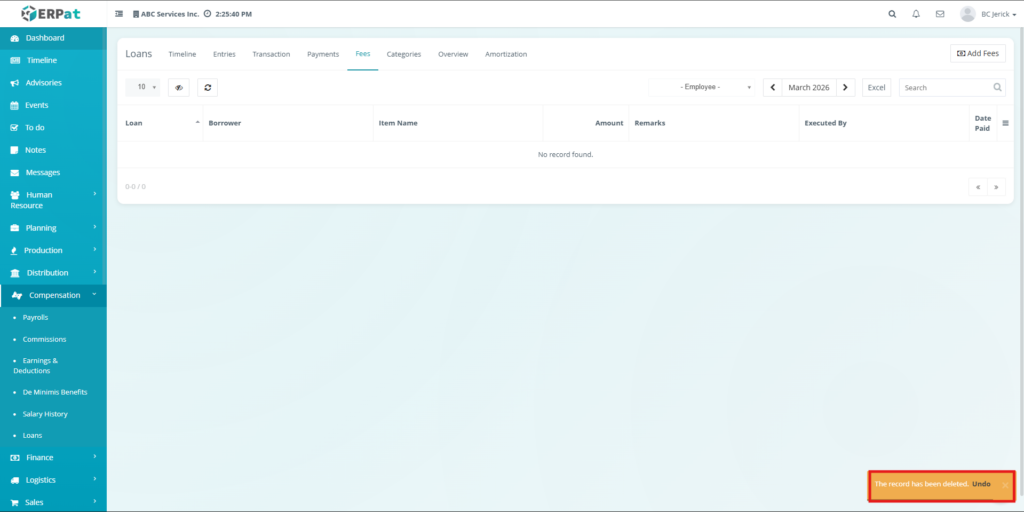
Steps for Deleting a Fee #
Steps #
- Click the Action dropdown.
- Select Delete.
- Confirm deletion.

Steps to Undo a deletion #
Steps #
- Wait for the popup.
- Click Undo.
Steps to Adding Fees #
Steps #
- Click Add Fees button.
- Select loan.
- Enter title and amount.
- Add remarks.
- Click Save.
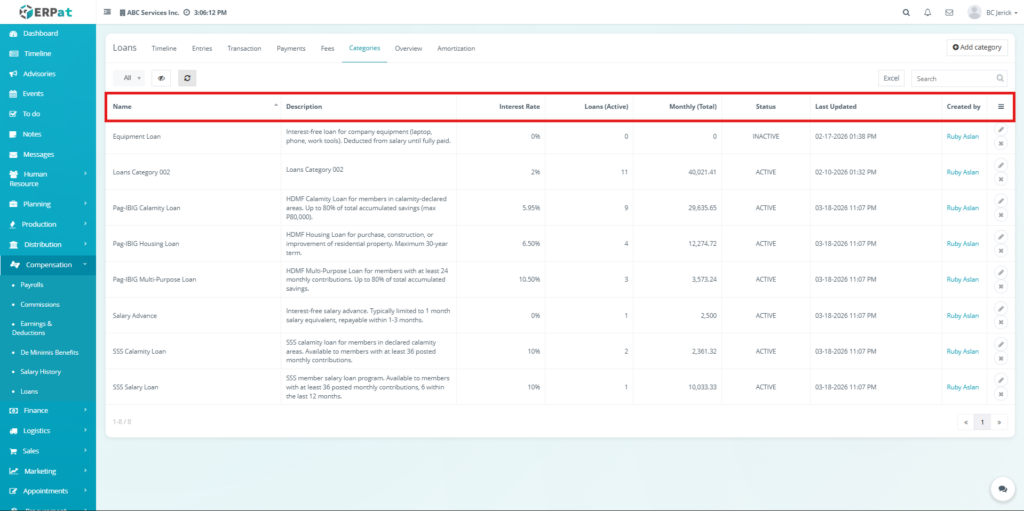
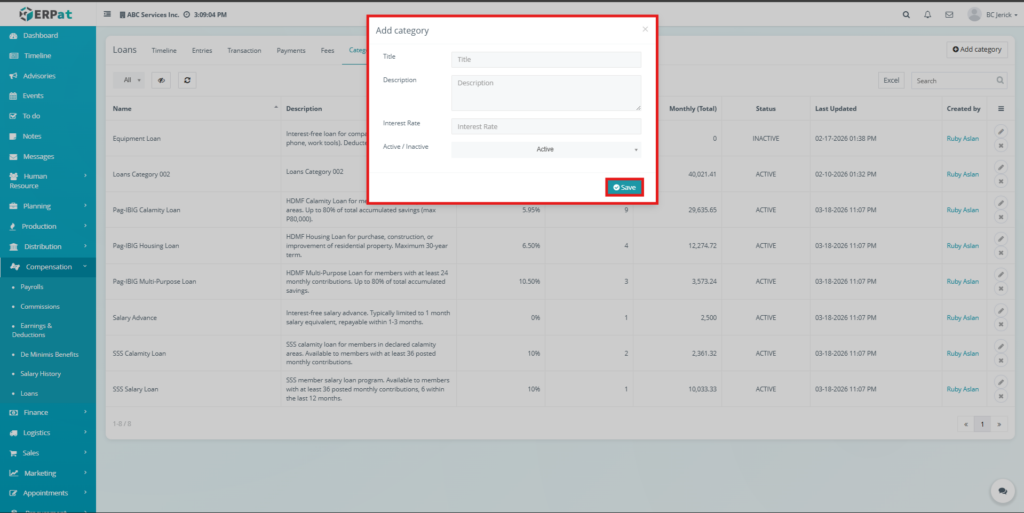
Categories Tab #
The Categories Tab is used to define and manage loan types, including their interest rates and configurations. It helps organize loans into structured classifications, making reporting, filtering, and loan management more efficient.
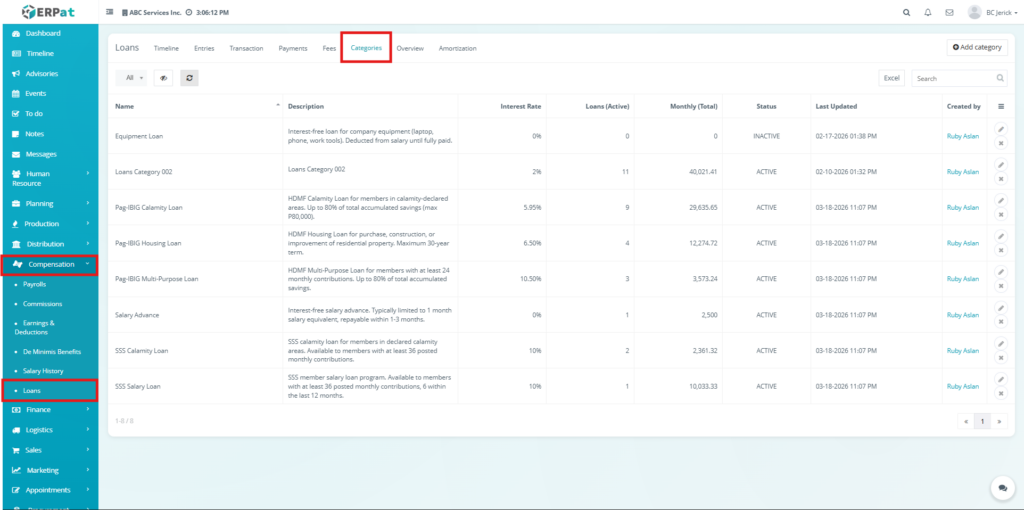
Listing Page #
- Name – Category title
- Description – Category details
- Interest Rate – Assigned interest
- Loans (Active) – Number of active loans
- Monthly (Total) – Total monthly value
- Status – Active or inactive
- Last Updated – Date modified
- Created By – User
- Action buttons – Dropdown action controls
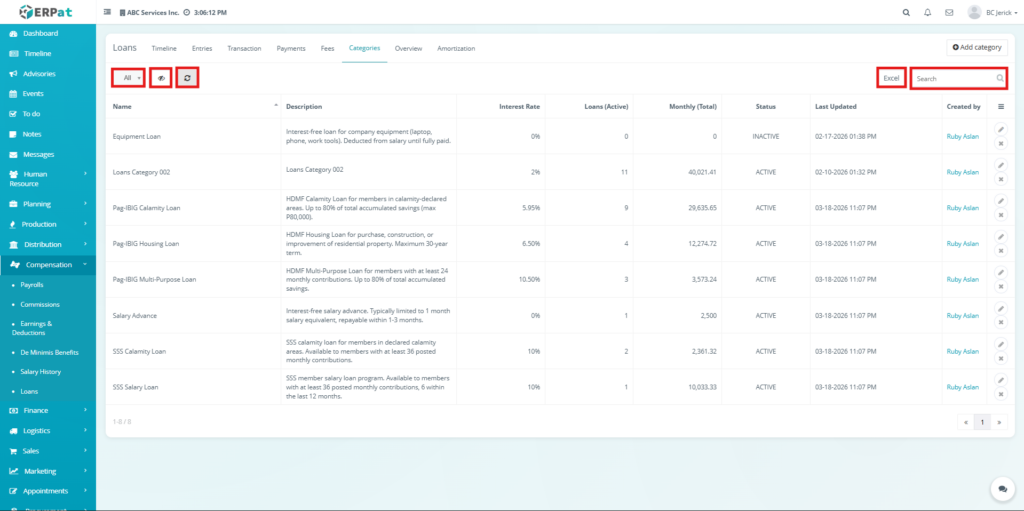
Additional Controls #
- Status filtering options
- Column visibility toggle
- Reload button
- Search bar
- Excel export
- Pagination controls
Steps for Editing Category #
Steps #
- Click the Action dropdown.
- Select Edit Category.
- Modify details.
- Click Save.

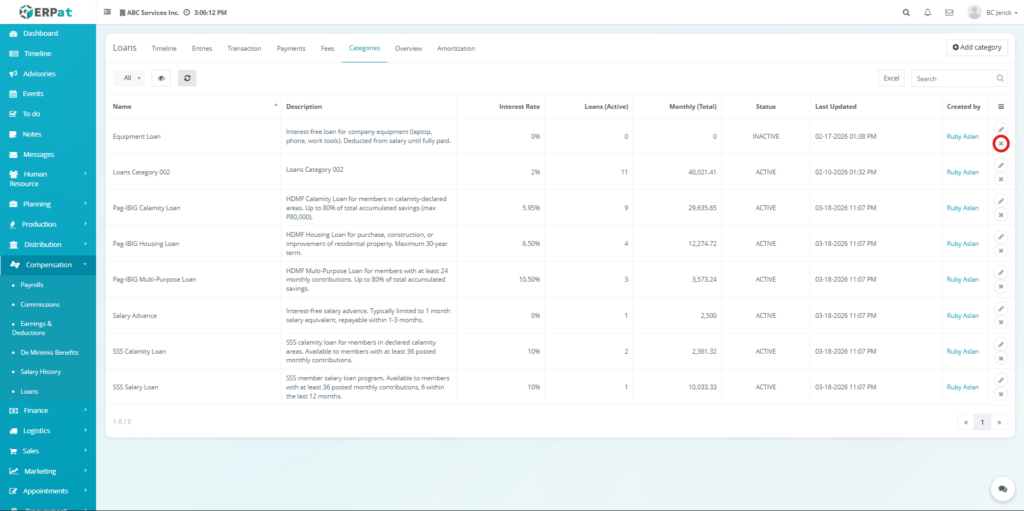
Steps for Deleting a Category #
Steps #
- Click the Action dropdown.
- Select Delete.
- Confirm deletion.
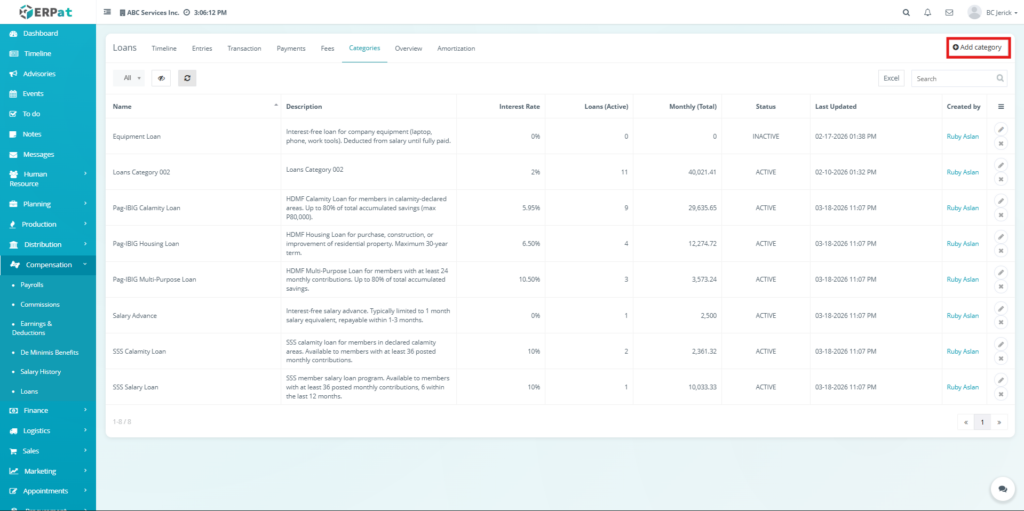
Steps to Adding Category #
Steps #
- Click Add Category button.
- Enter name, description, and interest rate.
- Select status.
- Click Save.
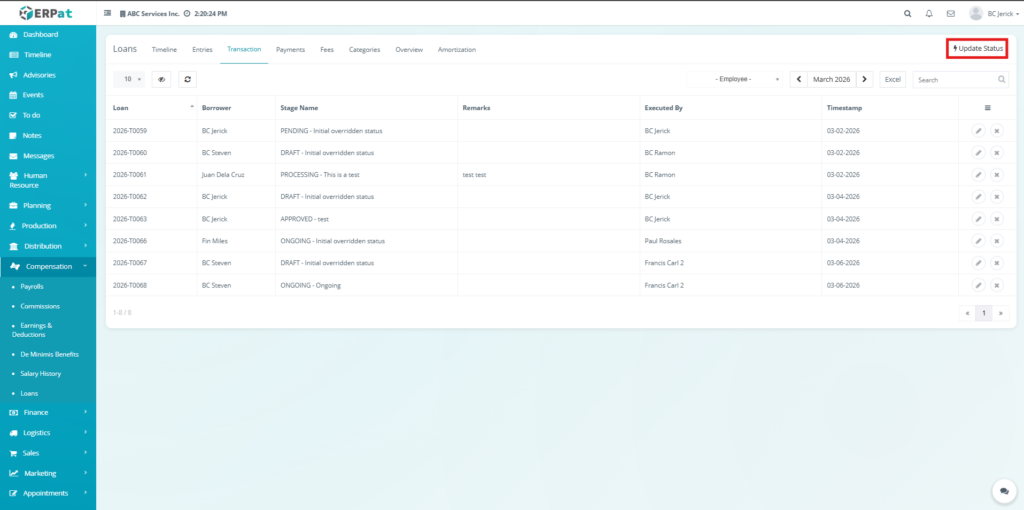
Transaction Tab #
The Fees Tab manages additional charges associated with loans, such as penalties or service fees. It allows users to record, update, and monitor fees, ensuring that all extra costs are properly tracked and reflected in loan balances.
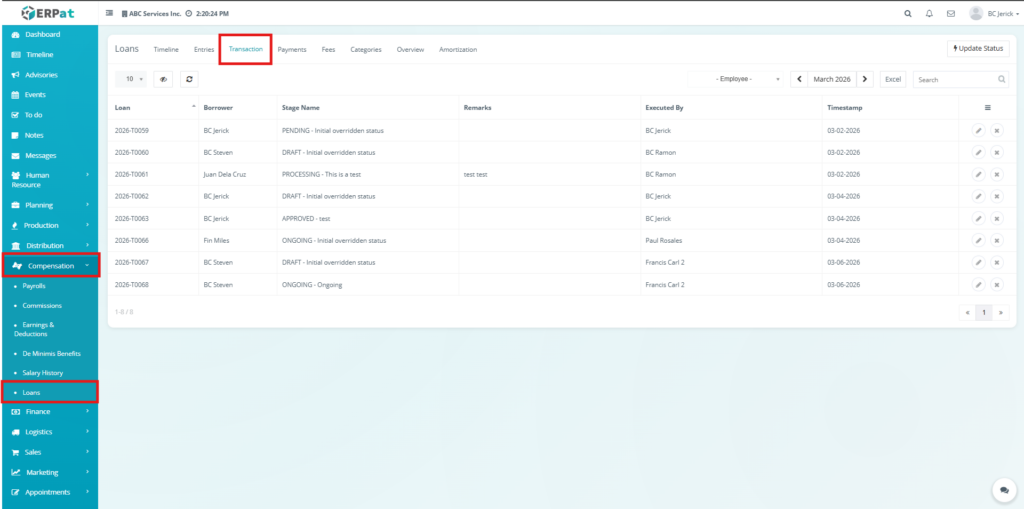
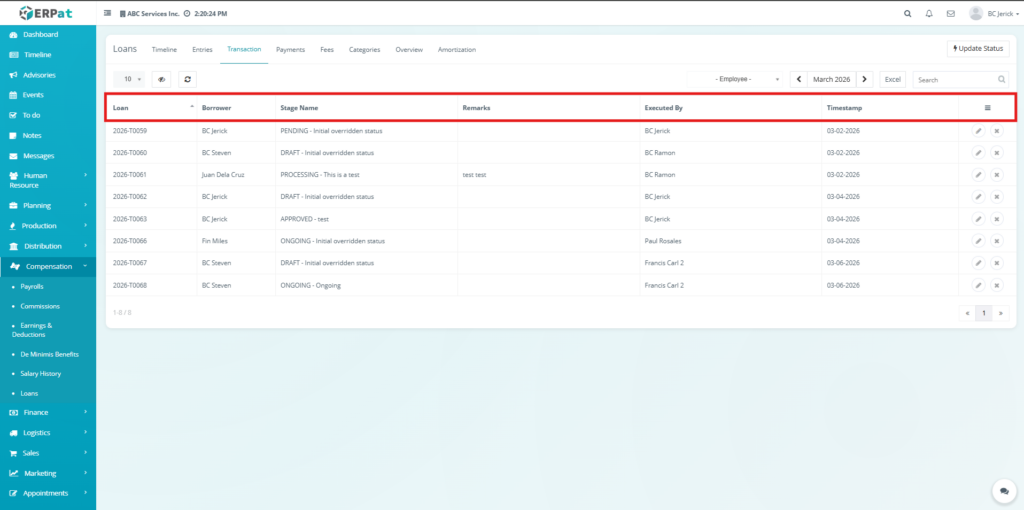
Listing Page #
- Loan
- Borrower
- Stage Name
- Remarks
- Executed By
- Timestamp
- Action buttons
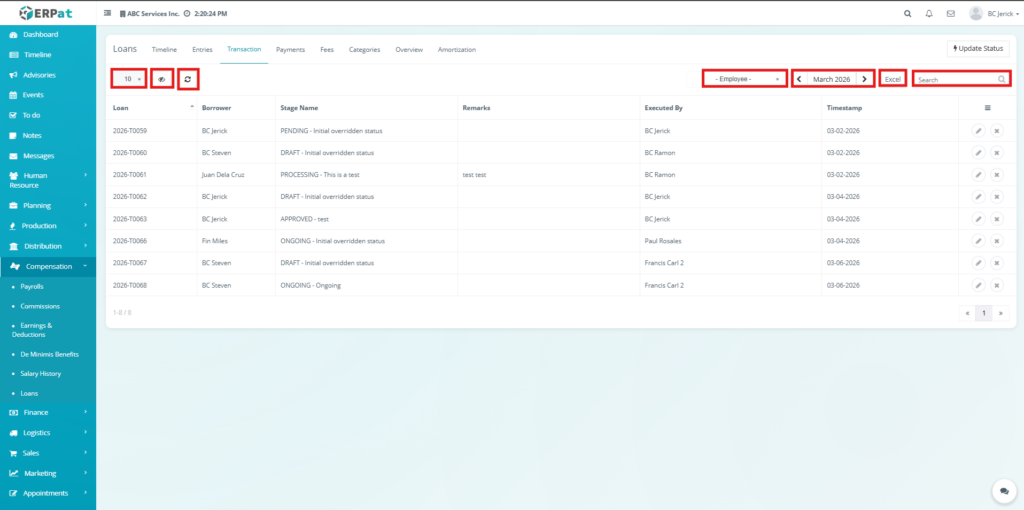
Additional Controls #
- Employee filtering
- Month filtering
- Search
- Pagination
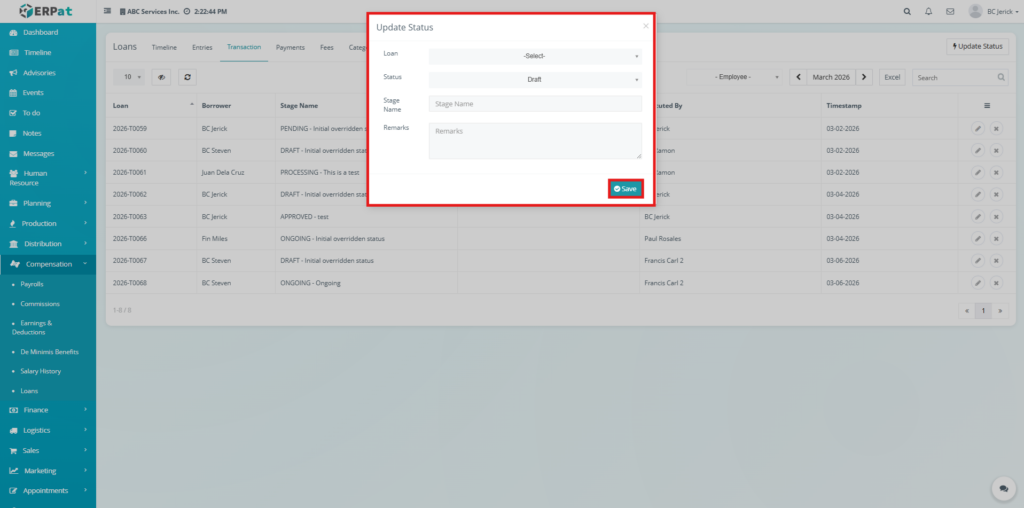
Steps for Updating a Status #
Steps #
- Click the Update Status button.
- The Update Status popup window will appear.
- Select the Loan from the dropdown list.
- Select the Status.
- Enter Stage Name.
- Add Remarks if necessary.
- Click Save.
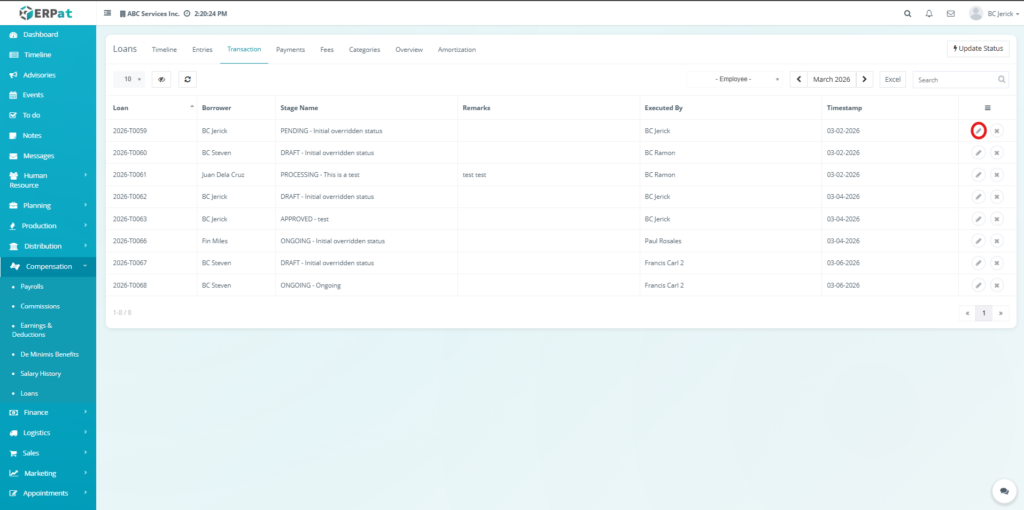
Steps for Editing Transaction #
Steps #
- Click the Action dropdown.
- Select Edit.
- Modify the transaction details.
- Click Save.
Steps for Deleting a Transaction #
Steps #
- Click the Action dropdown.
- Select Delete.
- Confirm the deletion.

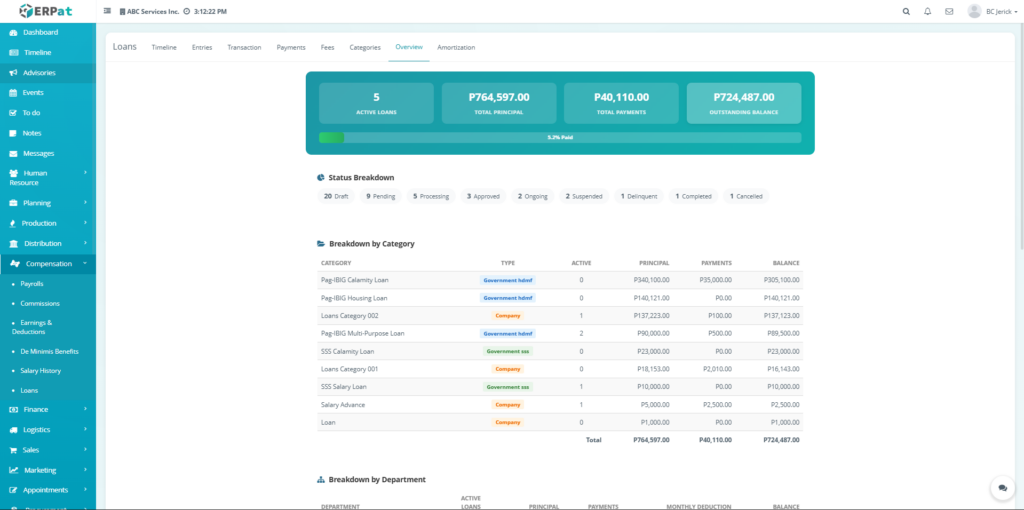
Overview Tab #
The Overview Tab provides a dashboard-style summary of all loan data, including totals, balances, and breakdowns by status, category, and employee. It helps users quickly assess loan performance and overall financial impact.
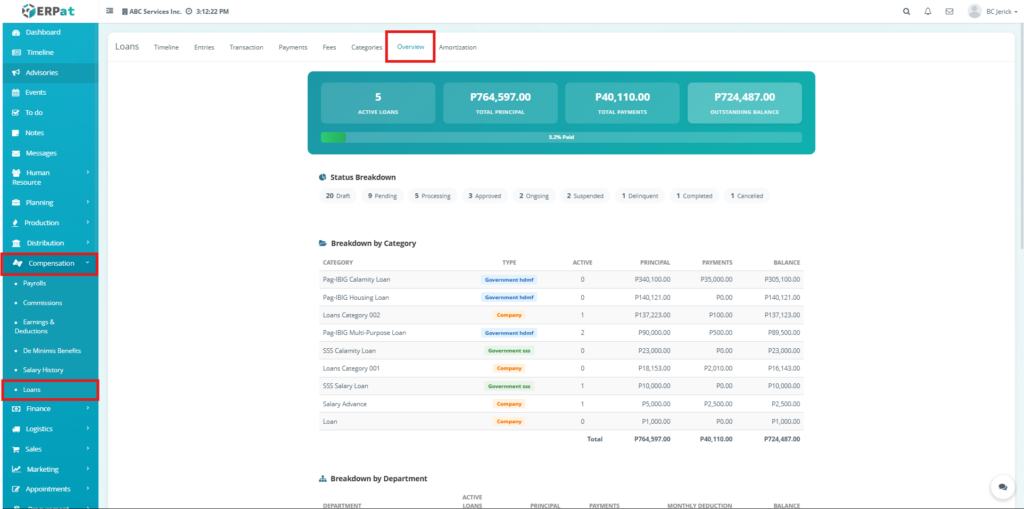
Listing Page #
- Active Loans
- Total Principal
- Total Payments
- Outstanding Balance
- Status Breakdown
- Category Breakdown
- Establishment Breakdown
- Employee Summary

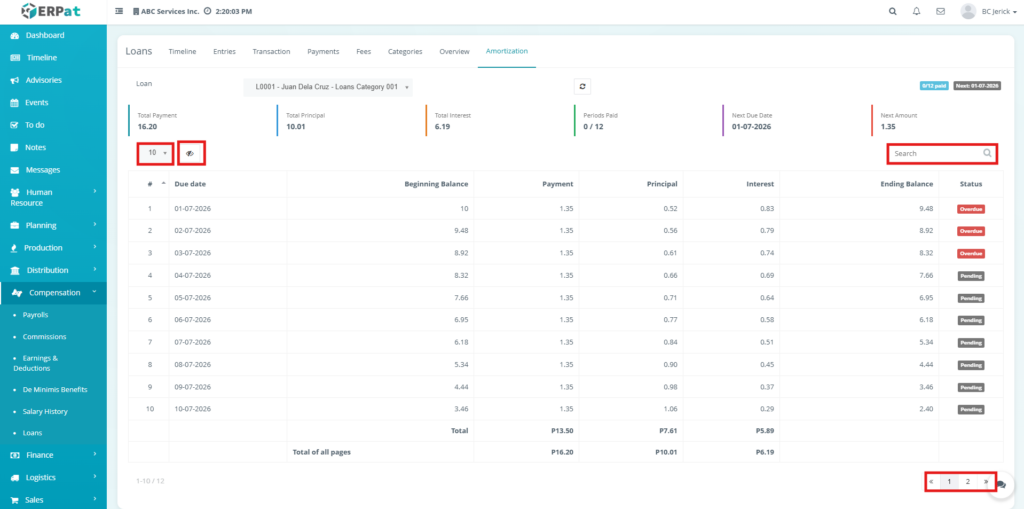
Amortization Tab #
The Amortization Tab displays the complete repayment schedule of a loan, showing how each payment is divided between principal and interest over time. It helps users track payment progress, monitor due dates, and view the remaining loan balance. This tab ensures transparency and accuracy in loan repayment by providing a clear breakdown of all scheduled payments.
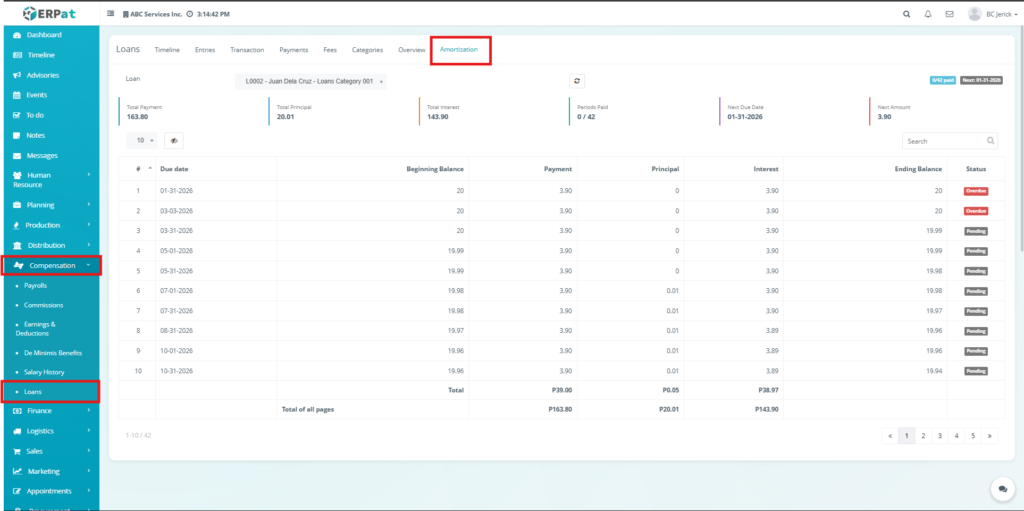
Listing Page #
- Due Date
- Beginning Balance
- Payment
- Principal
- Interest
- Ending Balance
- Status
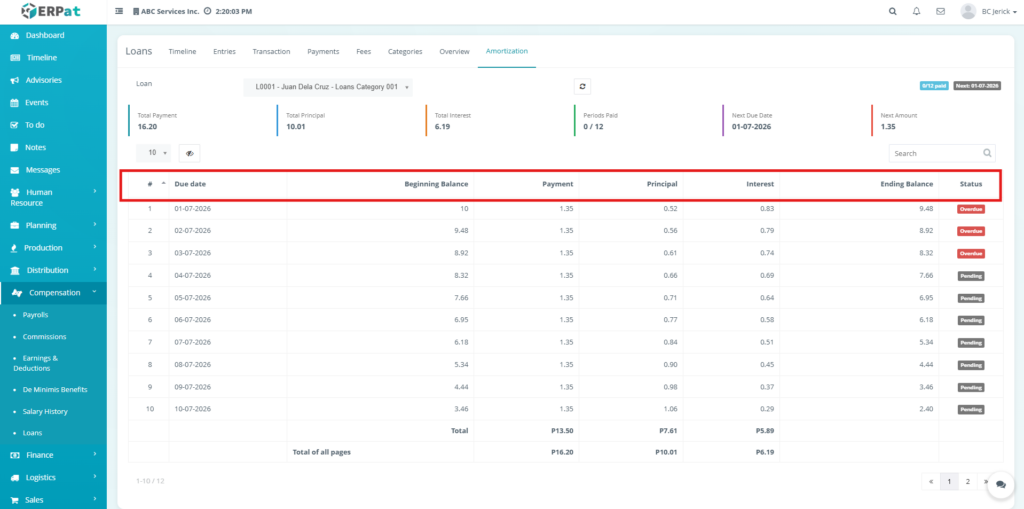
Additional Controls #
- Loan dropdown
- Search bar
- Pagination
Search and Filtering #
Users can search and filter records using dropdown filters, search bars, and date filters available across all tabs.
Permissions and Access Control #
- Access depends on assigned roles.
- Users can view records
- Authorized users can create and edit
- Only permitted users can delete
- Administrators have full control
Audit & Logs #
- All actions are recorded including:
- Loan creation and updates
- Payments and fees
- Status changes
- User activities
Last Updated: [March 19, 2026] Module Owner: Loan Module – ERPat System


