Overview #
The Settings – Setup page is used to configure setup-related options and supporting records needed by different modules in the system. This page allows administrators to manage initial data, run checking and fixing tools, create custom fields, configure the left menu, manage system accounts, define payment methods, and set shipping options. It serves as a central configuration area where administrators prepare and maintain important records and system options that affect how other modules function.
This page is important because many of the settings found here are connected to actual module operations. For example, some initial data options redirect the user to other modules for data management, custom fields affect what additional inputs are shown in forms, the check and fix page helps verify and correct attendance-related records, and payment or shipping setup affects transactions and operational workflows. By using this page, the administrator can organize and maintain the system properly before or during actual use.
Setup – Initial Data – Salary Grades #
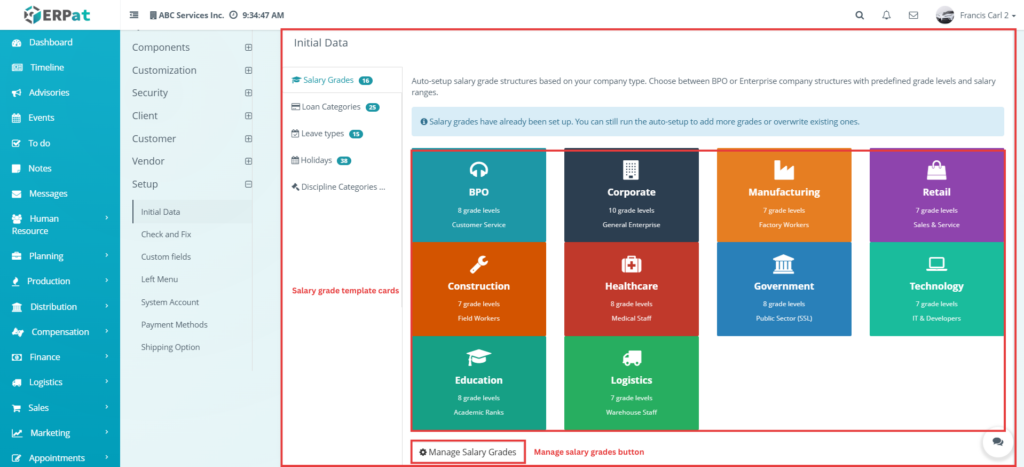
This page is used to manage the available salary grade templates in the system. When the user opens Settings > Setup > Initial Data > Salary Grades, the system displays several preset salary grade groups that can be used depending on the company type. This page is used when the administrator wants to review or set up salary grade structures for different types of organizations.
The page also includes a Manage Salary Grades button. When the user clicks this button, the system redirects them to Compensation > Salary History, where salary-related records can be managed in more detail. This means the page serves as a setup entry point for salary grade templates, while the full management of salary grade records is handled in the Compensation module.
Setup – Initial Data – Salary Grades – BPO #
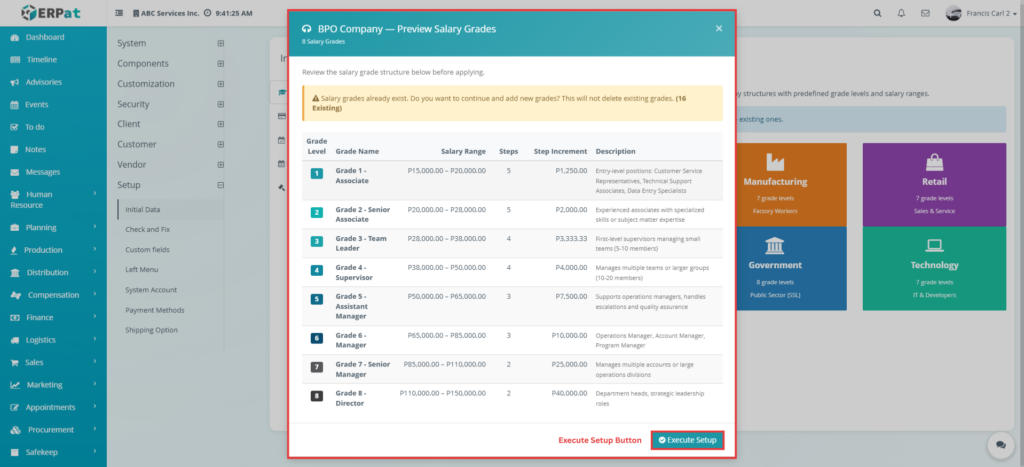
This page displays the preset salary grade template for a BPO company. When the user clicks the BPO salary grade option, the system shows a popup or list containing sample positions, salary grades, base pay, and related setup values for this company type. This page is used when the administrator wants to review the default BPO-based salary grade structure before applying it in the system.
When the user clicks the Execute button, the selected salary grade template is added into the system and will be reflected and displayed in Compensation > Salary History > Salary Grades tab. This allows the administrator to use the preset BPO salary grade records directly in the salary history module without manually entering them one by one.
Setup – Initial Data – Salary Grades – Corporate #
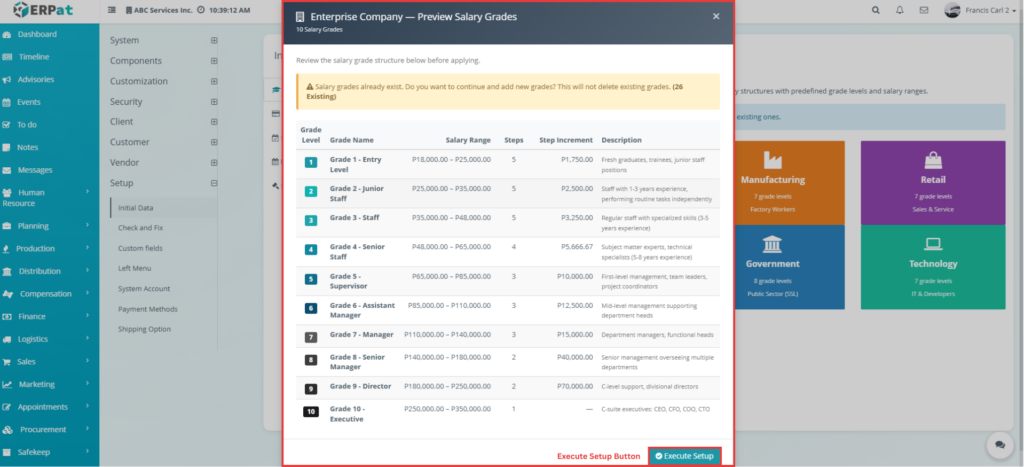
This page displays the preset salary grade template for a Corporate company. It shows the default salary grade structure intended for corporate-type organizations. This page is used when the administrator wants to review or set up salary grades appropriate for office-based or enterprise operations.
When the user clicks the Execute button, the selected salary grade template is added into the system and will be reflected and displayed in Compensation > Salary History > Salary Grades tab. This allows the administrator to quickly apply the preset corporate salary grade records for actual use in the salary history module.
Setup – Initial Data – Salary Grades – Manufacturing #
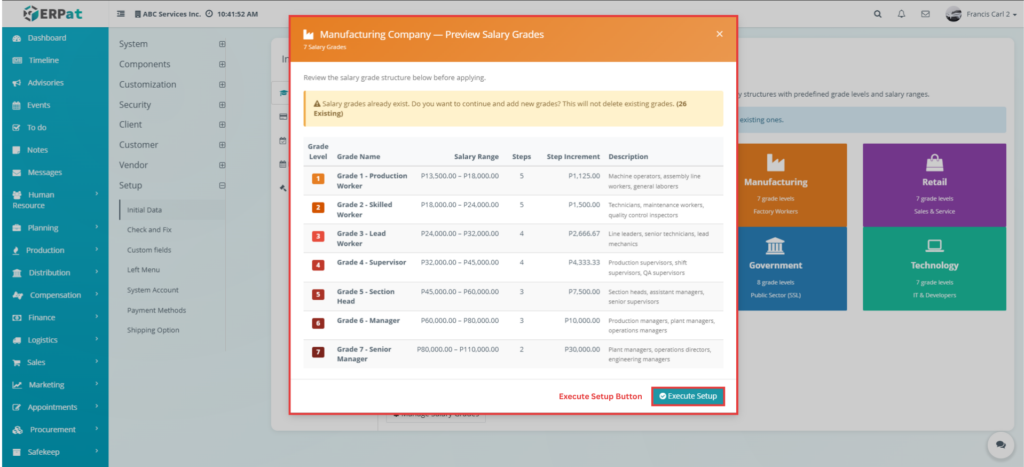
This page displays the preset salary grade template for a Manufacturing company. It provides the salary grade records and sample role structure that can be used for manufacturing-related operations. This page is used when the administrator wants to review or apply a salary grade structure suited for manufacturing roles.
When the user clicks the Execute button, the selected salary grade template is added into the system and will be reflected and displayed in Compensation > Salary History > Salary Grades tab. This allows the administrator to apply the manufacturing salary grade template directly to the salary history records.
Setup – Initial Data – Salary Grades – Retail #
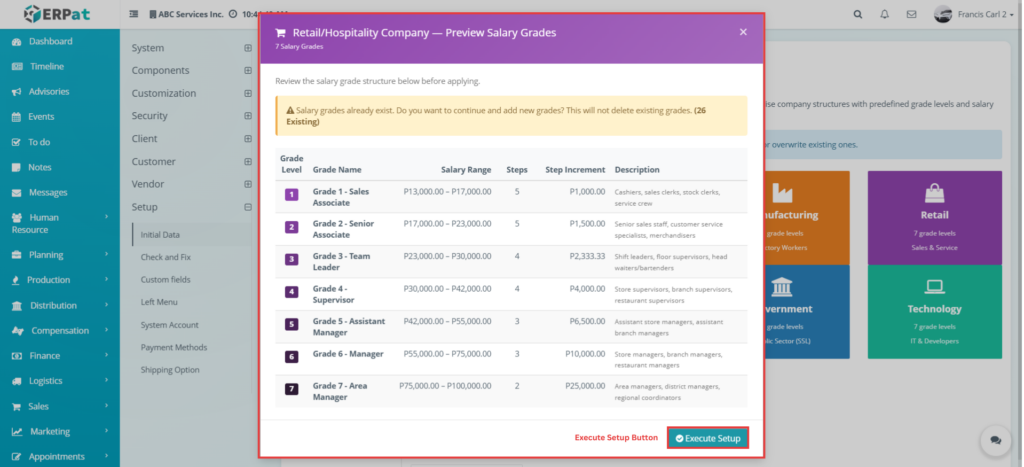
This page displays the preset salary grade template for a Retail company. It contains sample salary grades and salary-related values used for retail operations. This page is used when the administrator wants to review or apply salary setup based on retail job structures.
When the user clicks the Execute button, the selected salary grade template is added into the system and will be reflected and displayed in Compensation > Salary History > Salary Grades tab. This helps the administrator quickly insert the retail salary grade setup into the system.
Setup – Initial Data – Salary Grades – Construction #
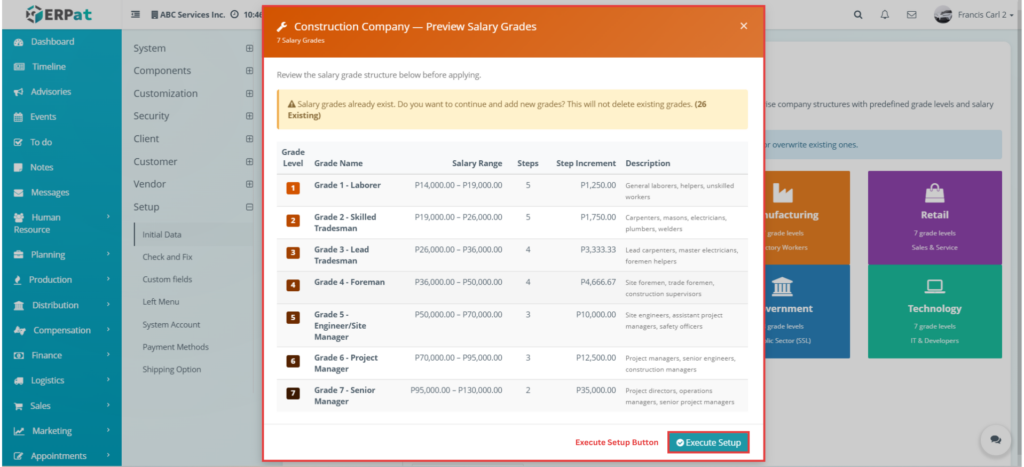
This page displays the preset salary grade template for a Construction company. It shows the set of salary grades intended for construction-related roles and provides a ready-to-review setup for this industry type. This page is used when the administrator wants to review or apply a construction-based salary grade structure.
When the user clicks the Execute button, the selected salary grade template is added into the system and will be reflected and displayed in Compensation > Salary History > Salary Grades tab. This allows the administrator to use the preset construction salary grade records in the salary history module.
Setup – Initial Data – Salary Grades – Healthcare #
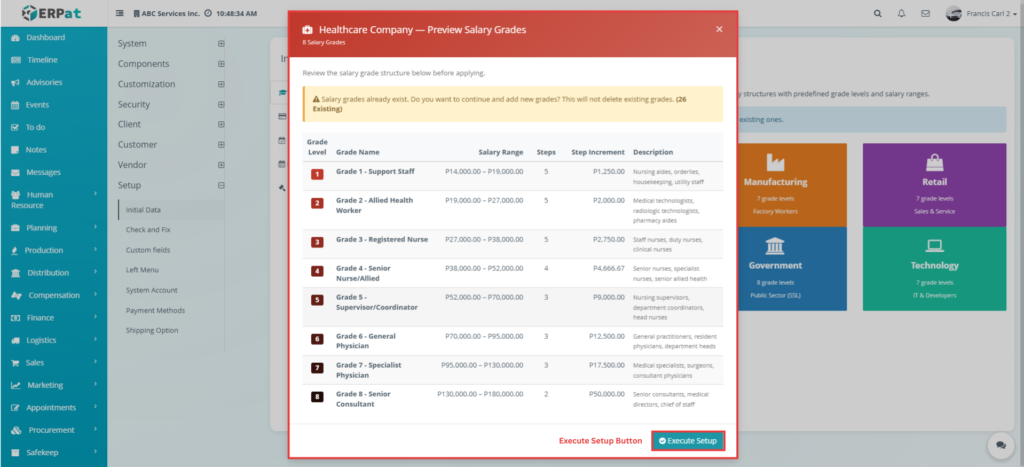
This page displays the preset salary grade template for a Healthcare company. It contains salary grade records suitable for healthcare-related roles. This page is used when the administrator wants to review or set up default salary grades for healthcare operations.
When the user clicks the Execute button, the selected salary grade template is added into the system and will be reflected and displayed in Compensation > Salary History > Salary Grades tab. This allows the administrator to insert healthcare salary grade records directly into the system.
Setup – Initial Data – Salary Grades – Government #
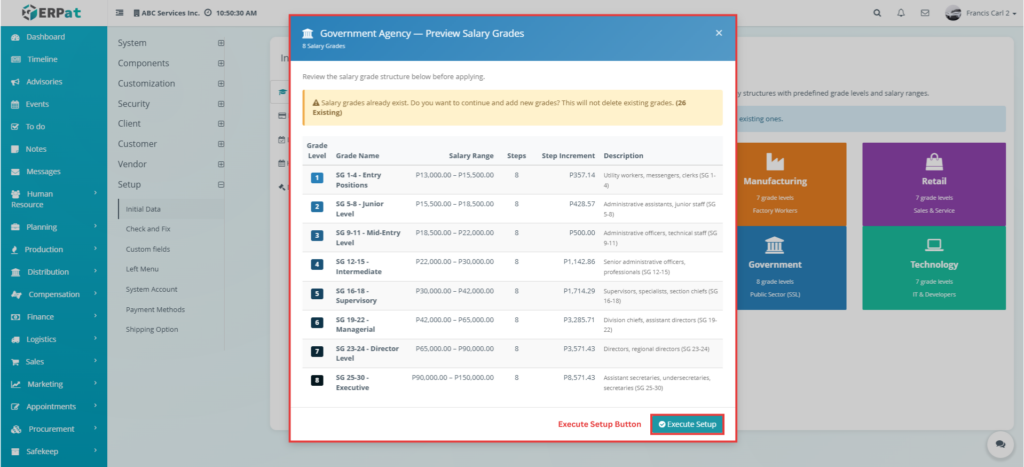
This page displays the preset salary grade template for a Government agency. It shows default salary grade data used for government-style job structures. This page is used when the administrator wants to review or apply salary grades based on a government organizational setup.
When the user clicks the Execute button, the selected salary grade template is added into the system and will be reflected and displayed in Compensation > Salary History > Salary Grades tab. This allows the administrator to use the preset government salary grade structure directly in the salary history module.
Setup – Initial Data – Salary Grades – Technology #
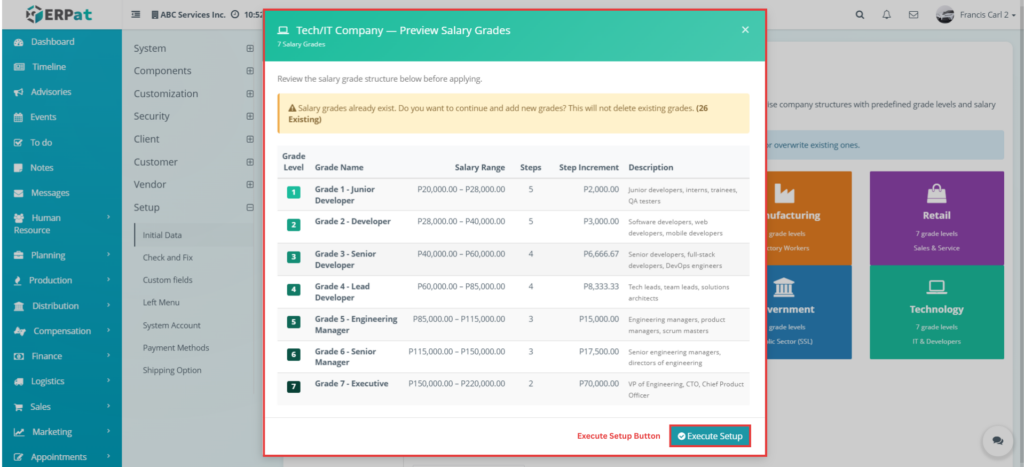
This page displays the preset salary grade template for a Technology company. It contains salary setup values and role mappings intended for tech-related organizations. This page is used when the administrator wants to review or apply salary grade defaults for technology-based roles.
When the user clicks the Execute button, the selected salary grade template is added into the system and will be reflected and displayed in Compensation > Salary History > Salary Grades tab. This helps the administrator quickly apply the technology salary grade setup in the salary history records.
Setup – Initial Data – Salary Grades – Education #
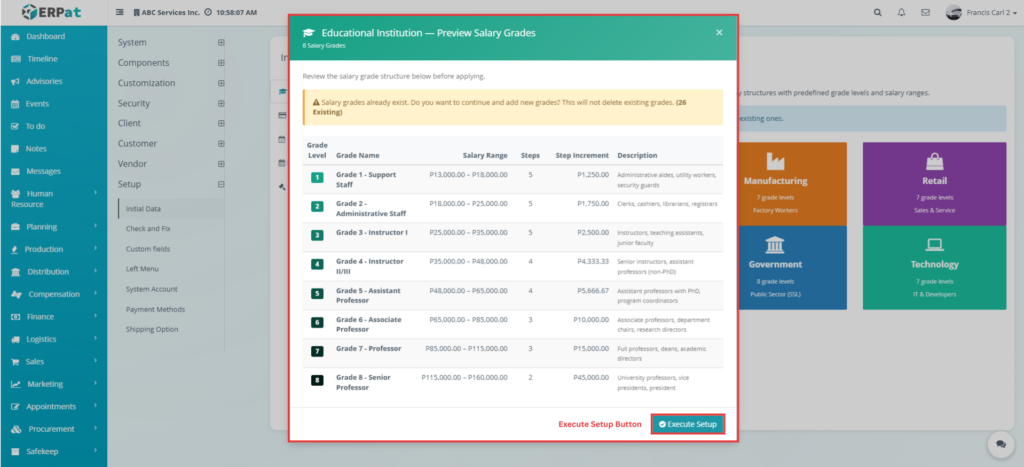
This page displays the preset salary grade template for an Educational institution. It contains salary grade structures appropriate for academic or education-based organizations. This page is used when the administrator wants to review or apply salary grade records for education-related roles.
When the user clicks the Execute button, the selected salary grade template is added into the system and will be reflected and displayed in Compensation > Salary History > Salary Grades tab. This allows the administrator to use the preset education salary grade structure directly in the system.
Setup – Initial Data – Salary Grades – Logistics #
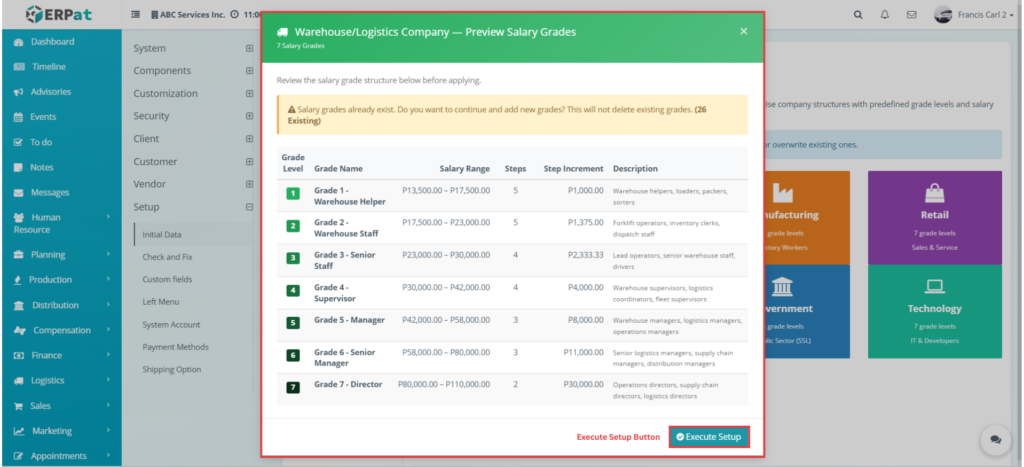
This page displays the preset salary grade template for a Logistics company. It shows the sample salary structure used for logistics-related job roles. This page is used when the administrator wants to review or apply a logistics-based salary grade setup.
When the user clicks the Execute button, the selected salary grade template is added into the system and will be reflected and displayed in Compensation > Salary History > Salary Grades tab. This helps the administrator quickly apply the logistics salary grade records into the salary history module.
Setup – Initial Data – Loan Categories #
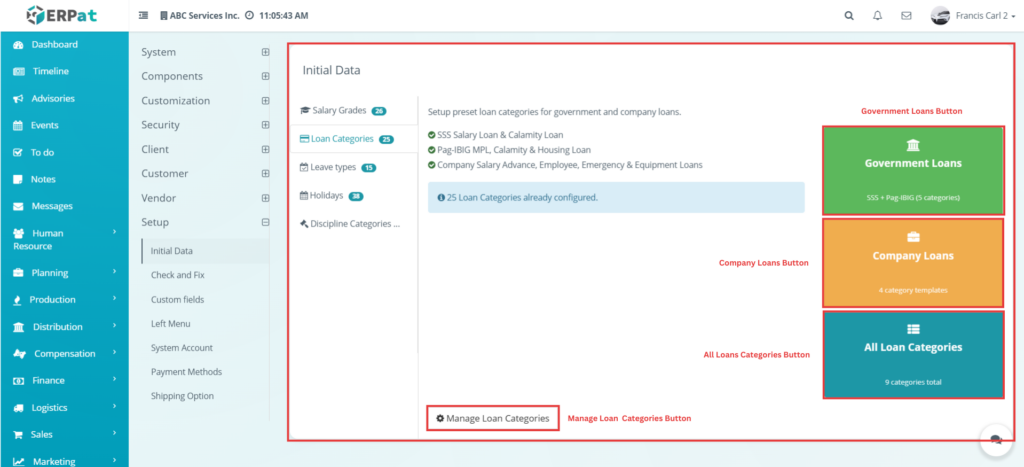
This page is used to manage preset loan category records in the system. When the user opens Settings > Setup > Initial Data > Loan Categories, the system shows predefined loan category options and setup buttons. This page is used when the administrator wants to prepare or import standard loan categories for use in the loan module.
The page also includes a Manage Loan Categories button. When the user clicks this button, the system redirects them to Compensation > Loans, where loan records and categories can be managed in detail. This means the setup page acts as the starting point for inserting or preparing loan categories, while full management takes place in the Compensation module.
Setup – Initial Data – Loan Categories – Government Loans #
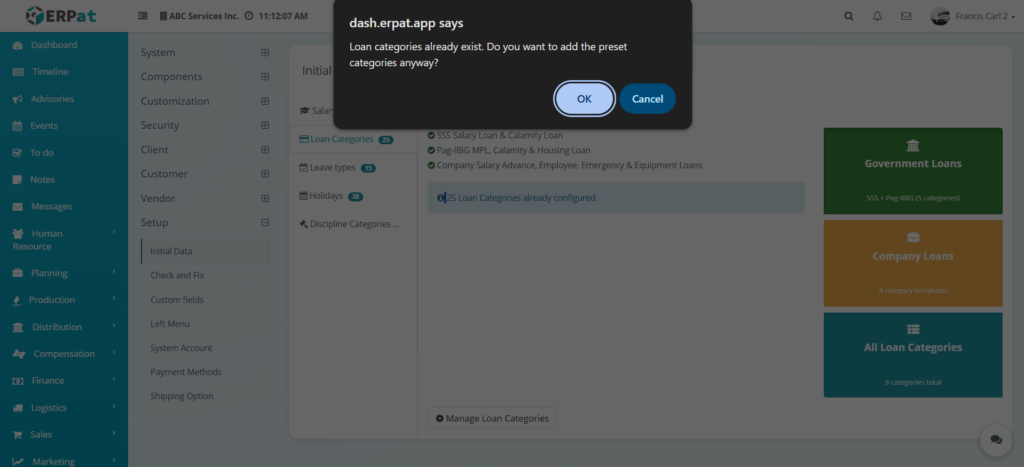
This popup appears when the user clicks Government Loans. It prompts the user to confirm whether they want to set up preset categories for government-related loan types. This feature is used by administrators to quickly insert standard government loan categories into the system.
If the user clicks “Yes,” five categories will be automatically added: Pag-IBIG Calamity Loan, Pag-IBIG Housing Loan, Pag-IBIG Multi-Purpose Loan, SSS Calamity Loan, and SSS Salary Loan. These categories will then be reflected in the Compensation > Categories tab and will also be available in the Compensation > Entries > Create Loan > Category dropdown menu.
Setup – Initial Data – Loan Categories – Company Loans #
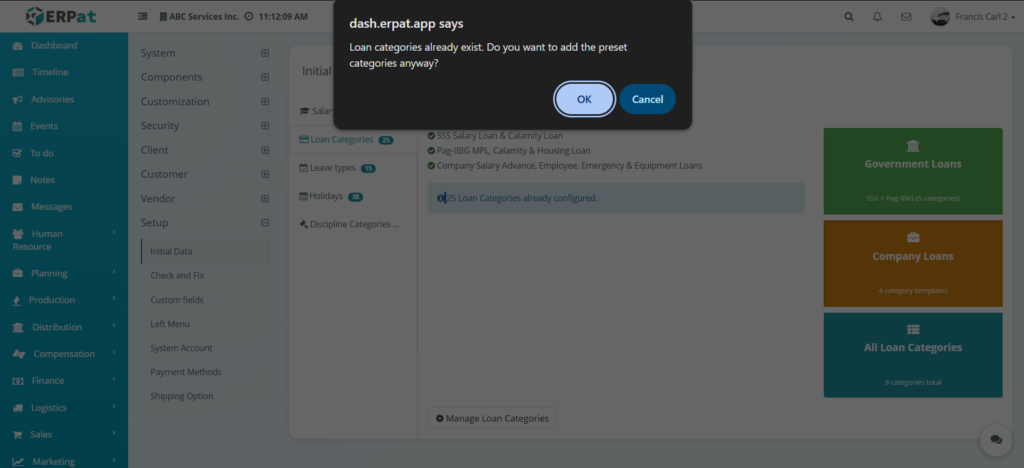
This popup appears when the user clicks Company Loans. It prompts the user to confirm whether they want to set up preset categories for company-based loan types. This feature allows administrators to quickly insert predefined company loan categories into the system.
If the user clicks “Yes,” four categories will be automatically added: Emergency Loan, Employee Loan, Equipment Loan, and Salary Advance. These categories will then be reflected in the Compensation > Categories tab and will also be available in the Compensation > Entries > Create Loan > Category dropdown menu.
Setup – Initial Data – Loan Categories – All Loan Categories #
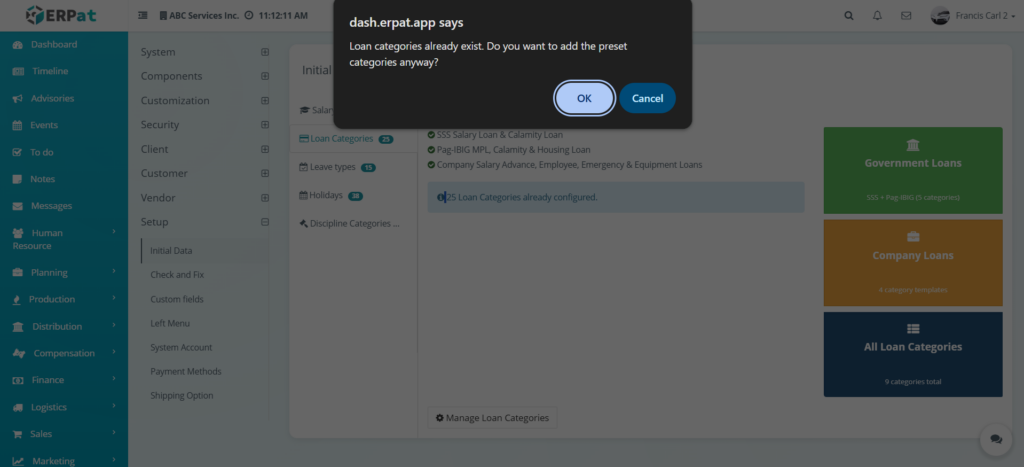
This popup appears when the user clicks All Loan Categories. It prompts the administrator to confirm whether they want to insert all preset loan category records into the system. This feature is used when the administrator wants to quickly set up every available preset loan category at once.
If the user clicks “Yes,” nine categories will be automatically added: Pag-IBIG Calamity Loan, Pag-IBIG Housing Loan, Pag-IBIG Multi-Purpose Loan, SSS Calamity Loan, SSS Salary Loan, Emergency Loan, Employee Loan, Equipment Loan, and Salary Advance. These categories will then be reflected in the Compensation > Categories tab and will also be available in the Compensation > Entries > Create Loan > Category dropdown menu.
Setup – Initial Data – Leave Types #
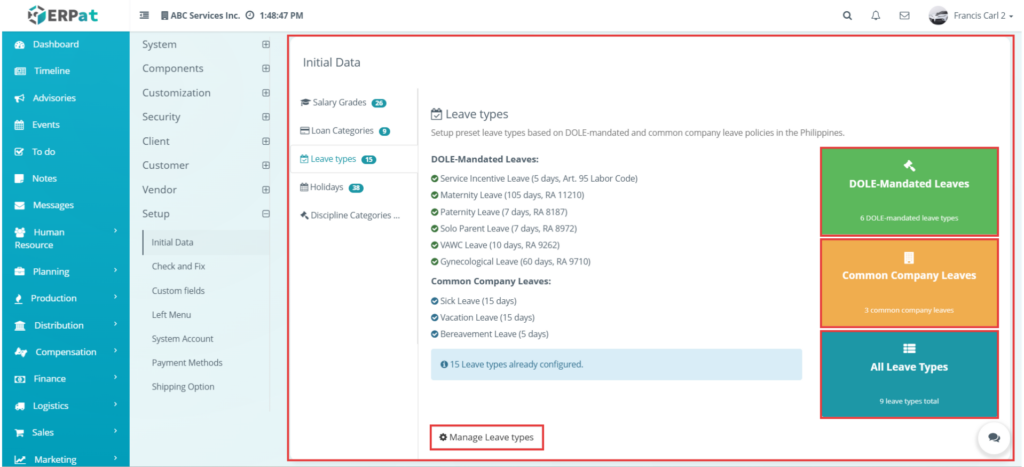
This page is used to manage preset leave type records in the system. When the user opens Settings > Setup > Initial Data > Leave Types, the system displays setup buttons for leave type groups and a list of available leave records. This page is used when the administrator wants to prepare or insert standard leave types that will later be used in leave management.
Setup – Initial Data – Leave Types – DOLE-Mandated Leaves #
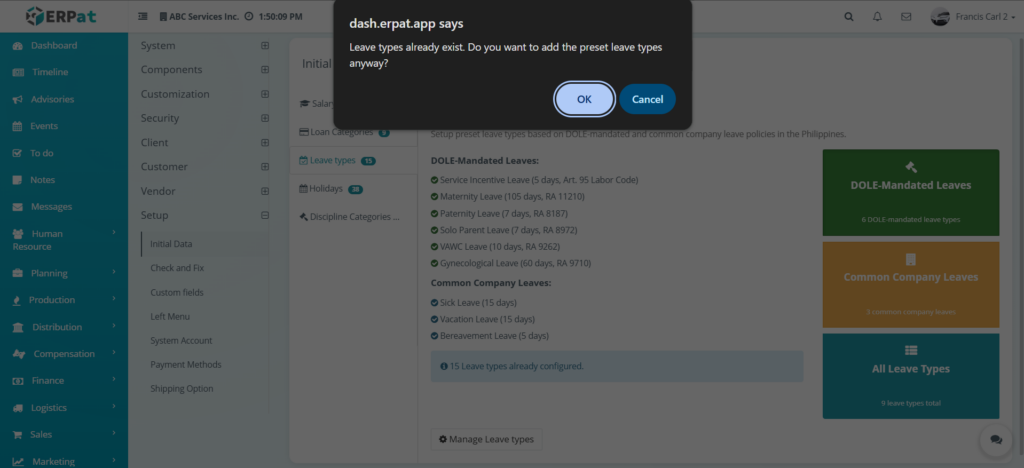
This popup appears when the user clicks DOLE-Mandated Leaves. It asks for confirmation before inserting the preset leave types required by labor regulations. This page is used when the administrator wants to add standard government-mandated leave types into the system. If you click “Yes,” all DOLE-mandated leave types will be added, including: Service Incentive Leave (5 days, Art. 95 Labor Code), Maternity Leave (105 days, RA 11210), Paternity Leave (7 days, RA 8187), Solo Parent Leave (7 days, RA 8972), VAWC Leave (10 days, RA 9262), and Gynecological Leave (60 days, RA 9710).
These will be reflected in the Human Resource > Leaves > Leave Types tab and will also be available in the following dropdown menus:
- Human Resource > Leaves > Pending Approval > Apply Leave > Leave Type
- Human Resource > Leaves > All Applications > Assign Leave > Leave Type
- Human Resource > Leaves > Leave Credits > Add > Leave Type (Origin)
Setup – Initial Data – Leave Types – Common Company Leaves #
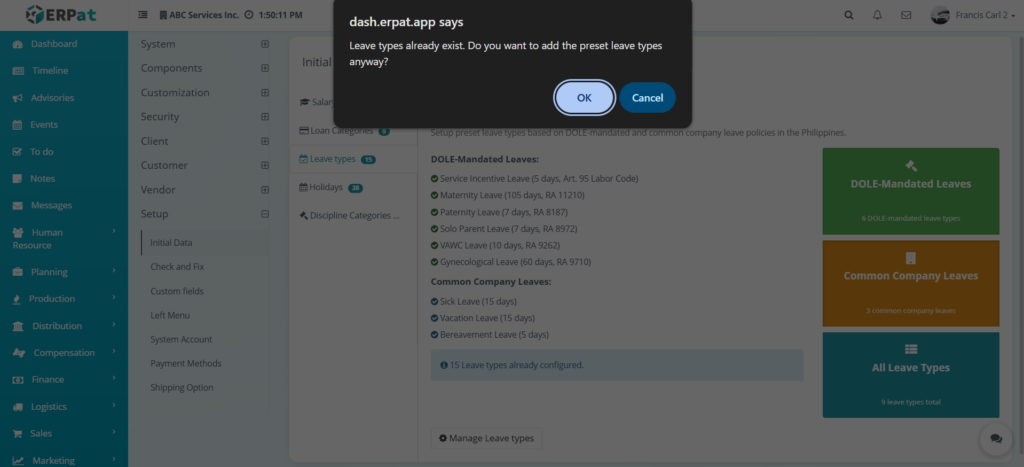
This popup appears when the user clicks Common Company Leaves. It asks the user to confirm whether they want to insert the preset leave types commonly used by companies. This page is used when the administrator wants to set up standard internal leave types in the system. If you click “Yes,” all Common Company Leave types will be added, including: Sick Leave (15 days), Vacation Leave (15 days), and Bereavement Leave (5 days).
These will be reflected in the Human Resource > Leaves > Leave Types tab and will also be available in the following dropdown menus:
- Human Resource > Leaves > Pending Approval > Apply Leave > Leave Type
- Human Resource > Leaves > All Applications > Assign Leave > Leave Type
- Human Resource > Leaves > Leave Credits > Add > Leave Type (Origin)
Setup – Initial Data – Leave Types – All Leave Types #
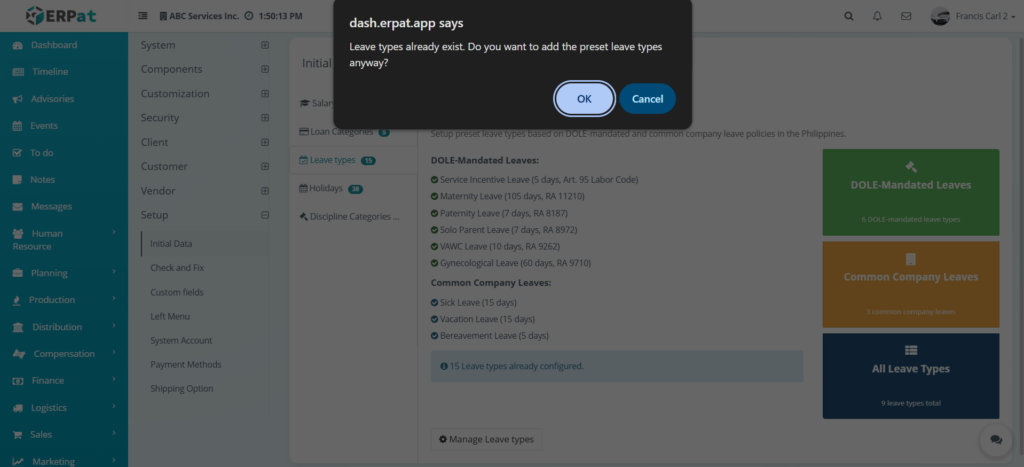
This popup appears when the user clicks All Leave Types. It asks the user to confirm whether all available preset leave types should be inserted into the system. This page is used when the administrator wants to set up all predefined leave categories at once. If you click “Yes,” all leave types will be added, including: Service Incentive Leave (5 days, Art. 95 Labor Code), Maternity Leave (105 days, RA 11210), Paternity Leave (7 days, RA 8187), Solo Parent Leave (7 days, RA 8972), VAWC Leave (10 days, RA 9262), Gynecological Leave (60 days, RA 9710), Sick Leave (15 days), Vacation Leave (15 days), and Bereavement Leave (5 days).
These will be reflected in the Human Resource > Leaves > Leave Types tab and will also be available in the following dropdown menus:
- Human Resource > Leaves > Pending Approval > Apply Leave > Leave Type
- Human Resource > Leaves > All Applications > Assign Leave > Leave Type
- Human Resource > Leaves > Leave Credits > Add > Leave Type (Origin)
Setup – Initial Data – Holidays #
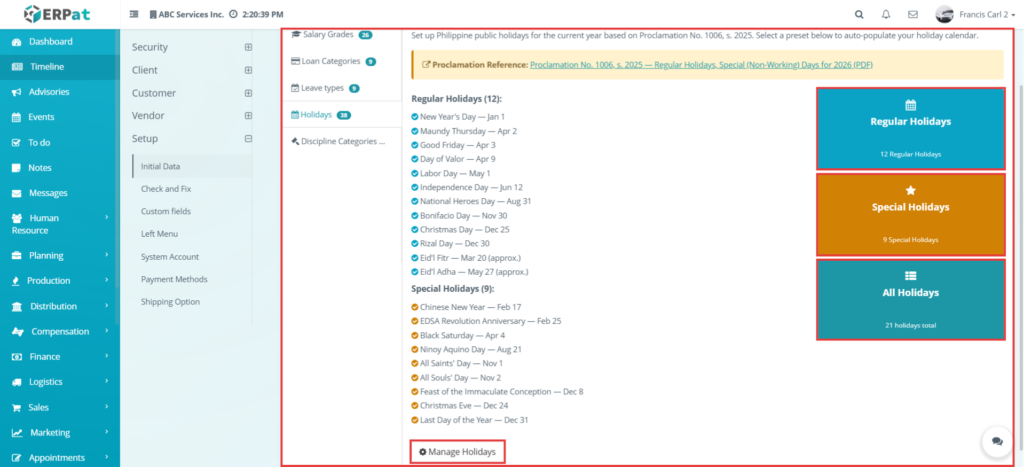
This page is used to manage preset holiday data in the system. When the user opens Settings > Setup > Initial Data > Holidays, the system displays existing holiday setup records along with buttons for importing different groups of holidays. This page is intended for administrators who want to prepare or insert holiday data that can later be used by attendance, leave, and payroll-related features.
The page also includes a Manage Holidays button. When the user clicks this button, they are redirected to Human Resource > Holidays, where holiday records can be managed in more detail. This means the setup page is used for initial holiday import and preparation, while full holiday management is handled in the Human Resource module.
When the user clicks “Regular Holiday,” all 12 listed holidays will be applied and added to Human Resource > Holidays, where the regular holidays will be displayed.
When the user clicks “Special Holidays,” all 9 listed holidays will be applied and added to Human Resource > Holidays, where the special holidays will be displayed.
When the user clicks “All Holidays,” all listed holidays (both Regular and Special) will be applied and added to Human Resource > Holidays, where all holidays will be displayed.
Setup – Initial Data – Discipline Categories #
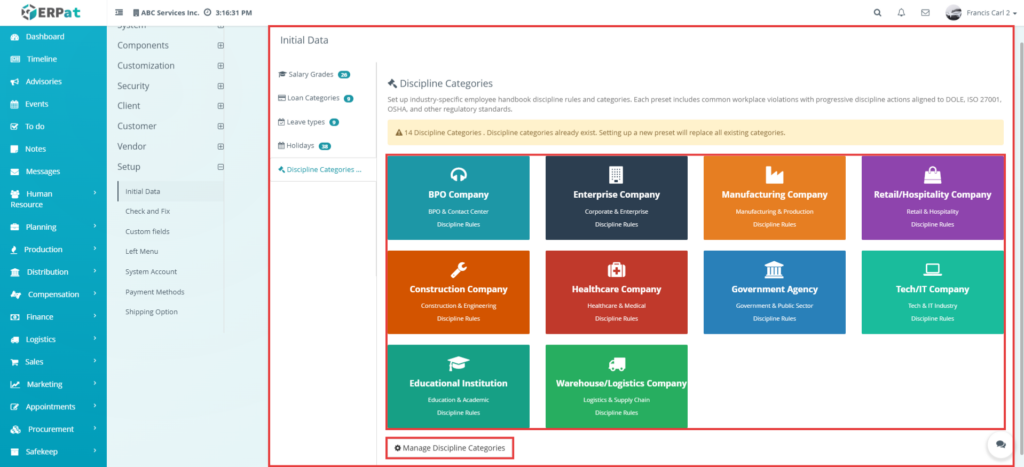
This page is used to manage preset discipline category templates in the system. When the user opens Settings > Setup > Initial Data > Discipline Categories, the system displays several company-type options such as BPO Company, Enterprise Company, Manufacturing Company, Retail/Hospital Company, Construction Company, Healthcare Company, Government Agency, Tech/IT Company, Educational Institution, and Warehouse/Logistics Company. This page is used when the administrator wants to insert predefined discipline categories based on the organization type.
This pop-up appears when a user clicks any of the discipline category company-type buttons. It prompts the user to confirm whether the preset disciplinary categories should be added for the selected company type. This page is used when an administrator wants to insert discipline category records based on a specific organizational template.
When the user clicks “BPO Company,” the following categories will be added to the Human Resources > Disciplinary > Categories tab:
(Workplace Conduct & Professionalism, Work-from-Home Policy Violations, Use of Company Property & Equipment, Substance Abuse & Intoxication, Social Media & Online Conduct, Health & Safety Compliance, Fraud, Dishonesty & Falsification, Dress Code & Personal Grooming, Data Privacy & Information Security, Conflict of Interest & Moonlighting, Confidentiality & Non-Disclosure, Call Quality & Customer Interaction, Attendance & Punctuality, Anti-Harassment & Workplace Discrimination).
When the user clicks “Enterprise Company,” the following categories will be added to the Human Resources > Disciplinary > Categories tab:
(Workplace Safety & Emergency Preparedness, Substance Abuse & Fitness for Duty, Social Media & Public Communications, Intellectual Property & Trade Secrets, Information Security & Cyber Hygiene, Financial Integrity & Anti-Fraud, Dress Code & Professional Appearance, Data Privacy & Personal Information Protection, Conflict of Interest & Business Ethics, Company Property & Resource Management, Code of Conduct & Professional Ethics, Attendance & Time Management, Anti-Harassment & Safe Workplace, Anti-Corruption & Bribery).
When the user clicks “Manufacturing Company,” the following categories will be added to the Human Resources > Disciplinary > Categories tab:
(Workplace Safety & Hazard Prevention, Theft, Pilferage & Property Damage, Substance Abuse & Impairment, Quality Control & Product Standards, Production Area Housekeeping (5S), Machine & Equipment Operation, Insubordination & Workplace Conduct, Hazardous Materials & Chemical Safety, Fire Safety & Emergency Response, Falsification & Dishonesty, Environmental Compliance, Attendance & Shift Compliance, Anti-Harassment & Equal Opportunity).
When the user clicks “Retail/Hospitality Company,” the following categories will be added to the Human Resources > Disciplinary > Categories tab:
(Workplace Safety & Store Security, Uniform, Grooming & Personal Presentation, Substance Abuse & Fitness for Duty, Social Media & Brand Representation, Point-of-Sale & Payment Card Security, Inventory Management & Loss Prevention, Fraud, Dishonesty & Falsification, Food Safety & Hygiene (F&B), Customer Service Standards, Cash Handling & Financial Integrity, Attendance & Schedule Adherence, Anti-Harassment & Workplace Respect).
When the user clicks “Construction Company,” the following categories will be added to the Human Resources > Disciplinary > Categories tab:
(Workplace Violence & Conduct on Site, Working at Heights & Fall Protection, Tool & Material Accountability, Substance Abuse & Impairment on Site, Quality Standards & Workmanship, Personal Protective Equipment (PPE) Compliance, Heavy Equipment & Machinery Operation, Falsification & Documentation Fraud, Excavation & Confined Space Safety, Environmental & Waste Management, Electrical Safety & Hot Works, Attendance & Site Mobilization).
When the user clicks “Healthcare Company,” the following categories will be added to the Human Resources > Disciplinary > Categories tab:
(Substance Abuse & Fitness for Duty, Professional Conduct & Ethics, Patient Confidentiality & Health Records, Medication Administration & Drug Safety, Medical Equipment & Technology, Infection Prevention & Control (IPC), Falsification & Records Integrity, Emergency Response & Triage, Clinical Practice & Patient Safety, Biomedical Waste Management, Attendance & Duty Coverage, Anti-Harassment & Workplace Safety).
When the user clicks “Government Agency,” the following categories will be added to the Human Resources > Disciplinary > Categories tab:
(Partisan Political Activity, Oppression & Abuse of Authority, Neglect of Duty, Insubordination & Refusal to Perform Duties, Graft & Corruption, Government Property & Resource Accountability, Dishonesty & Falsification of Documents, Data Privacy & Records Management, Conflict of Interest & Financial Disclosure, Conduct Prejudicial to the Best Interest of the Service, Attendance & Punctuality, Anti-Sexual Harassment & Safe Spaces).
When the user clicks “Tech/IT Company,” the following categories will be added to the Human Resources > Disciplinary > Categories tab:
(System Security & Vulnerability Management, Substance Abuse & Fitness for Duty, Source Code & Intellectual Property Protection, Remote Work & VPN Security, Production Environment & Change Management, Open Source & License Compliance, Information Security & Access Control, Incident Response & Security Breach Reporting, Data Privacy & User Data Protection, Code of Conduct & Professional Ethics, Attendance & Work Arrangement Compliance, Anti-Harassment & Inclusive Workplace, Acceptable Use of Technology).
When the user clicks “Educational Institution,” the following categories will be added to the Human Resources > Disciplinary > Categories tab:
(Use of School Property & Technology, Substance Abuse & Campus Environment, Student Welfare & Protection, Student Data Privacy & Records (FERPA), Social Media & Public Representation, Research Ethics & Intellectual Honesty, Professional Conduct & Teacher Ethics, Falsification & Document Integrity, Campus Safety & Emergency Protocols, Attendance & Teaching Schedule Compliance, Anti-Harassment & Safe Learning Environment, Academic Integrity & Grading Standards).
When the user clicks “Warehouse/Logistics Company,” the following categories will be added to the Human Resources > Disciplinary > Categories tab:
(Workplace Conduct & Housekeeping, Warehouse Safety & Material Handling, Vehicle & Fleet Safety (Drivers), Theft, Pilferage & Cargo Security, Substance Abuse & Fitness for Duty, Inventory Accuracy & Stock Management, Hazardous Goods & Dangerous Materials, Forklift & Equipment Operation, Falsification & Document Fraud, Delivery & Customer Interaction, Data & System Integrity (WMS), Cold Chain & Temperature-Sensitive Goods, Attendance & Shift Compliance, Anti-Harassment & Team Conduct).
Setup – Check and Fix #
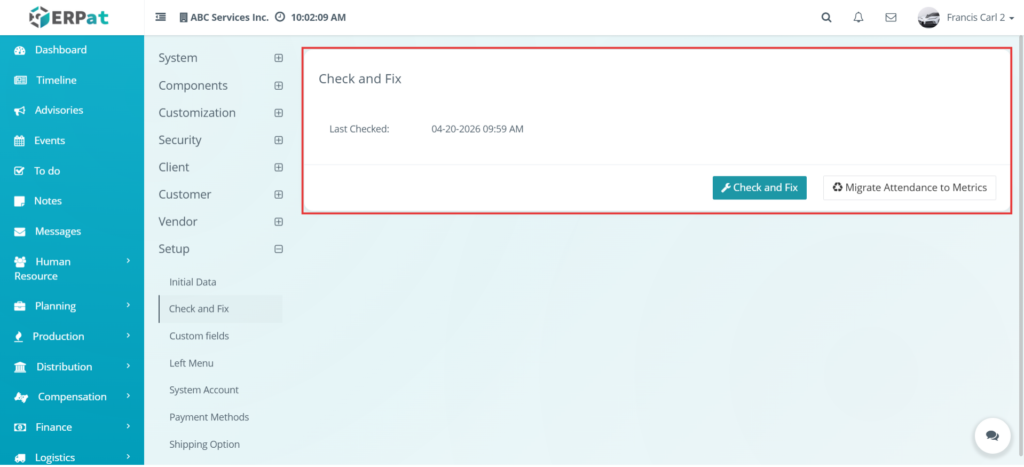
This page is used to review and correct attendance-related records in the system. When the user opens Settings > Setup > Check and Fix, the system displays a page with tools such as Check and Fix and Migrate Attendance to Metrics. This page is used when the administrator wants to verify attendance records, update time-based entries, or migrate attendance data into metrics-related records.
Setup – Check and Fix – Check and Fix #
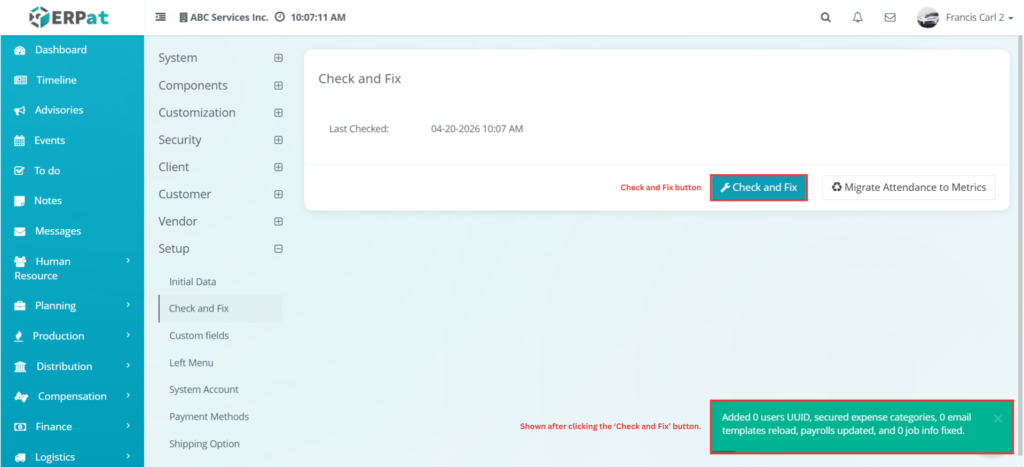
This action is used to run the checking and fixing process for records in the page. When the user clicks Check and Fix, the system processes the selected data and displays a result or success message to indicate that the action has been completed. This function is used when the administrator wants to automatically correct or validate records that may contain issues.
Setup – Check and Fix – Migrate Attendance to Metrics #
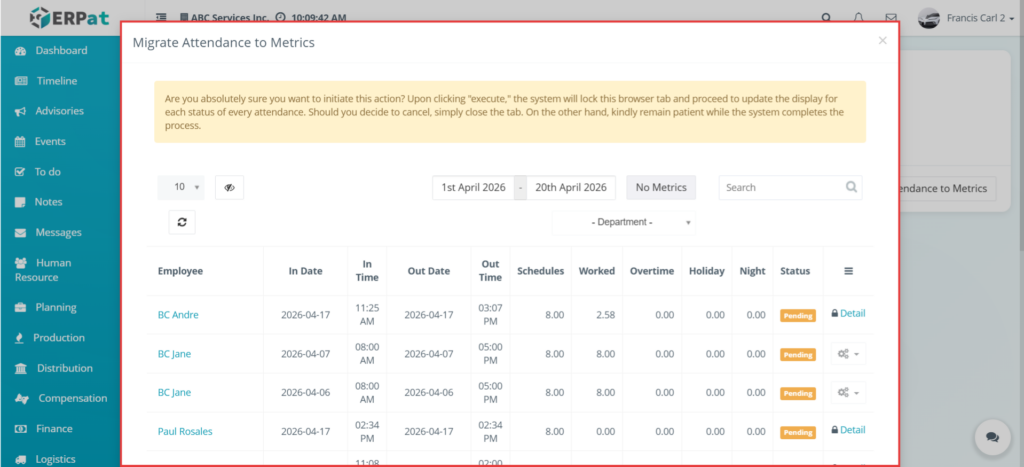
This page is used to convert attendance records into metrics-based records. When the user clicks Migrate Attendance to Metrics, the system displays a record list that can be filtered based on the date range selected by the user. The page also allows the user to filter records based on No Metrics and by Department, depending on the data they want to review. This page is used when the administrator wants to analyze or process attendance records that need to be migrated into the metrics format.
Setup – Check and Fix – Action Button #
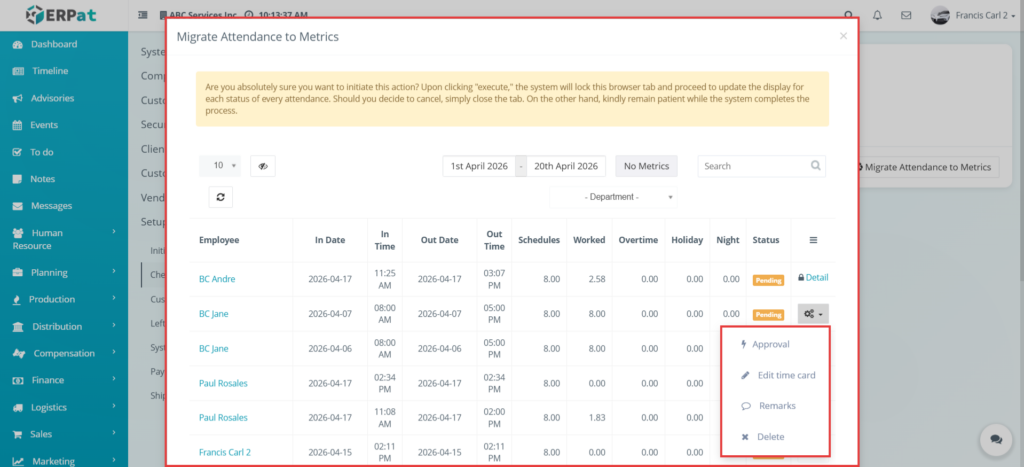
This section shows the available actions for each attendance-related record in the Migrate Attendance to Metrics page. When the user clicks the action button for a record, the system displays several available options such as Approval, Edit time card, Remarks, and Delete. This section is used when the administrator wants to manage a specific attendance record directly from the list.
Setup – Check and Fix – Action Button – Approval – Metrics #
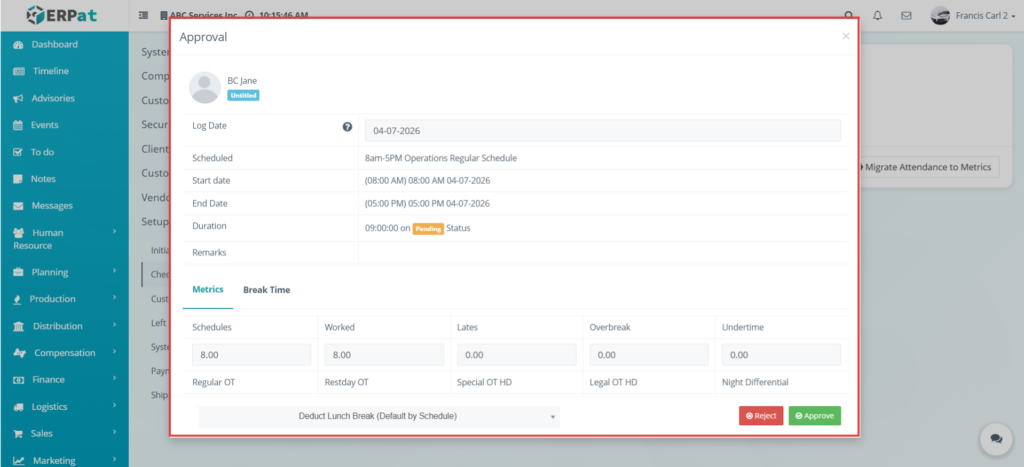
This page is used to review and approve a metrics-related attendance record. When the user clicks “Approval” for a record involving metrics, the system opens an approval form displaying the employee’s details, attendance values, and related computed data. This page allows the administrator to either confirm or reject the displayed metrics information before it is finalized.
The Approve button is used to accept the record. Once approved, the status changes to “Approved,” and the update is reflected in Human Resources > Attendance. To view the changes, select the appropriate date range based on the user’s log date.
The Reject button is used to decline the record.
Setup – Check and Fix – Action Button – Approval – Break Time #
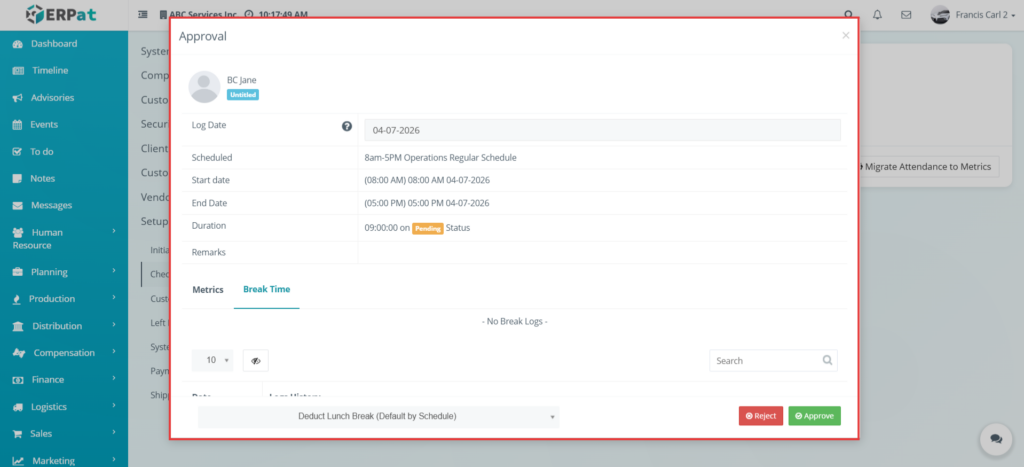
This page is used to review and approve break time-related attendance records. When the user clicks Approval for a break time record, the system displays a form showing the employee’s information and the recorded break details. This page is used when the administrator wants to validate whether the break data is correct before finalizing it. The Approve button is used to accept the record, and the Reject button is used to decline it.
Setup – Check and Fix – Action Button – Edit Time Card #
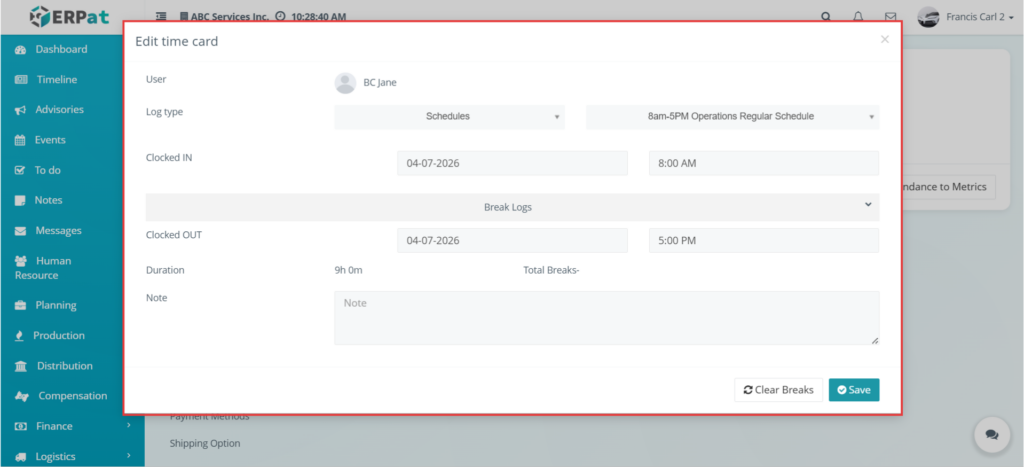
This page is used to manually edit a time card record. When the user clicks Edit time card, the system opens a form containing fields such as Log type, Schedules, time values, and Break Logs. In the Log type area, the available schedule choices include Overtime and Adaptive, while the dropdown beside the schedule field contains the list of schedules already created in the system. The Break Logs section is used to display and edit break-related log entries. When the user opens the break logs dropdown, the system shows the list of break entries that can be reviewed or adjusted. After making changes, the user can click Save to apply the update or Clear Breaks to remove the break entries shown in the form.
Setup – Check and Fix – Action Button – Remarks #
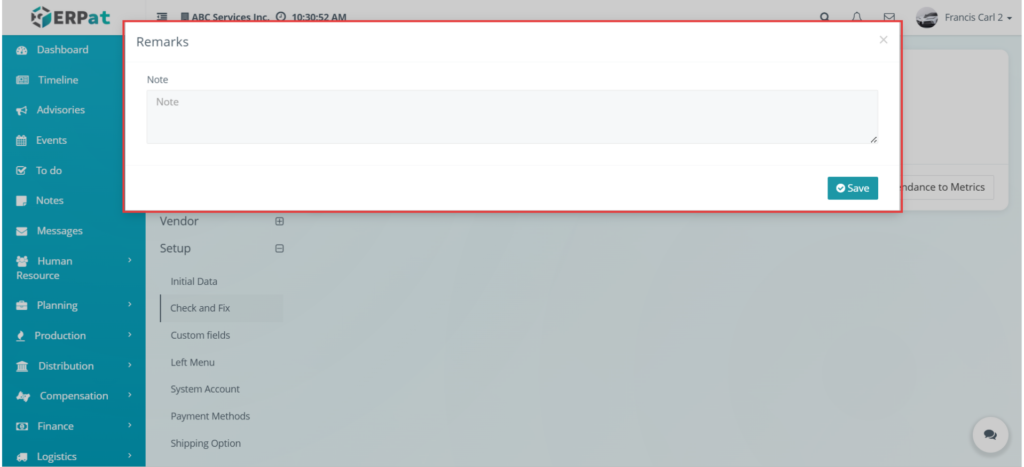
This page is used to view or enter remarks for the selected attendance-related record. When the user clicks Remarks, the system opens a small form or popup where notes or comments connected to the record can be reviewed or entered. This is used when the administrator wants to document explanations or additional notes related to a specific record.
Setup – Check and Fix – Action Button – Delete #
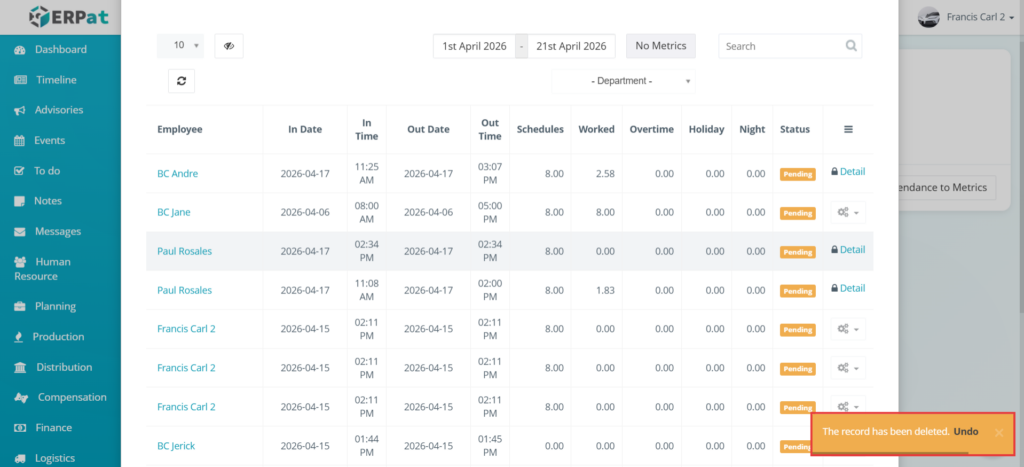
This action is used to remove the selected attendance-related record from the list. When the user clicks Delete, the system deletes the record and displays a yellow popup notification in the lower right area of the page. Based on your file, the user can click Undo if they want to restore the deleted item, or they can close the popup if they do not want to take any additional action. This function is used when the administrator wants to remove an incorrect or unnecessary record.
Setup – Custom Fields – Clients #
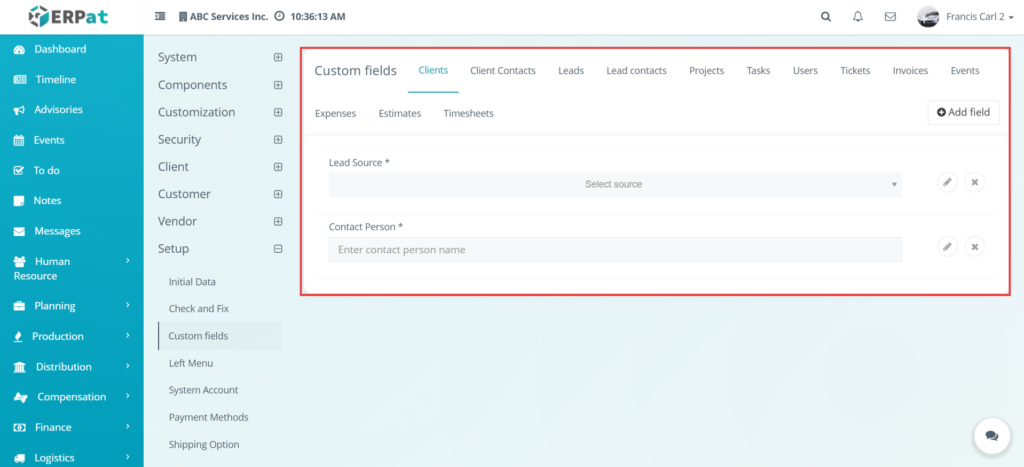
This page is used to create and manage custom fields for the Clients section. When the user opens Settings > Setup > Custom fields > Clients, the system displays the list of existing custom fields and allows the user to add new ones. This page is used when the administrator wants to add extra input fields that are not included in the default client form. Based on your note, all fields created here will also be displayed in Sales > Clients > Clients tab and Sales > Clients > Add client.
Setup – Custom Fields – Clients – Add Field #
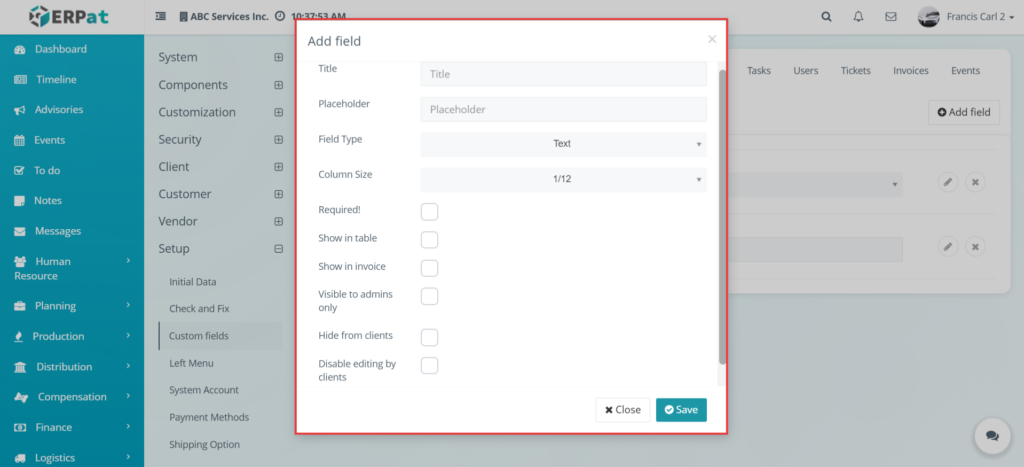
This form is used to add a new custom field for clients. When the user clicks Add field, the system opens a modal where the user can define the field title, placeholder, field type, column size, and additional display or visibility options. This page is used when the administrator wants to create a new client-specific input field that will appear in the client pages. After completing the form, the user clicks Save to create the field.
Setup – Custom Fields – Clients – Edit Field #
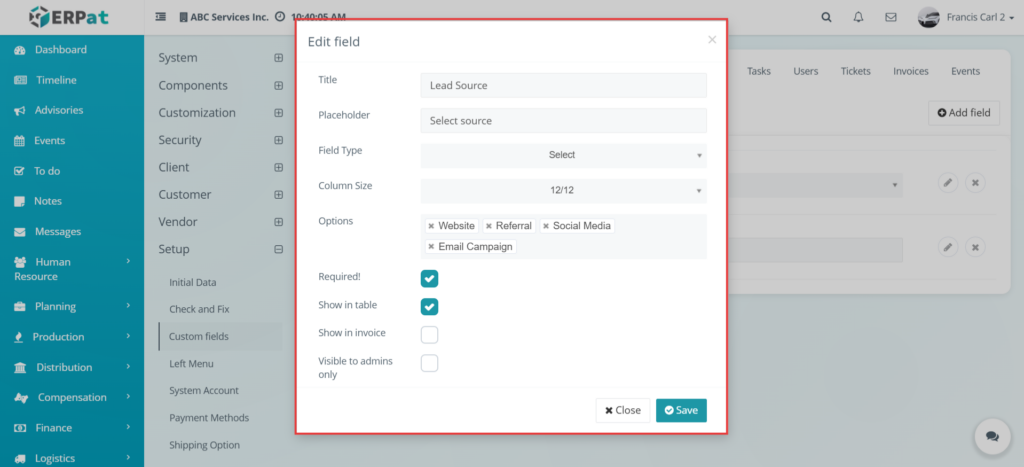
This form is used to update an existing custom field for clients. When the user clicks the edit button for a field, the system opens a modal containing the current field settings. The administrator can modify the title, placeholder, field type, size, or visibility options, then click Save to apply the changes. This page is used when the administrator wants to revise an already created custom client field.
Setup – Custom Fields – Clients – Delete Field #
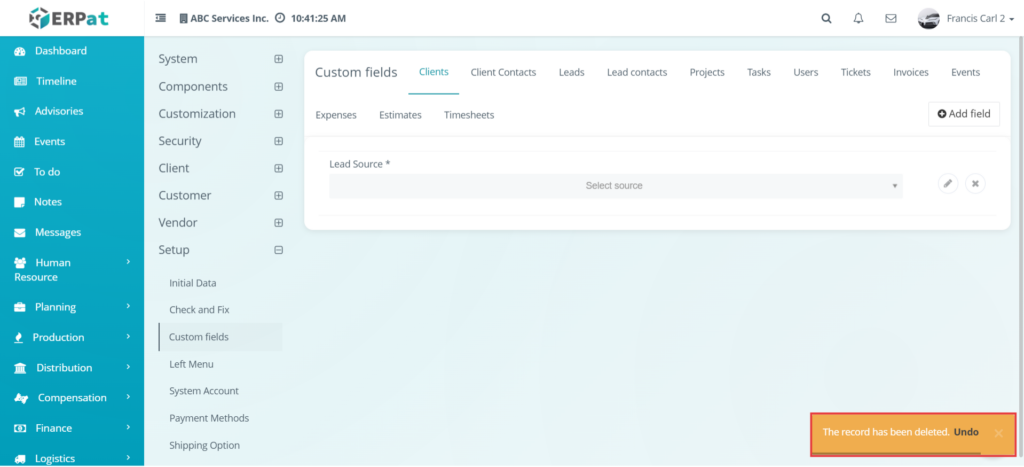
This action is used to remove an existing custom field for clients. Based on your file, deleting a field shows a popup notification similar to the other delete actions in the system. The user can use Undo if they want to restore the deleted field, or they can close the popup if they no longer need to take action. This is used when the administrator wants to remove an unused or incorrect custom field.
Setup – Custom Fields – Client Contacts #
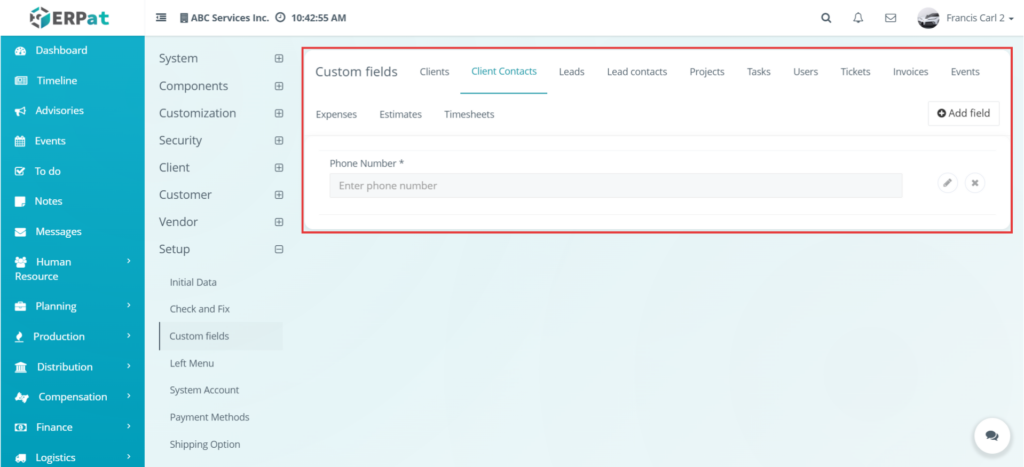
This page is used to create and manage custom fields for Client Contacts. When the user opens Settings > Setup > Custom fields > Client Contacts, the system displays the custom field list for that section. Based on your note, all fields added here will also appear in Sales > Clients > Contacts tab and Sales > Clients > Add contact. This page is used when the administrator wants to add extra input fields for contact records.
Setup – Custom Fields – Client Contacts – Add Field #
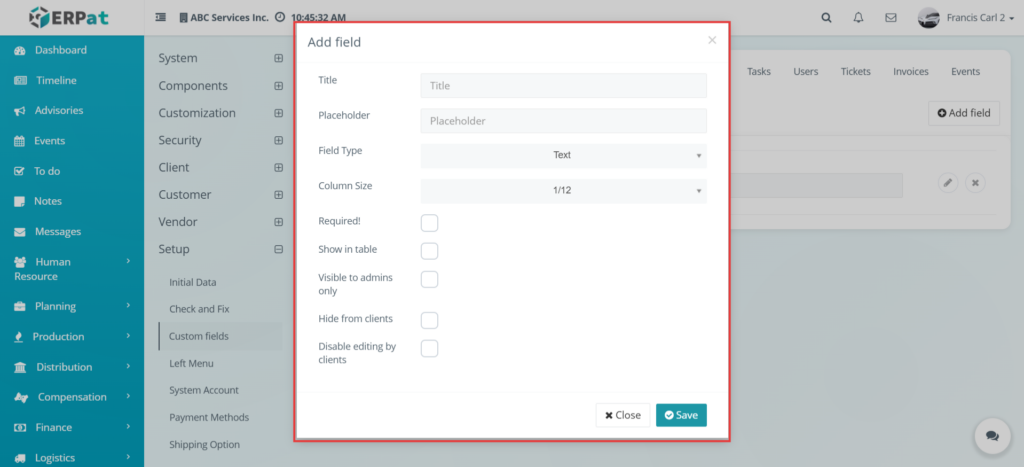
This form is used to add a new custom field for client contacts. The user fills in the field information and clicks Save to create the field. This page is used when the administrator wants to create additional contact-related input fields in the client contact forms.
Setup – Custom Fields – Client Contacts – Edit Field #
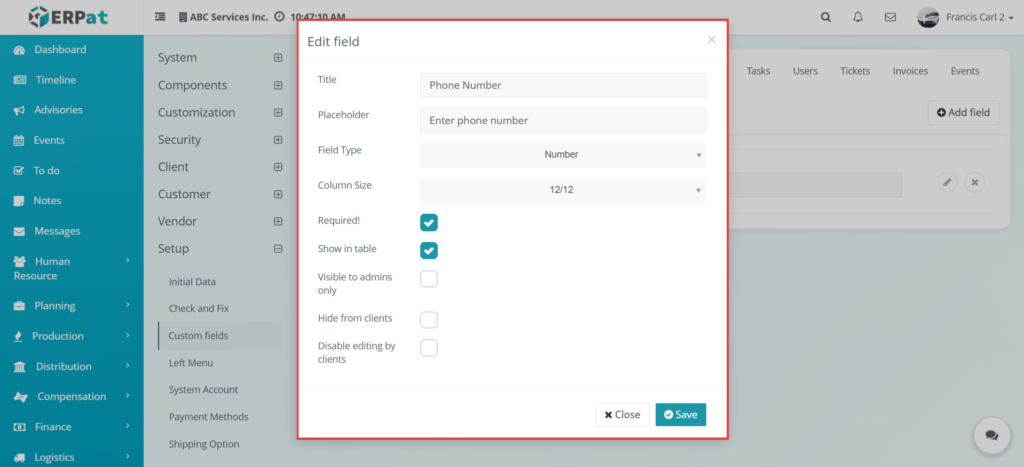
This form is used to update an existing client contact custom field. The user can revise the field details and save the changes. This page is used when the administrator wants to correct or adjust a field already added to client contact forms.
Setup – Custom Fields – Client Contacts – Delete Field #
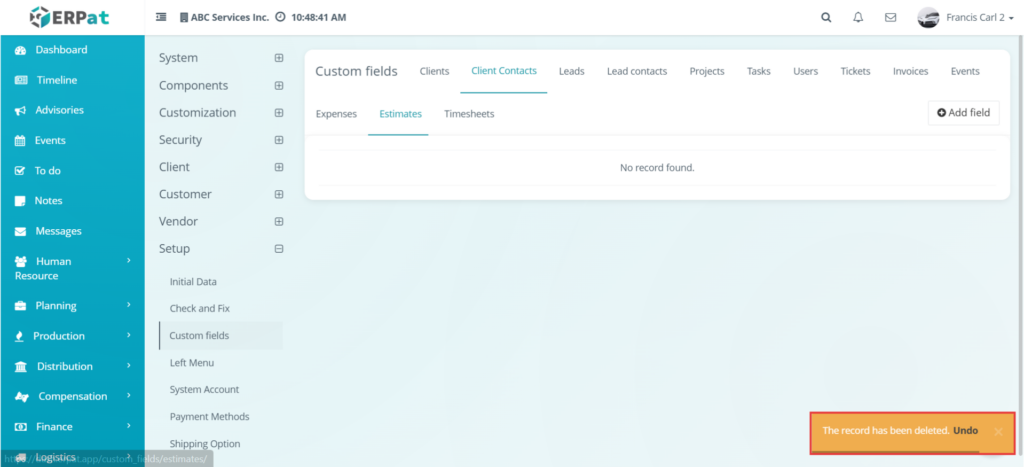
This action is used to delete a custom field from the Client Contacts section. The delete behavior is the same as the one shown in the Clients custom fields delete action, where a popup appears and the user can use Undo or close the message. This is used when an unnecessary or incorrect custom contact field must be removed.
Setup – Custom Fields – Leads #
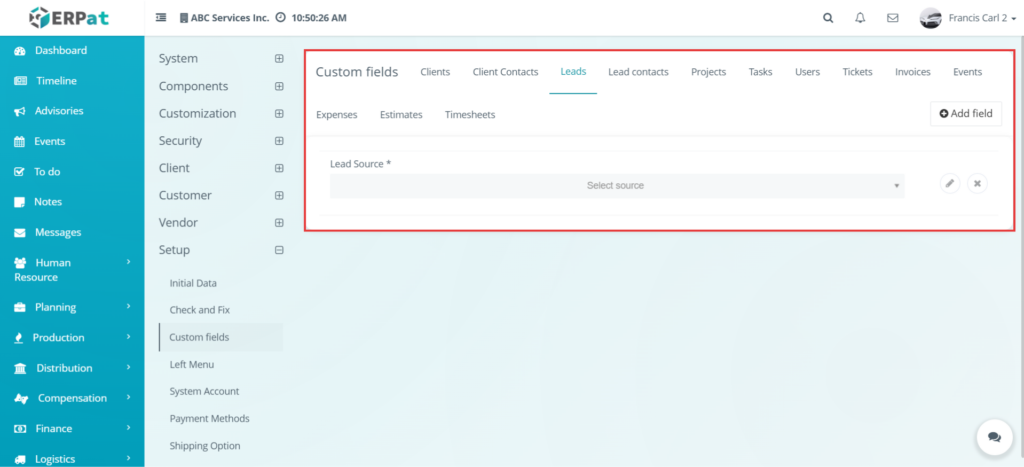
This page is used to create and manage custom fields for Leads. When the user opens Settings > Setup > Custom fields > Leads, the system shows the list of custom fields assigned to the Leads section. Based on your note, fields created here will also appear in Marketing > Leads > Click any list > Lead info tab and Marketing > Leads > Add lead. This page is used when the administrator wants to add extra fields for lead records.
Setup – Custom Fields – Leads – Add Field #
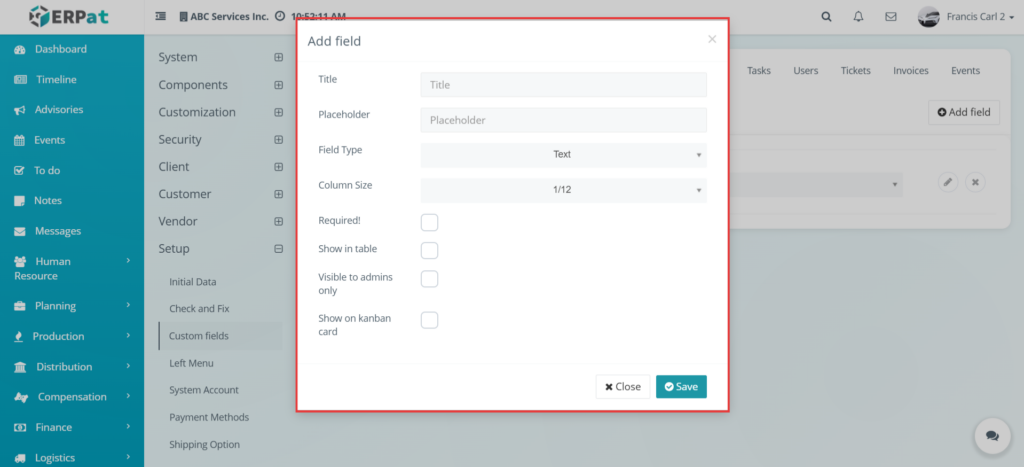
This form is used to create a new custom field for Leads. The user enters the field details, sets the desired behavior or options, and clicks Save. This page is used when the administrator wants to add additional fields that will appear in lead forms and details.
Setup – Custom Fields – Leads – Edit Field #
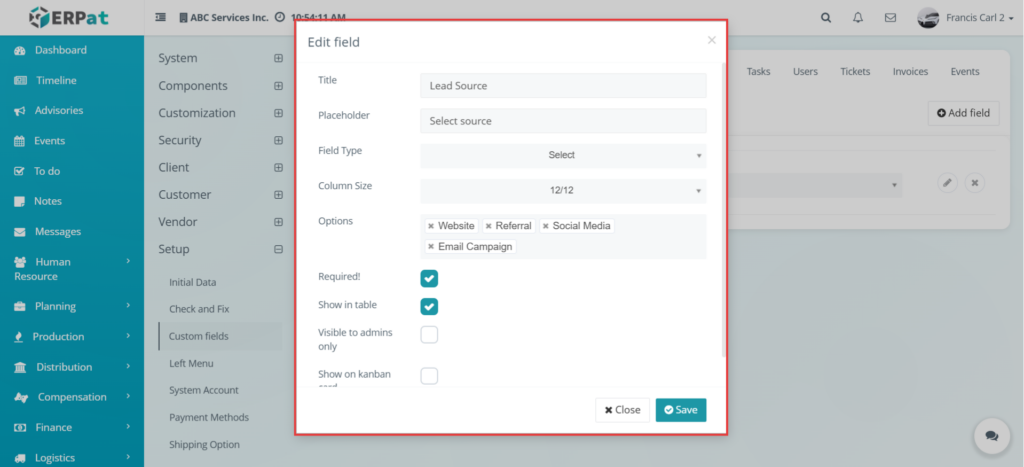
This form is used to update an existing lead custom field. The administrator can change the title, placeholder, values, and other display settings before saving the changes. This page is used when an existing custom lead field needs to be revised.
Setup – Custom Fields – Leads – Delete Field #
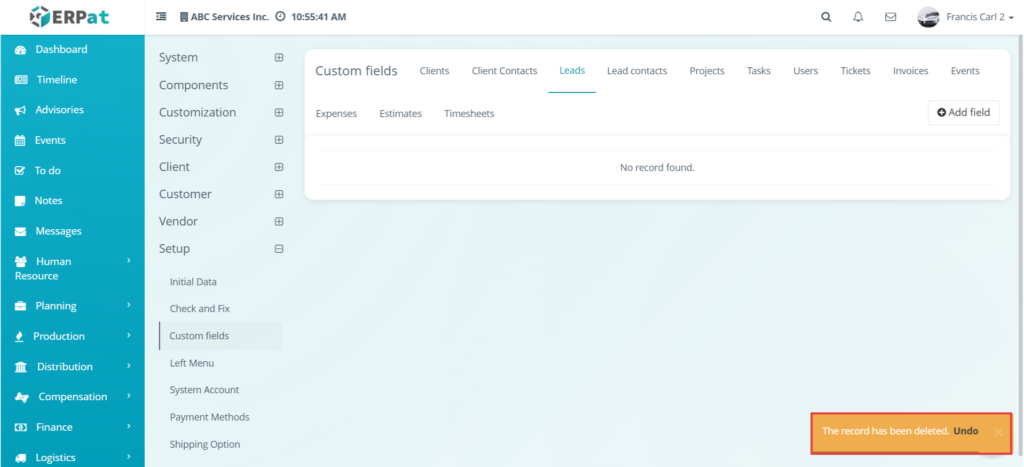
This action is used to remove a custom field from the Leads section. The delete behavior is the same as the Clients custom field delete action, where a popup appears and the user can undo the action or close the popup. This is used when the administrator wants to remove a lead field that is no longer needed.
Setup – Custom Fields – Lead Contacts #
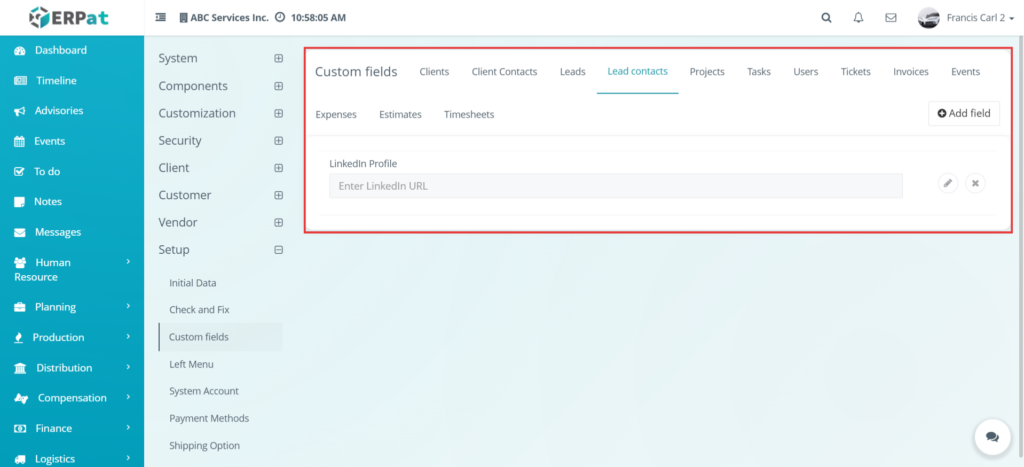
This page is used to create and manage custom fields for Lead Contacts. When the user opens Settings > Setup > Custom fields > Lead contacts, the system displays the field list for lead contact records. Based on your note, fields added here will appear in Marketing > Leads > Click any list > Contacts tab and Marketing > Leads > Contacts tab > Add contact. This page is used when the administrator wants to add additional contact-related fields for leads.
Setup – Custom Fields – Lead Contacts – Add Field #
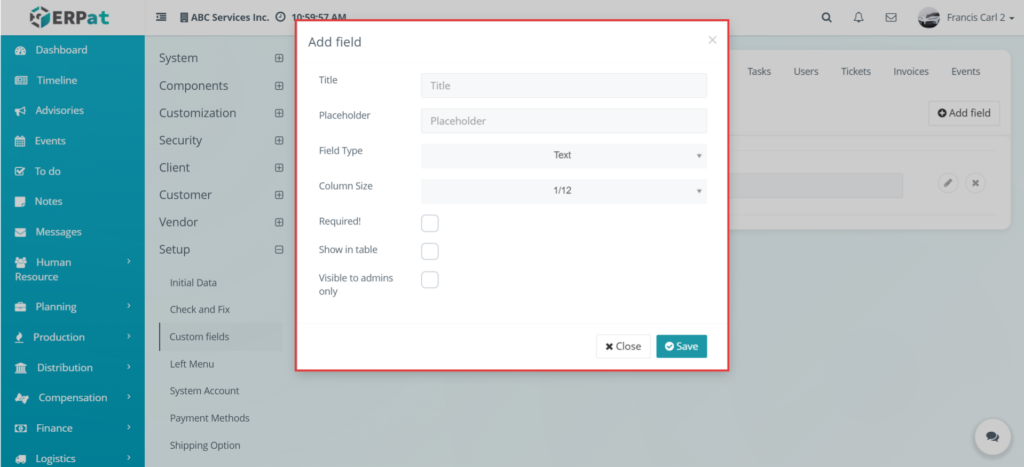
This form is used to add a new custom field for lead contacts. The user enters the field details and clicks Save to create it. This page is used when the administrator wants to extend the lead contact form with more input fields.
Setup – Custom Fields – Lead Contacts – Edit Field #
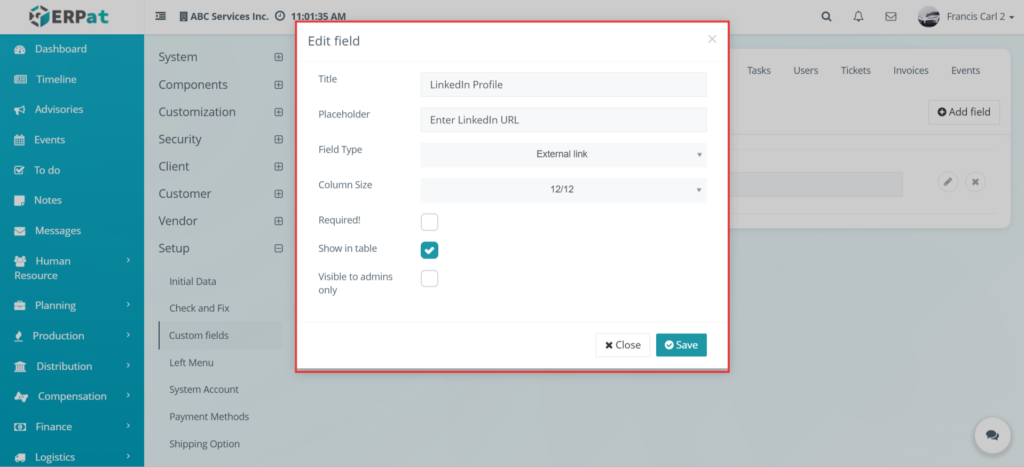
This form is used to edit an existing lead contact custom field. The user updates the field settings and saves the changes. This is used when the administrator needs to revise a previously created lead contact field.
Setup – Custom Fields – Lead Contacts – Delete Field #
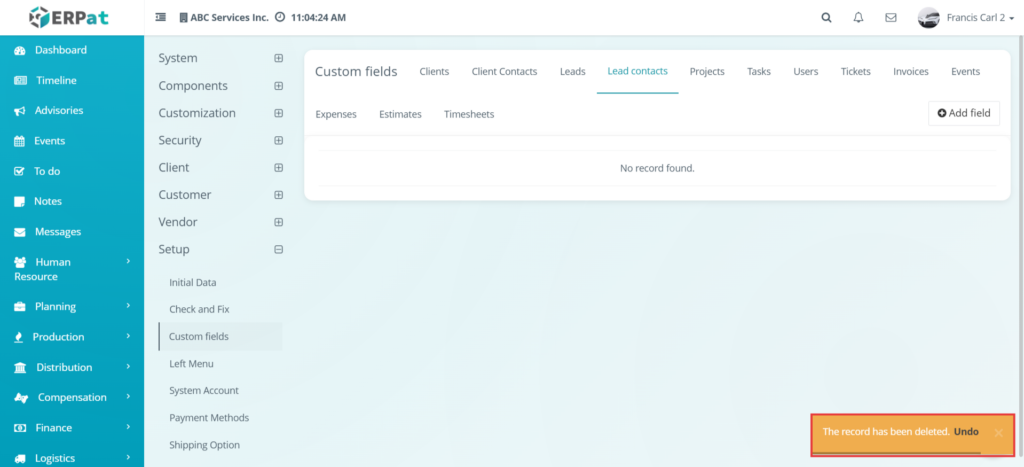
This action is used to delete a custom field from the Lead Contacts section. The delete behavior is the same as the Clients custom field delete action, where a popup appears and the user can undo the deletion or close the popup. This is used when an unwanted lead contact field must be removed.
Setup – Custom Fields – Projects #
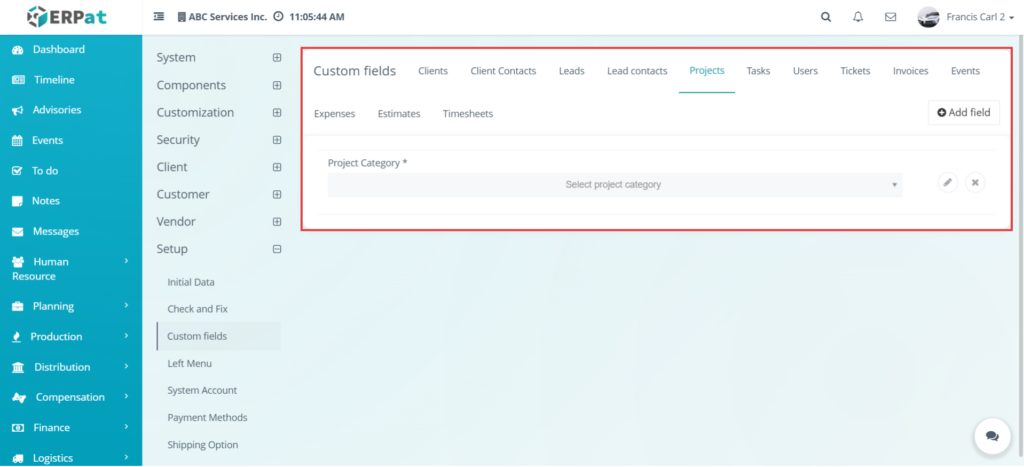
This page is used to create and manage custom fields for Projects. When the user opens Settings > Setup > Custom fields > Projects, the system displays the custom field list for project records. Based on your note, all fields created here will appear in Planning > All Projects and Planning > All Projects > Add project. This page is used when the administrator wants to add extra input fields to the project records.
Setup – Custom Fields – Projects – Add Field #
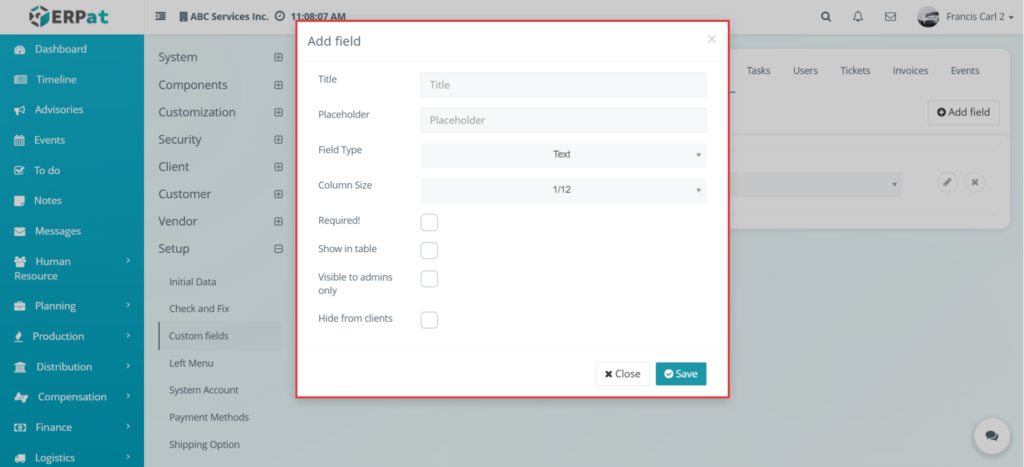
This form is used to create a new custom field for Projects. The user can enter the title, placeholder, field type, column size, and visibility or display options before saving the new field. This page is used when the administrator wants to extend the project form with additional fields that match the organization’s project tracking needs.
Setup – Custom Fields – Projects – Edit Field #
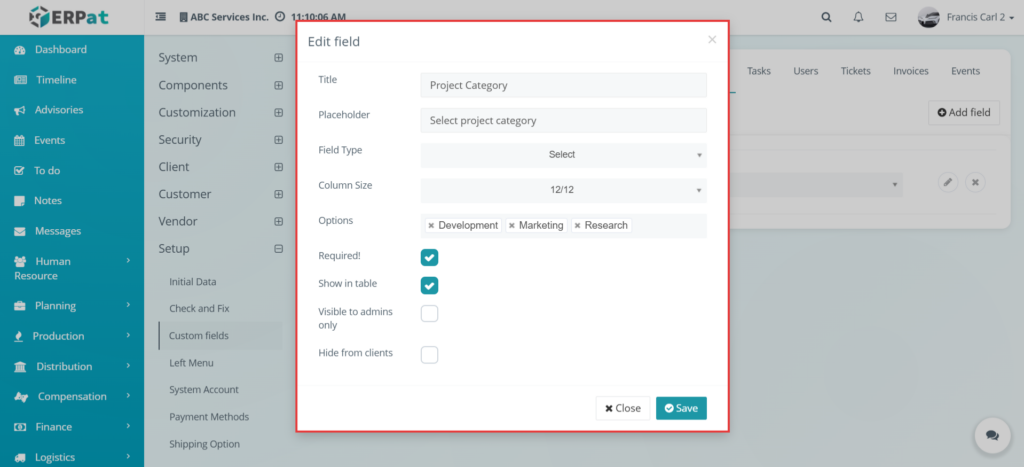
This form is used to update an existing project custom field. The user edits the field settings and clicks Save to apply the changes. This is used when the administrator wants to revise an already created project field.
Setup – Custom Fields – Projects – Delete Field #
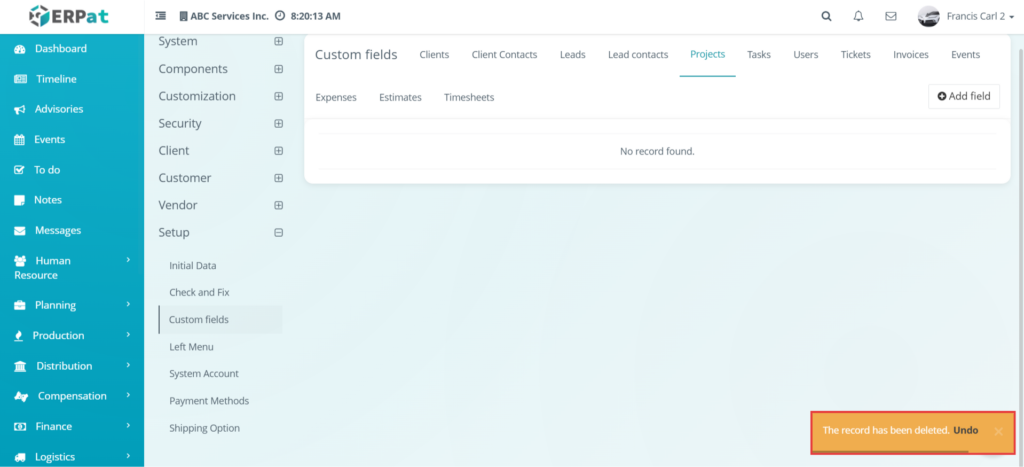
This action is used to delete a custom field from the Projects section. The delete behavior is the same as the one shown in the Clients custom fields area, where a popup appears and the user may undo the deletion or close the popup. This is used when the administrator wants to remove an unused project field.
Setup – Custom Fields – Tasks #
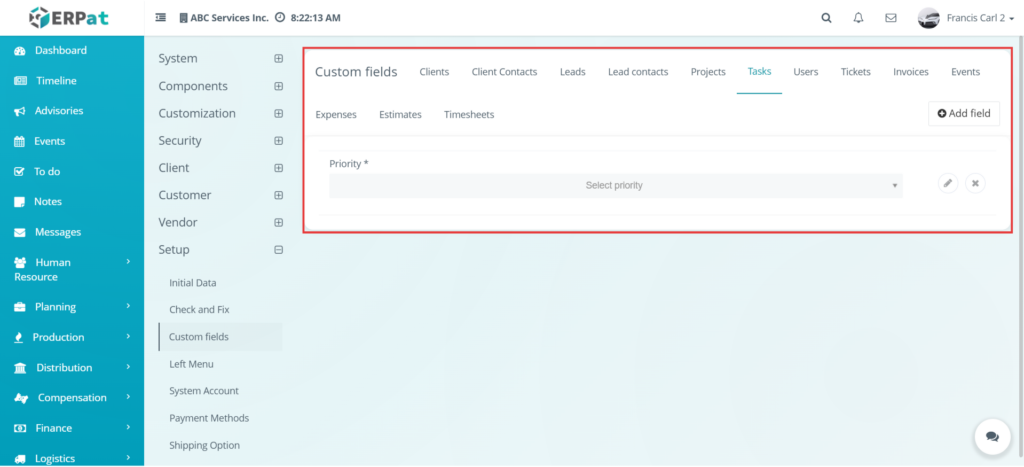
This page is used to create and manage custom fields for Tasks. When the user opens Settings > Setup > Custom fields > Tasks, the system displays the field list for task records. Based on your note, fields added here will appear in Planning > My Tasks > List tab and Planning > My Tasks > Add task. This page is used when the administrator wants to add additional fields for task management.
Setup – Custom Fields – Tasks – Add Field #
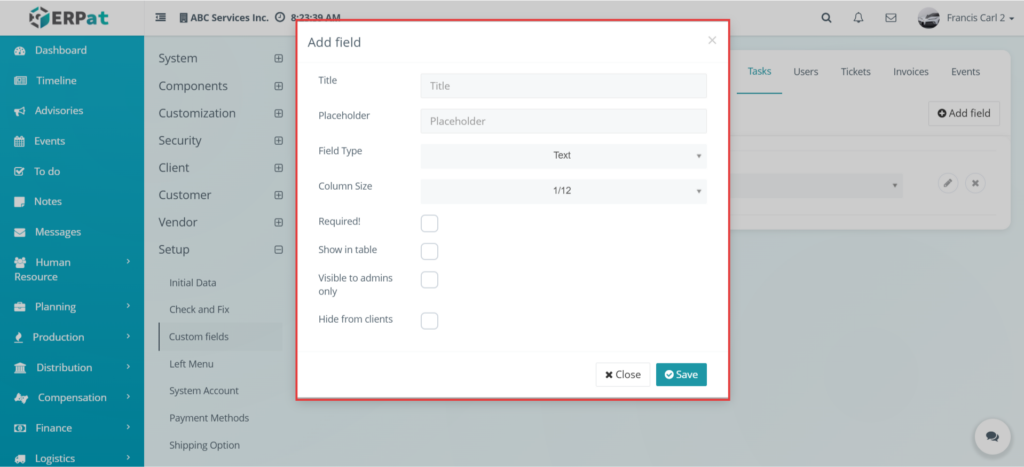
This form is used to add a new custom field for tasks. The user enters the field details and saves the new field. This page is used when the administrator wants to add more task-specific input fields to the system.
Setup – Custom Fields – Tasks – Edit Field #
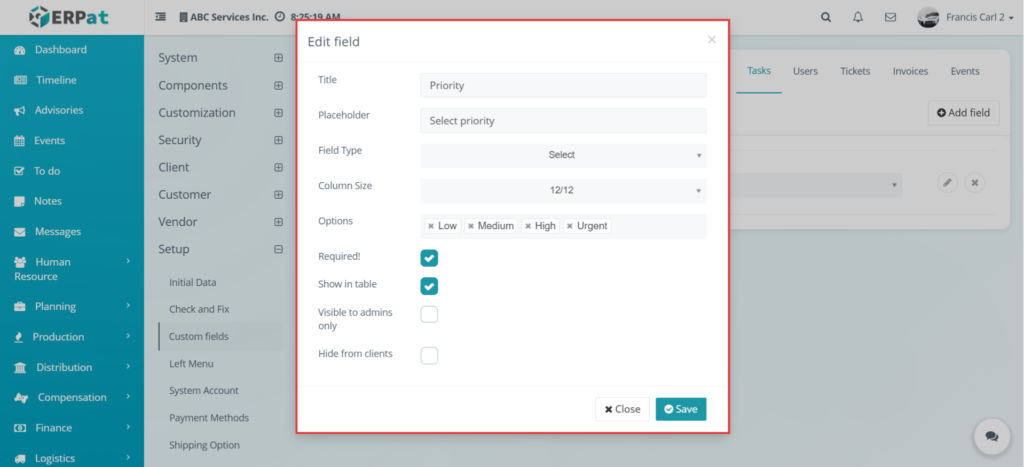
This form is used to update an existing task custom field. The administrator edits the field details and saves the changes. This page is used when an existing task field needs to be revised.
Setup – Custom Fields – Tasks – Delete Field #
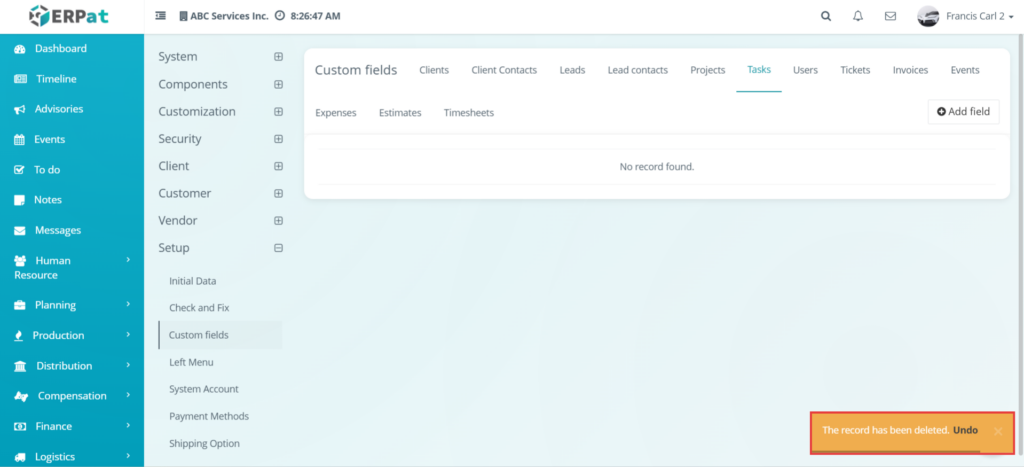
This action is used to remove a custom field from the Tasks section. The delete behavior is the same as the delete action shown in Clients custom fields, where the user can undo the action or close the popup. This is used when a task field is no longer needed.
Setup – Custom Fields – Users #
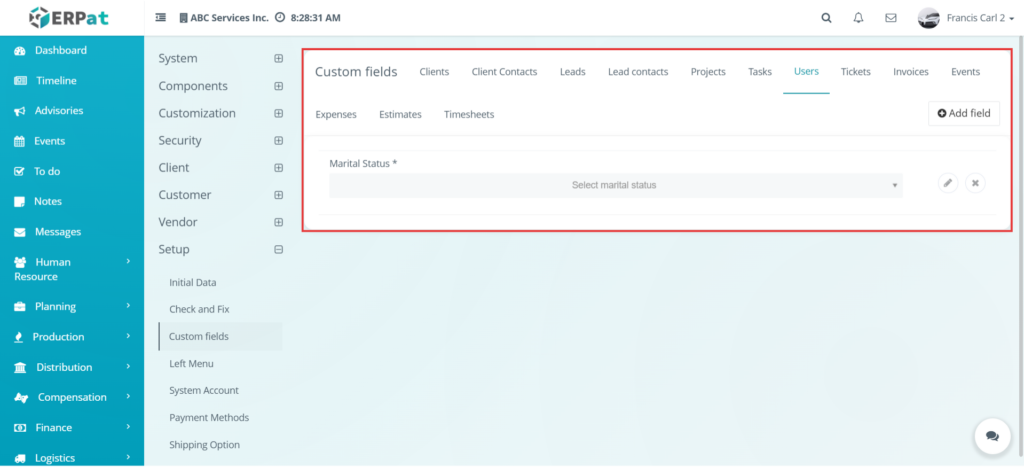
This page is used to create and manage custom fields for Users. When the user opens Settings > Setup > Custom fields > Users, the system displays the custom field list for the User section. Based on your note, fields created here will appear in My Profile > General Info > Other Information. This page is used when the administrator wants to add extra user profile fields.
Setup – Custom Fields – Users – Add Field #
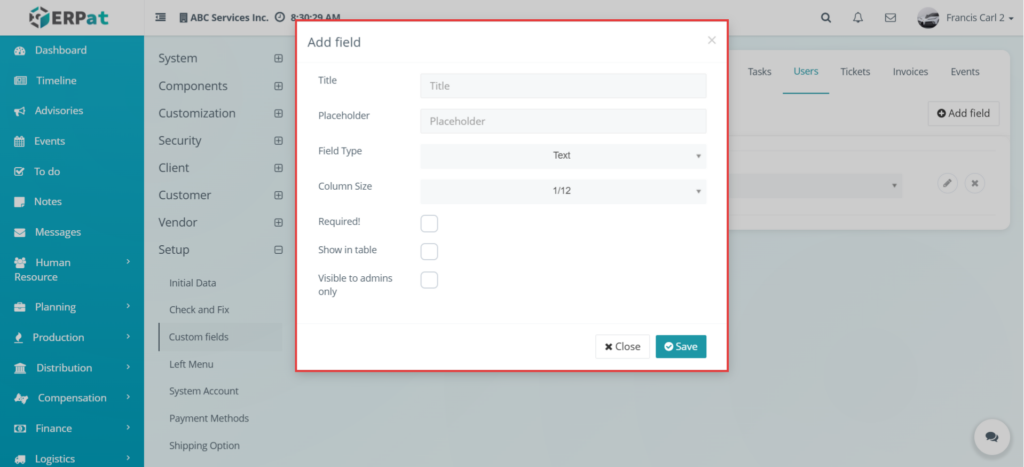
This form is used to add a new user custom field. The user enters the field information and saves it. This page is used when the administrator wants to create additional fields that will appear in the user profile information area.
Setup – Custom Fields – Users – Edit Field #
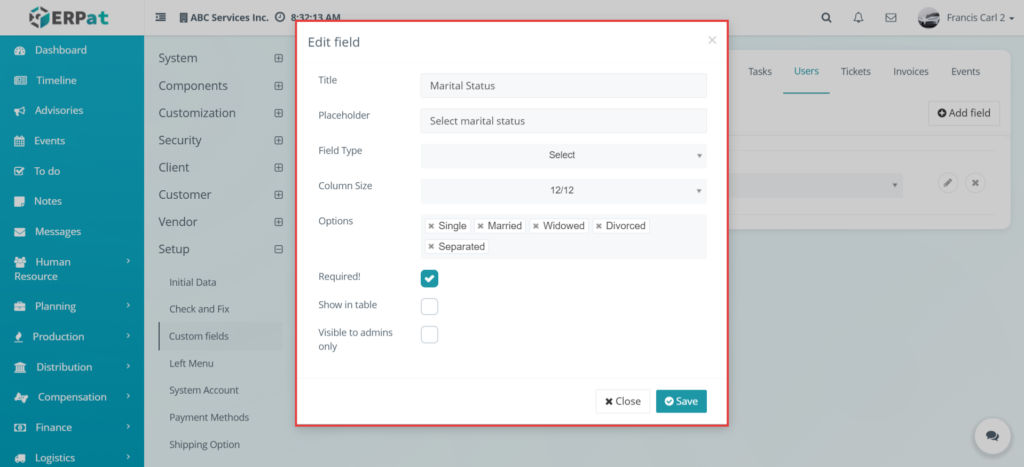
This form is used to update an existing user custom field. The administrator edits the field information and saves the changes. This is used when a user profile field must be revised.
Setup – Custom Fields – Users – Delete Field #
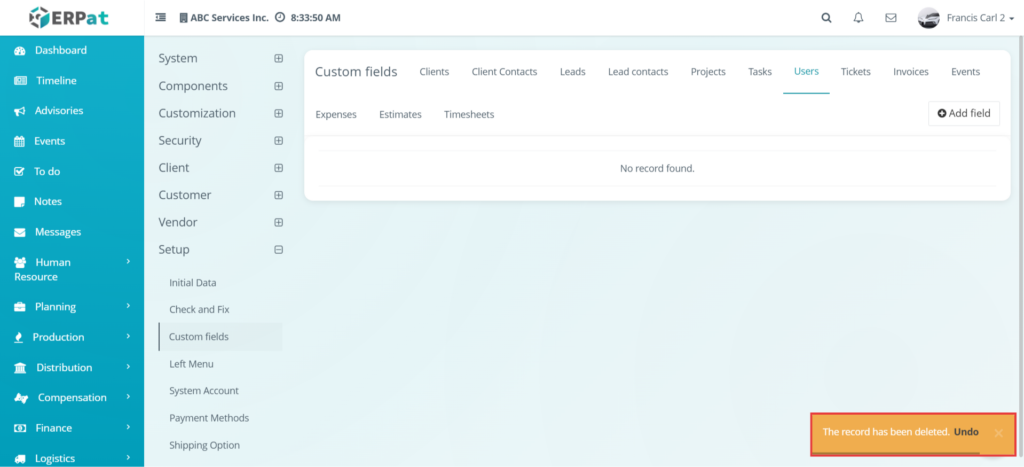
This action is used to delete a custom field from the Users section. The delete behavior is the same as the delete action shown in Clients custom fields, where the system displays a popup that can be undone or closed. This is used when the administrator wants to remove an unused user custom field.
Setup – Custom Fields – Tickets #
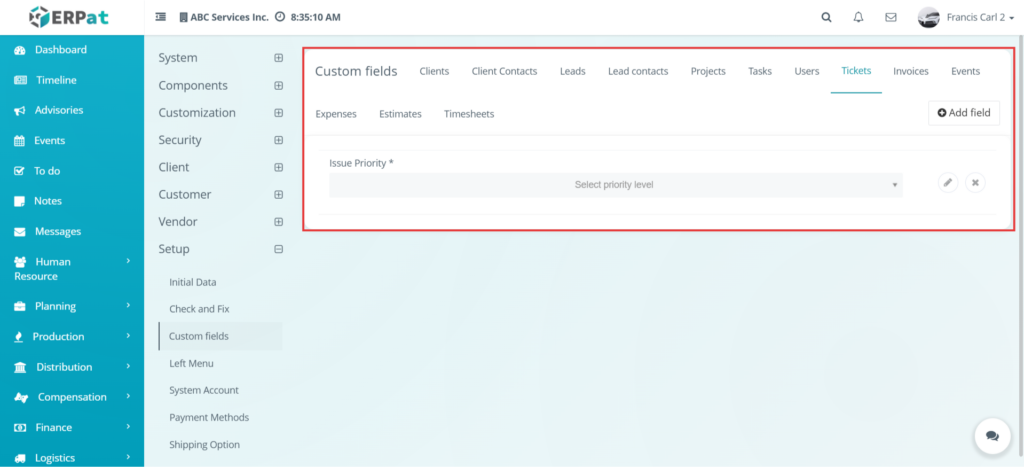
This page is used to create and manage custom fields for Tickets. When the user opens Settings > Setup > Custom fields > Tickets, the system displays the custom field list for ticket records. Based on your note, fields added here will appear in Help Center > Tickets and Help Center > Tickets > Add ticket. This page is used when the administrator wants to extend the ticket form with additional input fields.
Setup – Custom Fields – Tickets – Add Field #
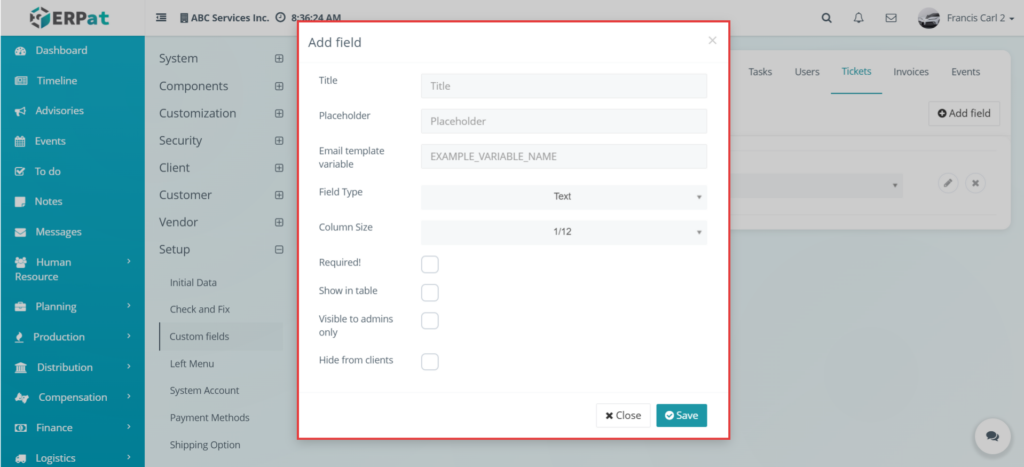
This form is used to add a new custom field for Tickets. The user enters the field details and saves the new field. This page is used when the administrator wants to create ticket-specific additional inputs.
Setup – Custom Fields – Tickets – Edit Field #
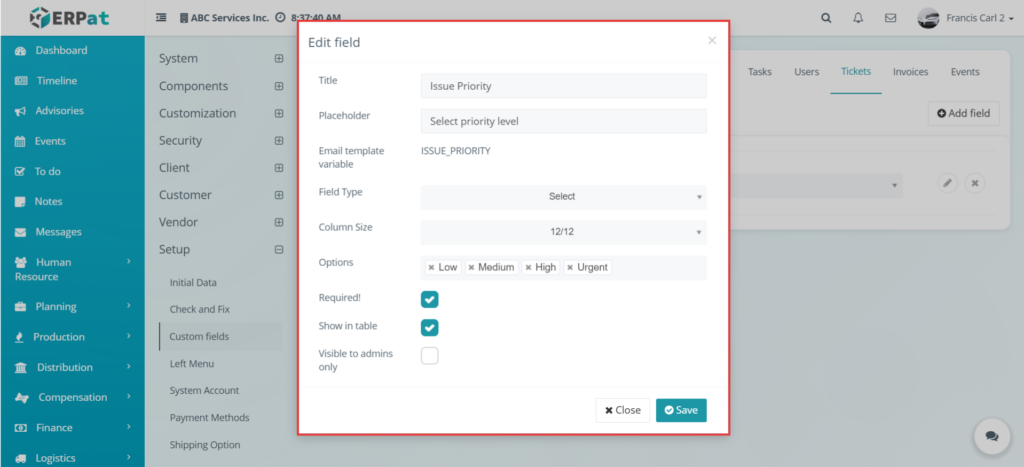
This form is used to update an existing ticket custom field. The administrator edits the field settings and saves the changes. This page is used when an existing custom ticket field needs to be modified.
Setup – Custom Fields – Tickets – Delete Field #
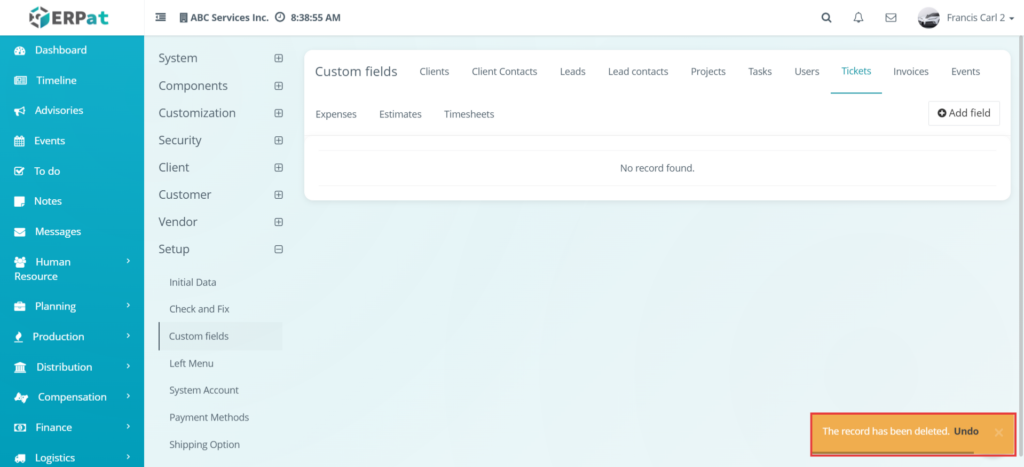
This action is used to delete a custom field from the Tickets section. The delete behavior is the same as the Clients custom field delete action, where the system shows a popup and the user may undo the action or close it. This is used when an unwanted ticket field must be removed.
Setup – Custom Fields – Invoices #
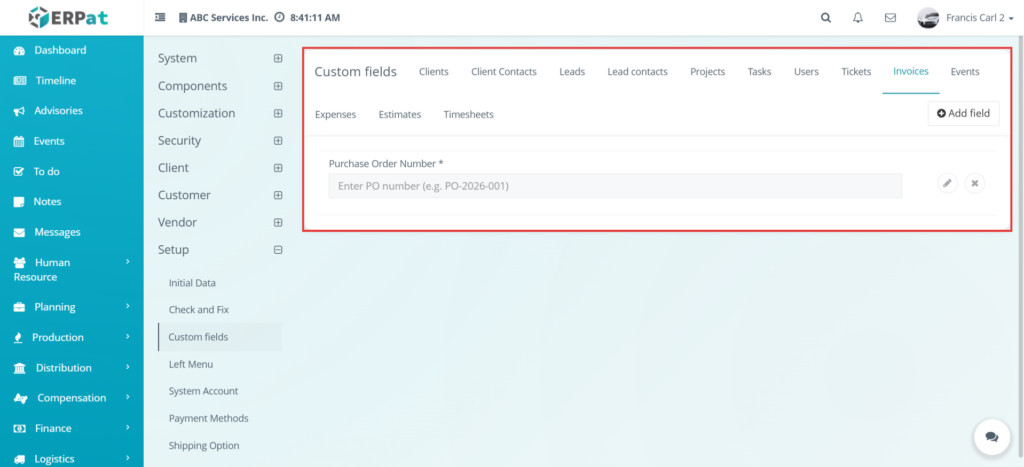
This page is used to create and manage custom fields for Invoices. When the user opens Settings > Setup > Custom fields > Invoices, the system displays the field list for invoices. Based on your note, fields created here will appear in Sales > Invoices and Sales > Invoices > Add invoice. This page is used when the administrator wants to extend invoice forms with additional input fields.
Setup – Custom Fields – Invoices – Add Field #
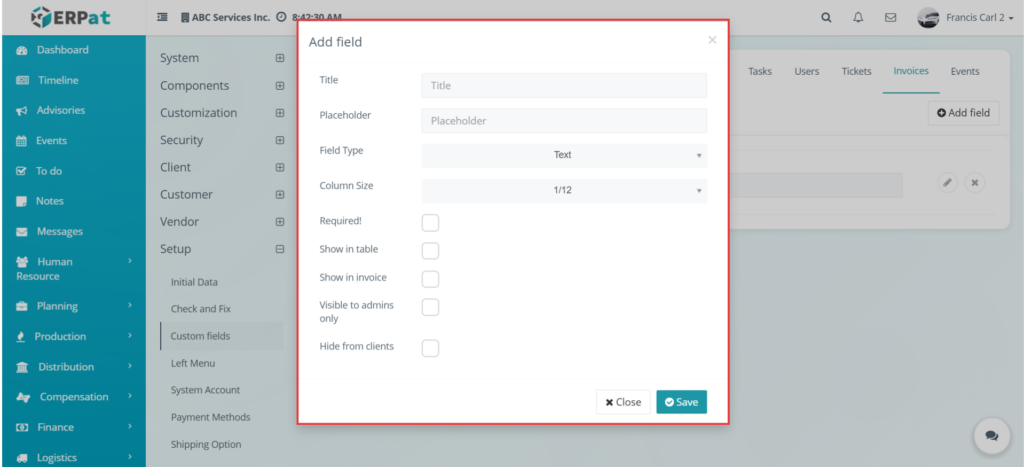
This form is used to add a new custom field for invoices. The user fills in the field information and saves it. This page is used when the administrator wants to add extra invoice-related fields in the system.
Setup – Custom Fields – Invoices – Edit Field #
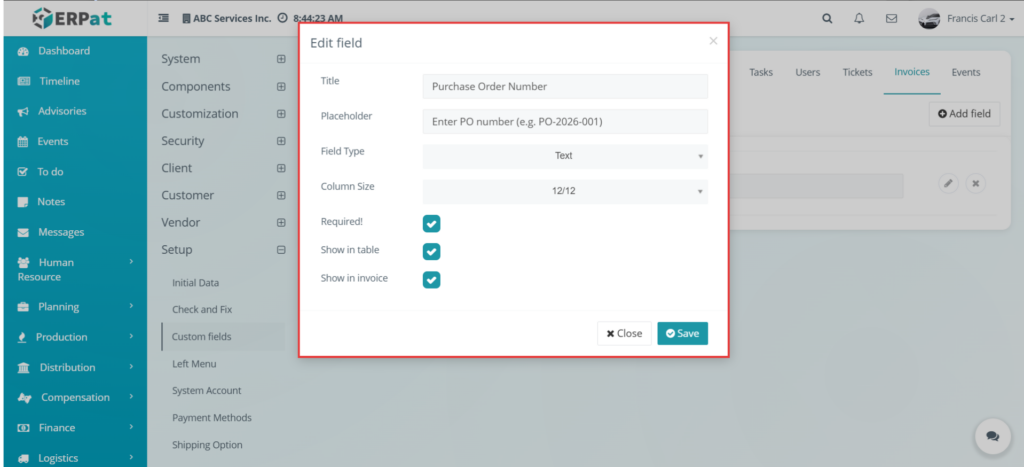
This form is used to edit an existing invoice custom field. The administrator updates the field details and saves the changes. This is used when an already created invoice field must be revised.
Setup – Custom Fields – Invoices – Delete Field #
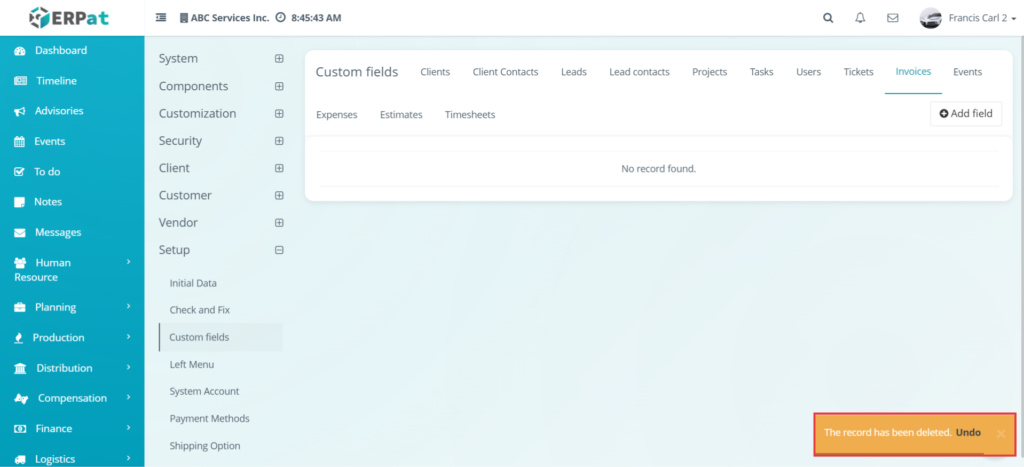
This action is used to delete a custom field from the Invoices section. The delete behavior is the same as the Clients custom field delete action, where the system shows a popup and the user may undo the action or close it. This page is used when an invoice field is no longer needed.
Setup – Custom Fields – Events #
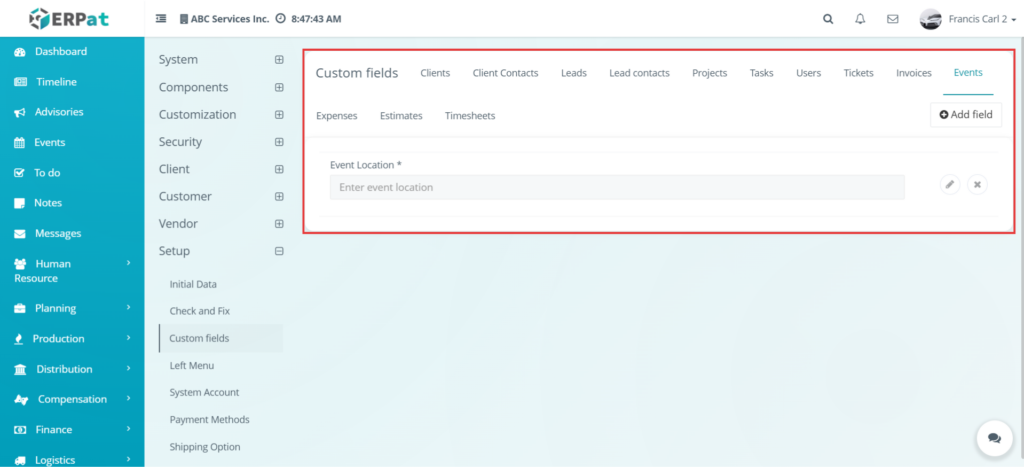
This page is used to create and manage custom fields for Events. When the user opens Settings > Setup > Custom fields > Events, the system displays the custom field list for event records. Based on your note, fields created here will appear in Event > Entries tab > Click any event title and Event > Entries tab > Add event. This page is used when the administrator wants to add additional input fields for event records.
Setup – Custom Fields – Events – Add Field #
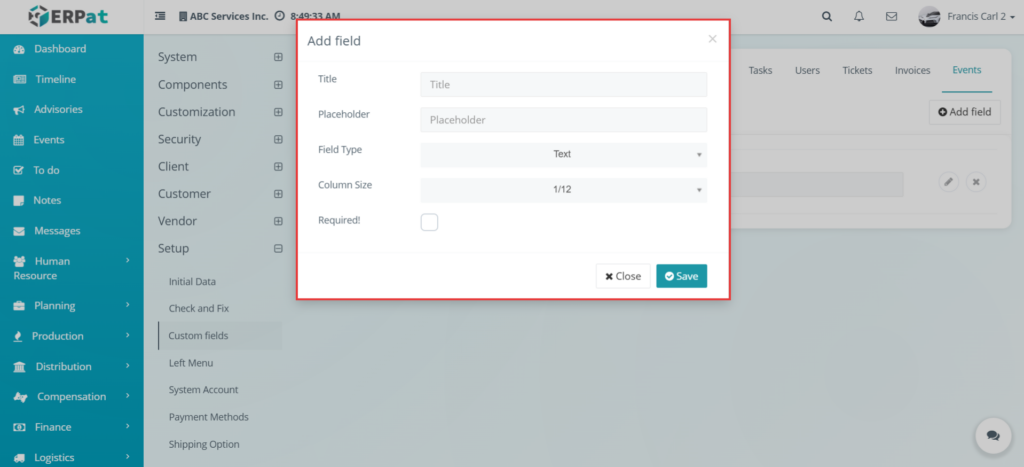
This form is used to add a new custom field for Events. The user enters the field information and saves the new field. This page is used when the administrator wants to extend event forms with more inputs.
Setup – Custom Fields – Events – Edit Field #
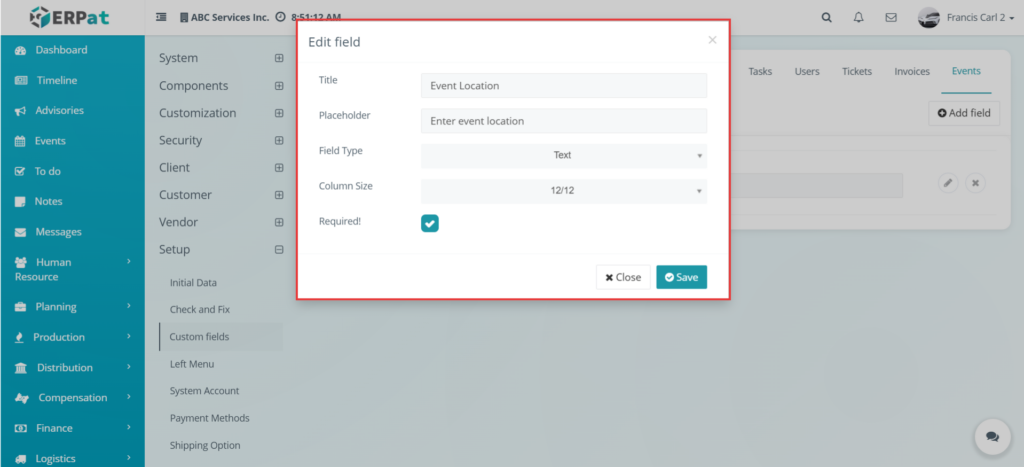
This form is used to update an existing event custom field. The administrator edits the field configuration and saves the changes. This page is used when an existing event field needs to be modified.
Setup – Custom Fields – Events – Delete Field #
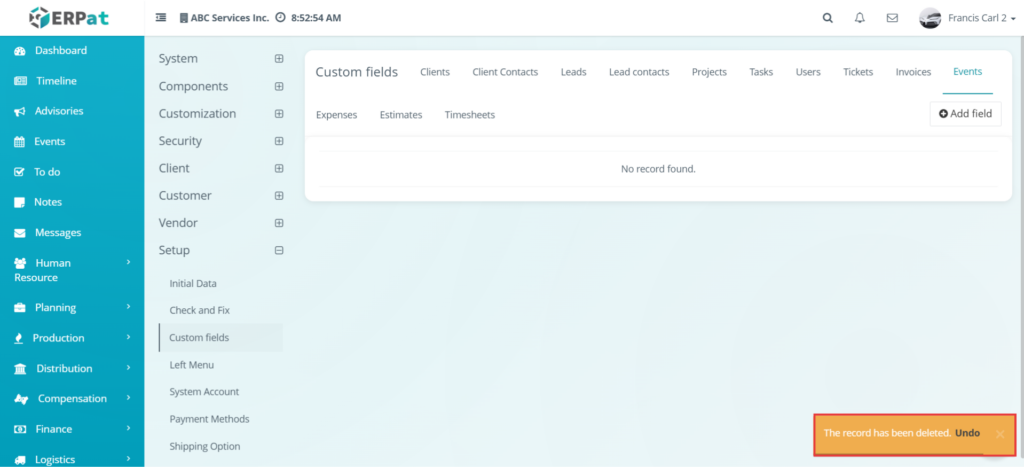
This action is used to delete a custom field from the Events section. The delete behavior is the same as the Clients custom field delete action, where the system shows a popup that can be undone or closed. This is used when an unwanted event field must be removed.
Setup – Left Menu #
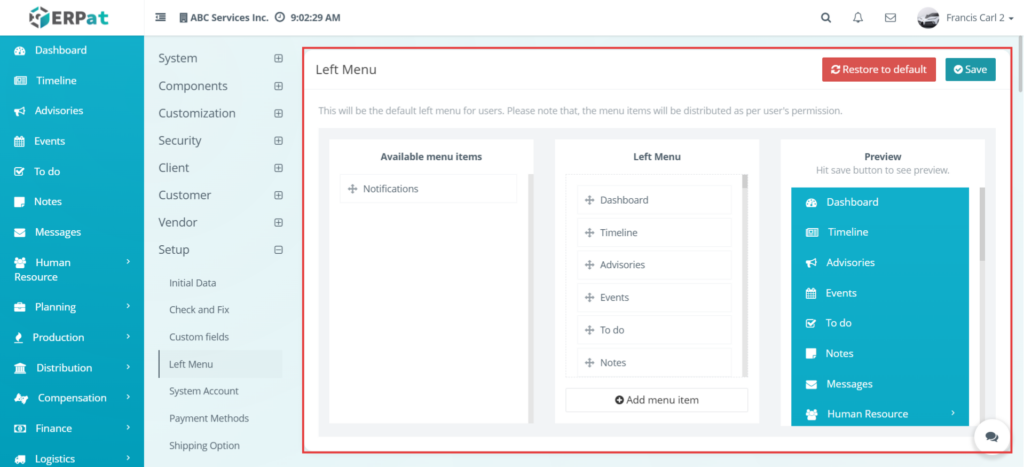
This page is used to configure the left-side navigation menu shown in the system. When the user opens Settings > Setup > Left Menu, the system displays three main areas: Available menu items, Left Menu, and Preview. This page is used when the administrator wants to control which items appear in the menu, how they are arranged, and how they will look when displayed. Based on your note, this page should also explain the Restore to default and Save buttons. The Restore to default button is used to return the menu configuration to its original default state, while the Save button is used to apply the current arrangement and settings.
The Available menu items section shows the items that can be added into the left menu. The Left Menu section shows the current configured menu structure. The Preview section allows the user to visually check how the final menu will appear after saving. This page is used when the administrator wants to organize or customize the menu navigation of the system.
Setup – Left Menu – Add Menu Item #
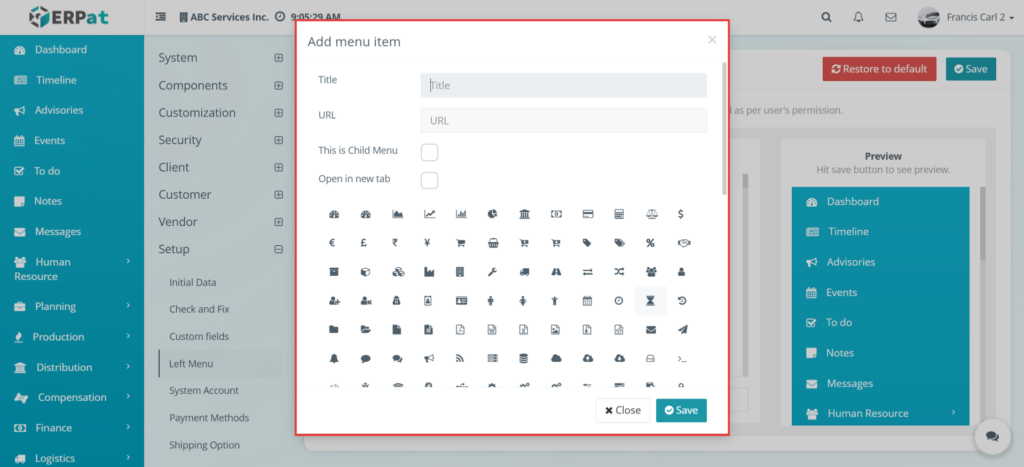
This form is used to add a new menu item into the left navigation menu. When the user clicks Add Menu Item, the system opens a modal where the user can enter the Title and URL of the menu item. The user can also choose whether This is Child Menu and whether the menu item should Open in new tab. Based on your note, the system also allows the user to choose an icon for the menu item from the icon list shown in the form. This page is used when the administrator wants to insert a custom navigation entry into the left menu. After entering the needed information, the user clicks Save to add the new menu item.Setup – System AccountThis form is used to add a new menu item into the left navigation menu. When the user clicks Add Menu Item, the system opens a modal where the user can enter the Title and URL of the menu item. The user can also choose whether This is Child Menu and whether the menu item should Open in new tab. Based on your note, the system also allows the user to choose an icon for the menu item from the icon list shown in the form. This page is used when the administrator wants to insert a custom navigation entry into the left menu. After entering the needed information, the user clicks Save to add the new menu item.
Setup – System Account #
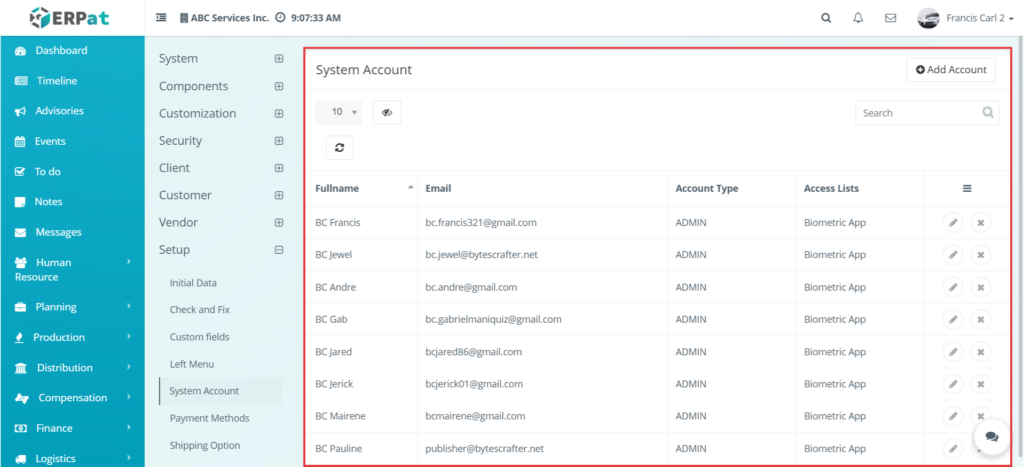
This page is used to manage system account records. When the user opens Settings > Setup > System Account, the system displays the list of available accounts along with their details. This page is used when the administrator wants to review, add, edit, or delete accounts used for administrative or system-level access.
Setup – System Account – Add Account #
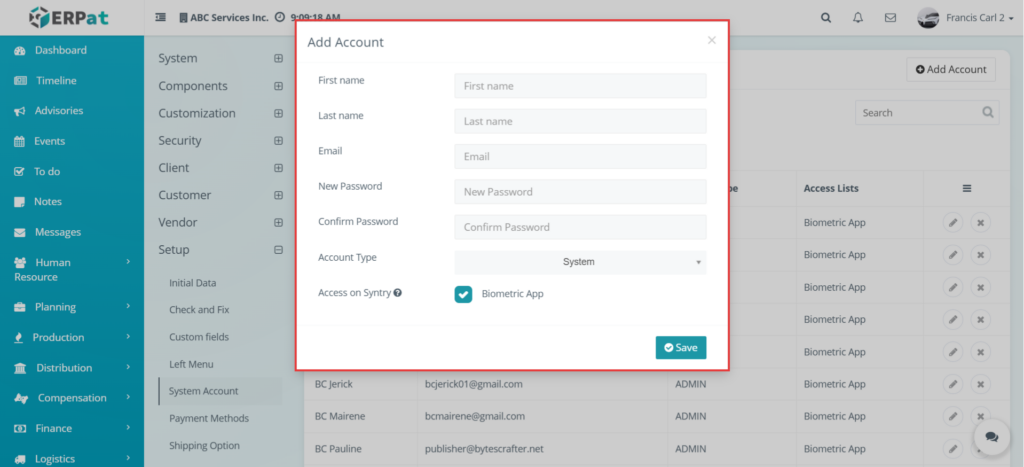
This form is used to create a new system account. When the user clicks Add Account, the system opens a form where the administrator can enter the account details. Based on your note, the Account Type choices are System and Admin. The Access on Syntry option means that biometric access is enabled for that account. This page is used when the administrator wants to create a new account that can access the system. After completing the required details, the user clicks Save.
Setup – System Account – Edit Account #
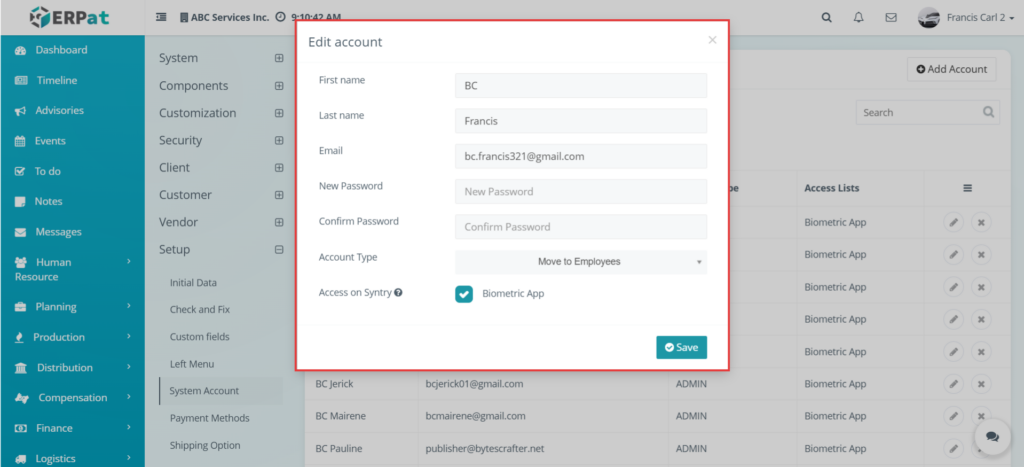
This form is used to edit an existing system account. When the user clicks the edit button, the system opens the account form with the current values already filled in. Based on your note, the Account Type choices in edit mode include System, Admin, and Move to Employees. This page is used when the administrator wants to update account information or reclassify the account type. After making the needed changes, the user clicks Save.
Setup – System Account – Delete #
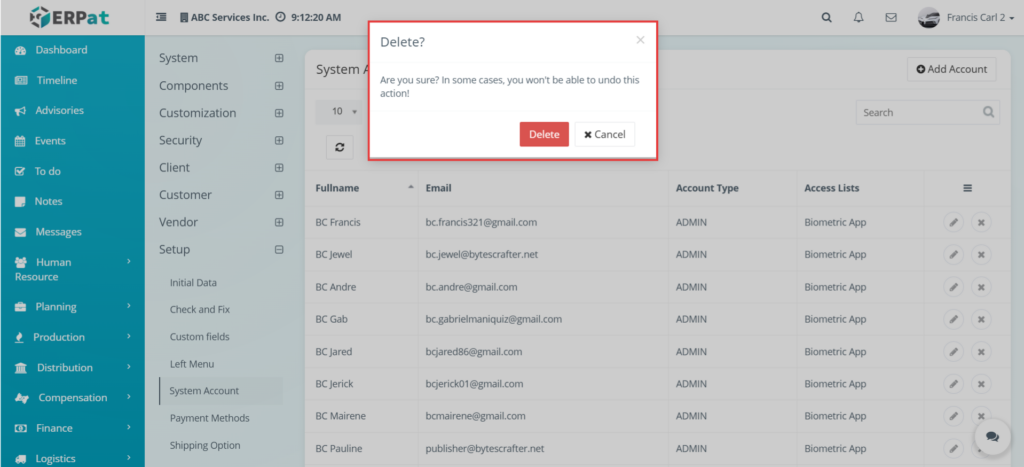
This action is used to delete a system account. When the user clicks the delete option, the system displays a confirmation popup asking whether the record should be removed. This page is used when the administrator wants to permanently remove an account from the system. The user confirms the action using the delete button or cancels it if no changes should be made.
Setup – Payment Methods #
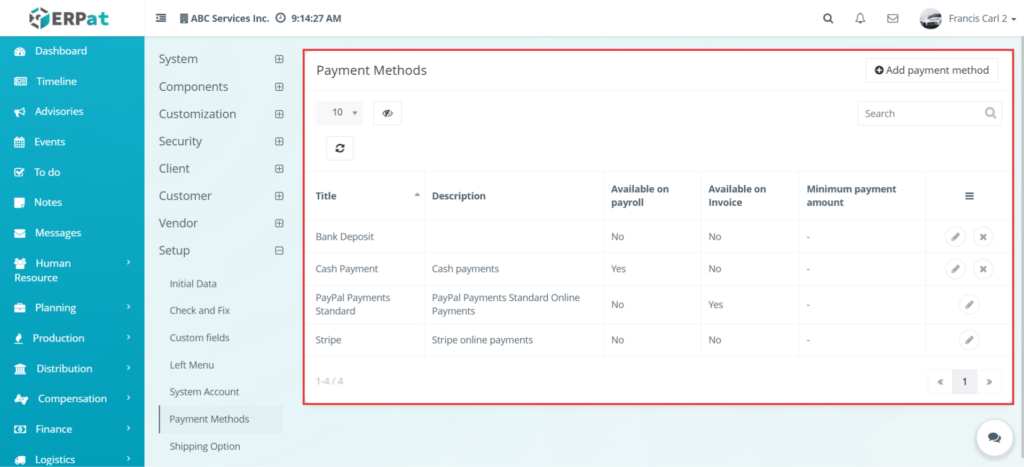
This page is used to manage available payment methods in the system. When the user opens Settings > Setup > Payment Methods, the system displays a list of existing payment method records, including their name, description, and usage settings. This page is used when the administrator wants to review, add, edit, or remove payment methods that can be used in transactions.
Setup – Payment Methods – Add Payment Method #
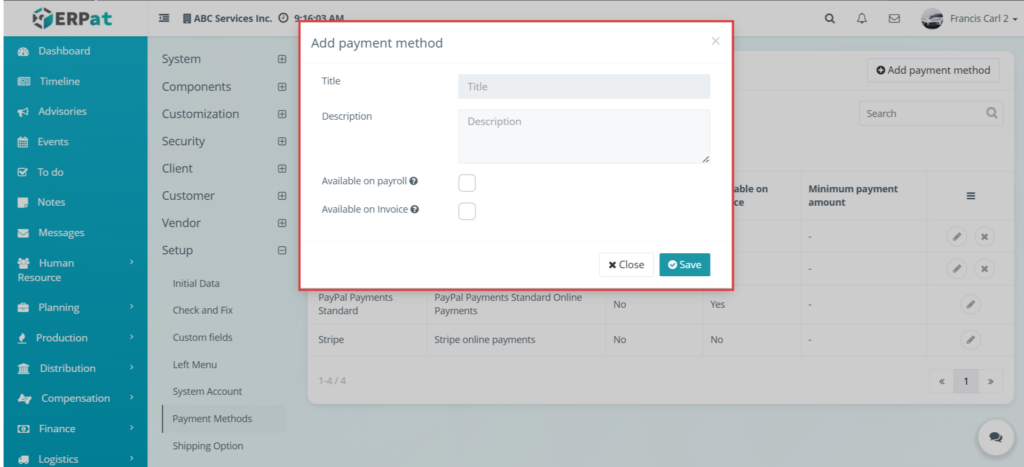
This form is used to create a new payment method. When the user clicks Add payment method, the system opens a form where the administrator can enter the name and description of the payment method. Based on your note, the Available on payroll option means the payment method will appear in the payroll modal dropdown list, while Available on Invoice means the payment method will be displayed in client invoices. This page is used when the administrator wants to add a new payment option for payroll or invoice transactions. After entering the details, the user clicks Save.
Setup – Payment Methods – Edit Payment Method #
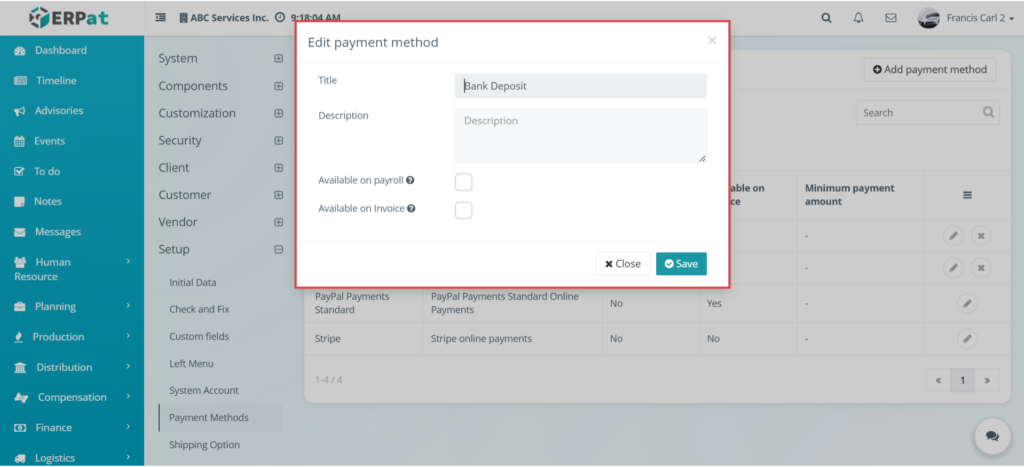
This form is used to update an existing payment method. When the user clicks the edit button, the system opens the payment method form with the current record details. The administrator can revise the title, description, and availability settings, then click Save to apply the changes. Based on your note, the meaning of Available on payroll and Available on Invoice remains the same in edit mode.
Setup – Payment Methods – Delete Payment Method #
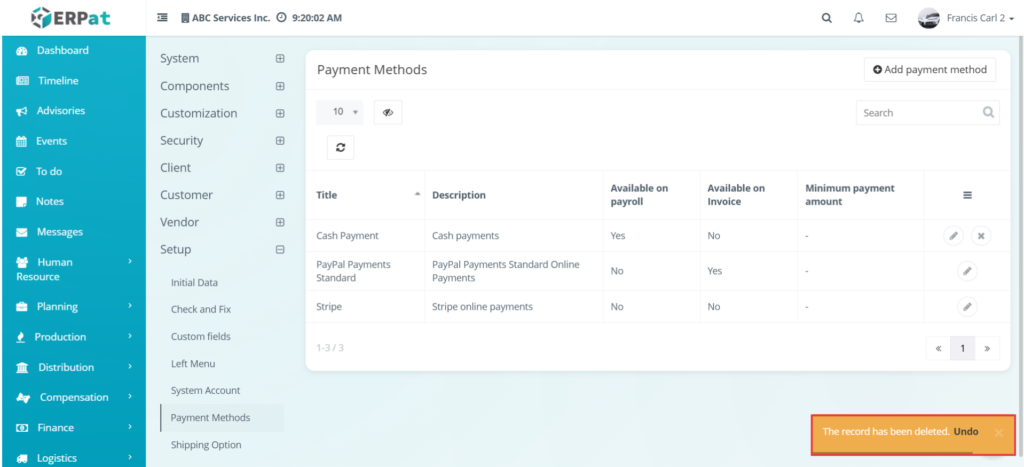
This action is used to delete a payment method from the system. Based on your note, when the user clicks delete, the system displays a popup notification where the user may undo the deletion or close the popup. This page is used when the administrator wants to remove a payment method that is no longer needed.
Setup – Shipping Option #
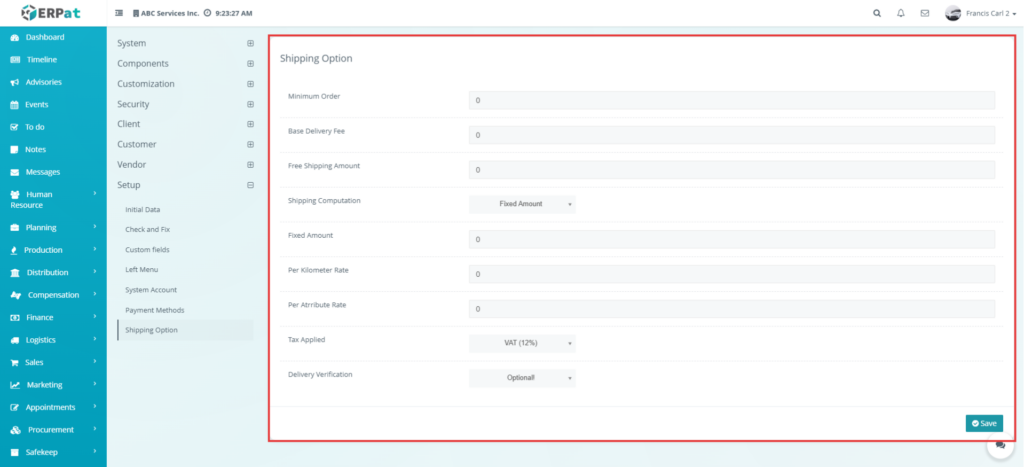
This page is used to configure shipping-related options in the system. When the user opens Settings > Setup > Shipping Option, the system displays fields used to define how shipping charges and delivery rules are applied. Based on your note, the Shipping Computation choices are Fixed Amount, Based on Distance, and Based on Package Attributes. The Tax Applied choices include VAT (12%), and the Delivery Verification choices are Optional, Yes, and No. This page is used when the administrator wants to set how shipping costs are computed and how delivery verification should behave in the system. After entering the values, the user clicks Save to apply the shipping setup.
Permissions and Access Control #
This module is restricted to authorized users to ensure data security and proper system configuration
Only system administrators or authorized users can access and modify setup records and settings
Users without proper permissions are not allowed to change setup data, custom fields, system accounts, payment methods, or shipping configuration
Access to this module is controlled through system roles and permissions
Best Practices #
Review all setup options carefully before applying changes
Use preset initial data only when it matches the organization’s actual setup
Test reflected changes after adding custom fields to make sure they appear in the correct pages
Double-check account, payment, and shipping settings before saving
Use delete actions carefully and restore records immediately if a mistake happens
Limit setup access to authorized administrators only
Audit & Logs #
The system records all activities performed within the module, including setting up initial data, updating records, adding custom fields, editing system accounts, and changing payment or shipping options
Each action is logged with details such as the user, date, and type of change
Last Updated: [April 22, 2025] Module Owner: Setting IS – ERPat System


