Overview #
The Banks Module serves as a centralized repository for managing the company’s financial accounts and banking information. It is designed to categorize and track every bank account entry, providing clear visibility into account numbers, branch locations, and ownership within the Finance department.
By organizing bank data into a structured format, this module ensures that financial assets are easily searchable and verifiable, facilitating better coordination of treasury operations, payroll funding, and financial reporting.
Key Features #
- Centralized Account Management: Maintain detailed records for every bank account, including bank names and unique account numbers.
- Multi-Currency Support: Track accounts based on their specific monetary units (e.g., PHP) to ensure accurate fiscal management.
- Audit Traceability: Monitor the lifecycle of each account with integrated timestamps for creation and the most recent updates.
- Data Export: Download the entire bank account list directly to Excel for external auditing or bank reconciliation purposes.
- Account Ownership Tracking: Identify the specific user responsible for adding or modifying bank records within the system.
Accessing the Banks Module #
- Log in to the system.
- Navigate to Finance from the main sidebar.
- Select Banks.
- By default, you will be directed to the Entries tab, displaying the main bank listing page.
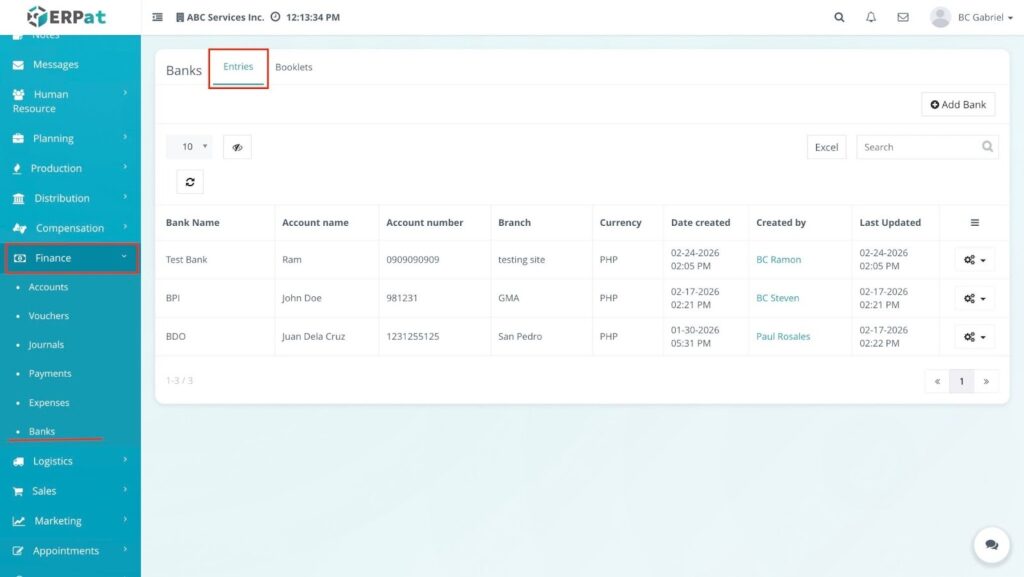
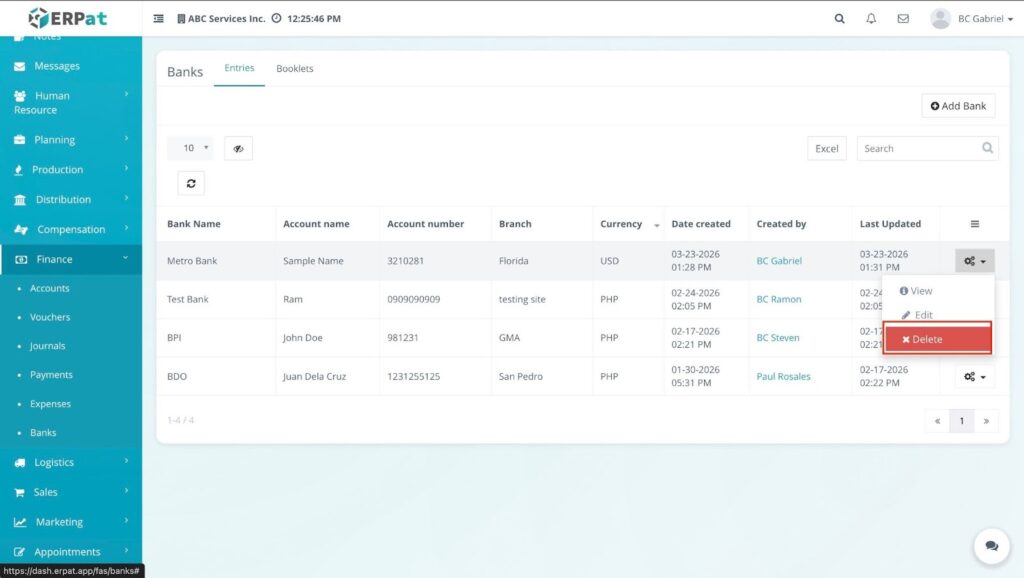
Banks Listing Page #
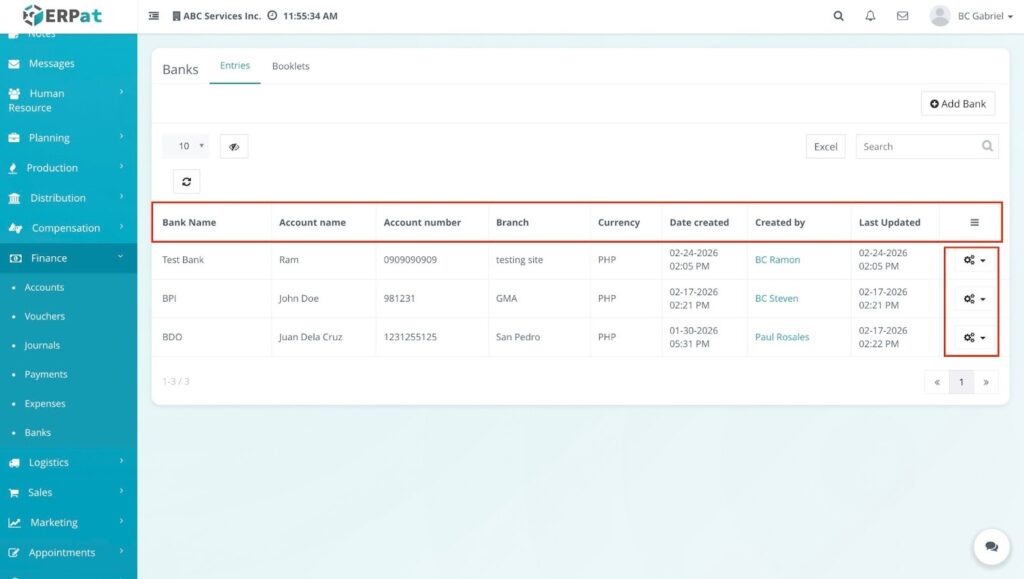
The listing page provides a comprehensive view of all registered financial accounts with the following information:
- Bank Name – The official name of the financial institution.
- Account Name – The specific name assigned to the account (e.g., Company Name or Individual Name).
- Account Number – The unique numerical identifier for the bank account.
- Branch – The physical location or specific branch where the account is maintained.
- Currency – The monetary unit used for the account (e.g., PHP).
- Date Created / Last Updated – Automated timestamps indicating when the record was first entered and its most recent modification.
- Created by – The name of the authorized user who added the bank entry to the system.
Actions – Quick controls for managing records via the Gear (⚙️) icon:
- View – Open a read-only detailed view of the bank account’s full profile and configuration.
- Edit – Modify account details, branch information, or status settings.
- Delete – Remove the bank entry from the active database records.
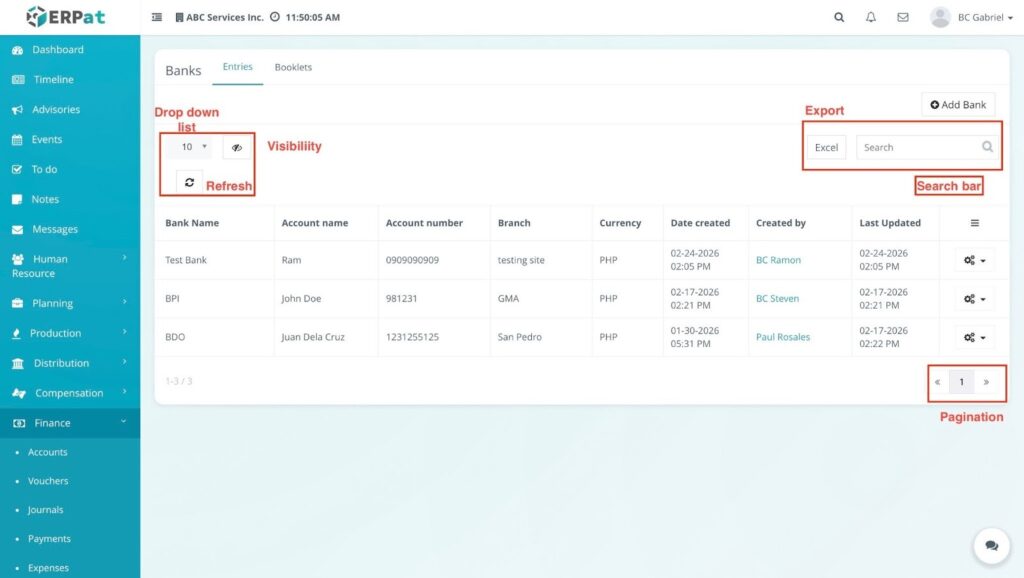
Additional Controls #
Search bar: Real-time lookup by Bank Name, Account Name, or Account Number.
Export (Excel): Download the current list view as a spreadsheet for offline reporting.
Visibility (👁️ icon): Toggle specific columns to customize your table view based on your current needs.
Refresh (🔄 icon): Reload the table to reflect the most recent data updates from the database.
Record Count Dropdown: Choose how many records to display per page (e.g., 10, 25, 50, 100).
Pagination: Use the arrow controls at the bottom right to navigate through the bank account database.
Steps to Add Bank #
- Access the Module – Navigate to the Finance module and select Banks.
- Locate Entries – Click the Entries tab to view the current bank listing page.
- Initiate Addition – Click the + Add Bank button located at the top right of the page.
- Input Details – Fill in the following required fields in the pop-up modal:
- Bank Name (e.g., Metro Bank).
- Account Name (e.g., Sample Name).
- Account Number (e.g., 3210281).
- Branch (e.g., Muntinlupa).
- Currency (Select from the dropdown menu).
- Save Entry – Click the Save button.
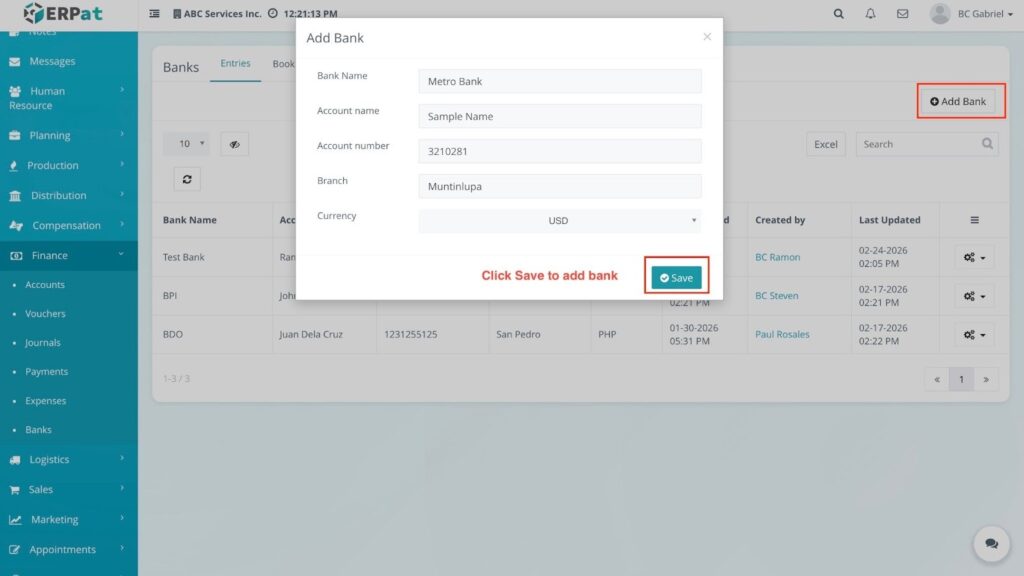
RESULT: #
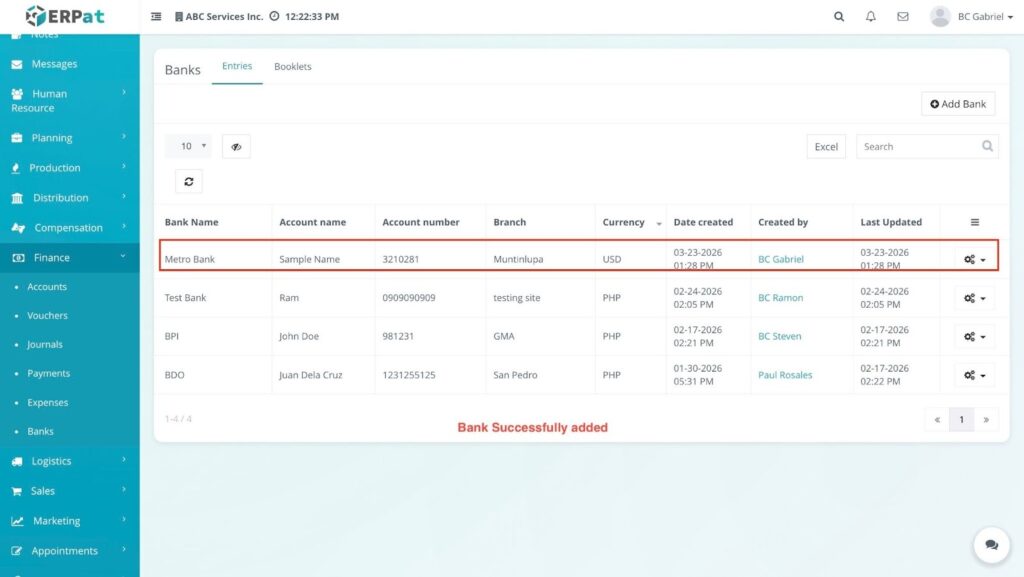
The modal closes and the new account appears immediately at the top of the listing table.
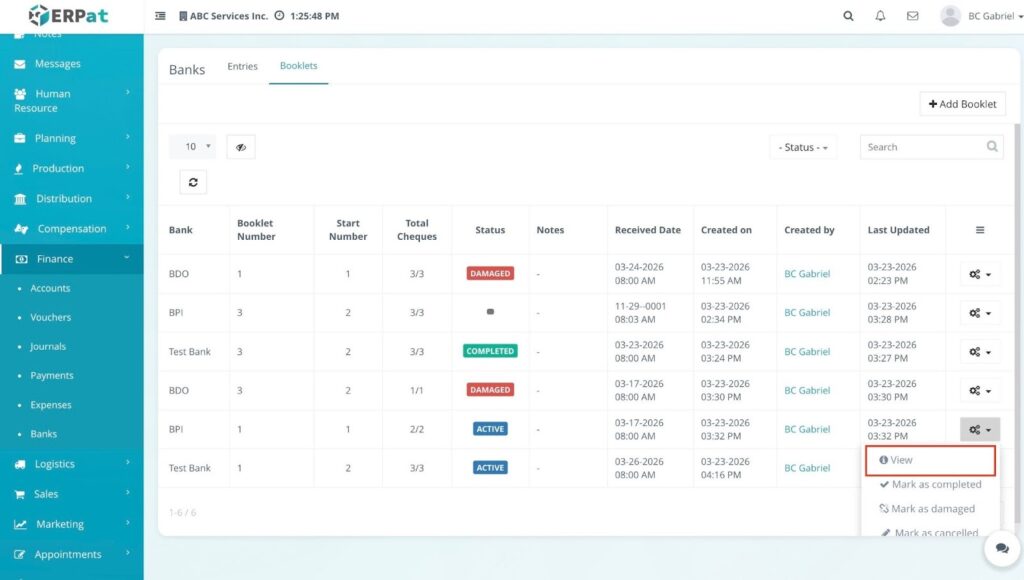
Steps to View Bank Details #
- Select Record – Locate the specific bank entry in the listing table.
- Open Actions – Click the Gear (⚙️) icon under the Actions column for that record.
- Select View – Choose View from the dropdown menu.
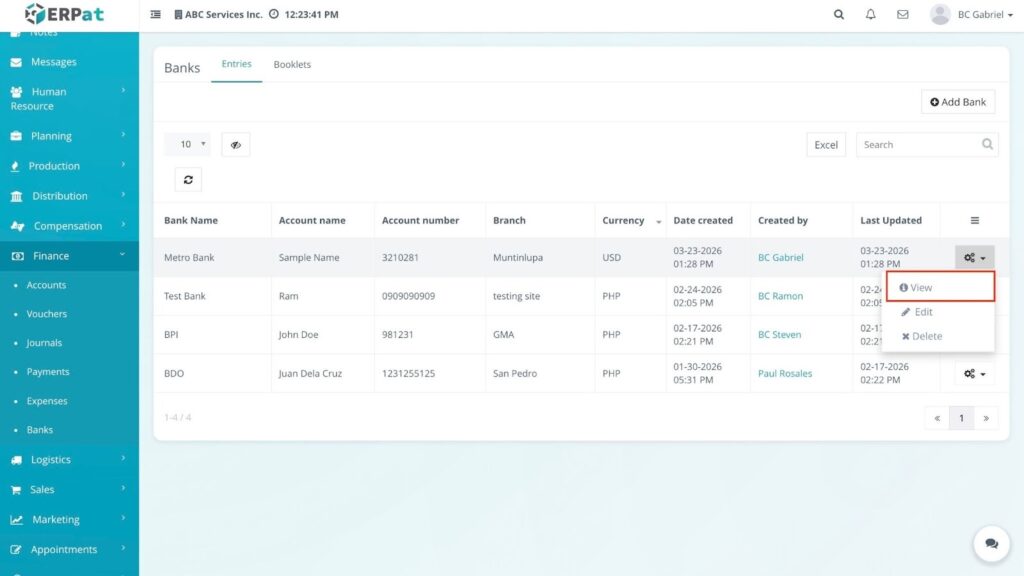
RESULT #
A View Bank modal opens, displaying a read-only summary of the account’s full configuration, identification details, and timestamps.
Steps to Edit Bank #
- Open Edit Modal – Locate the entry you wish to modify and click the Gear (⚙️) icon, then select Edit.
- Update Information – In the Edit Bank modal, update the necessary fields (e.g., updating the Branch location or Account Number).
- Save Changes – Click Save to apply the updates.
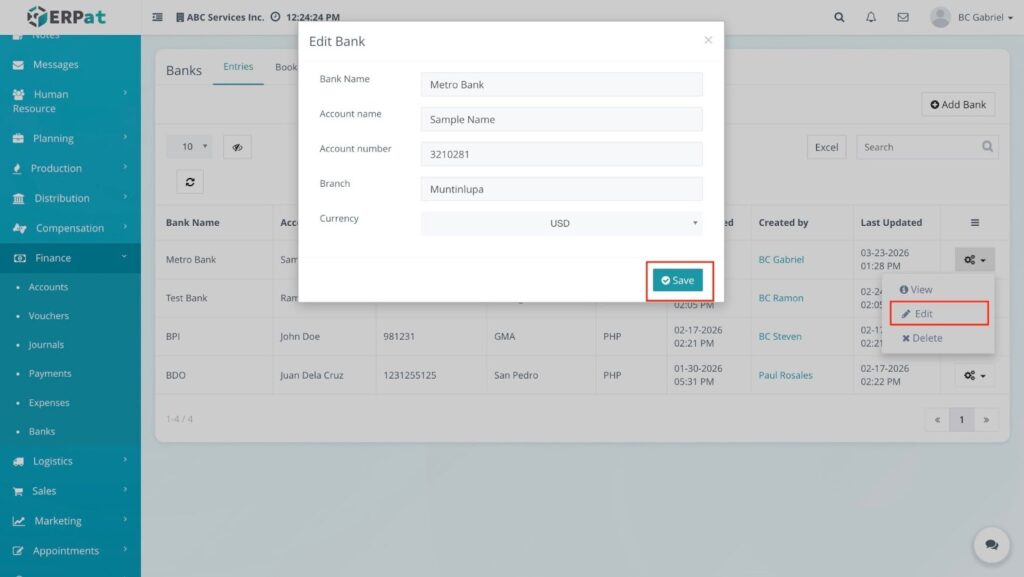
RESULT: #
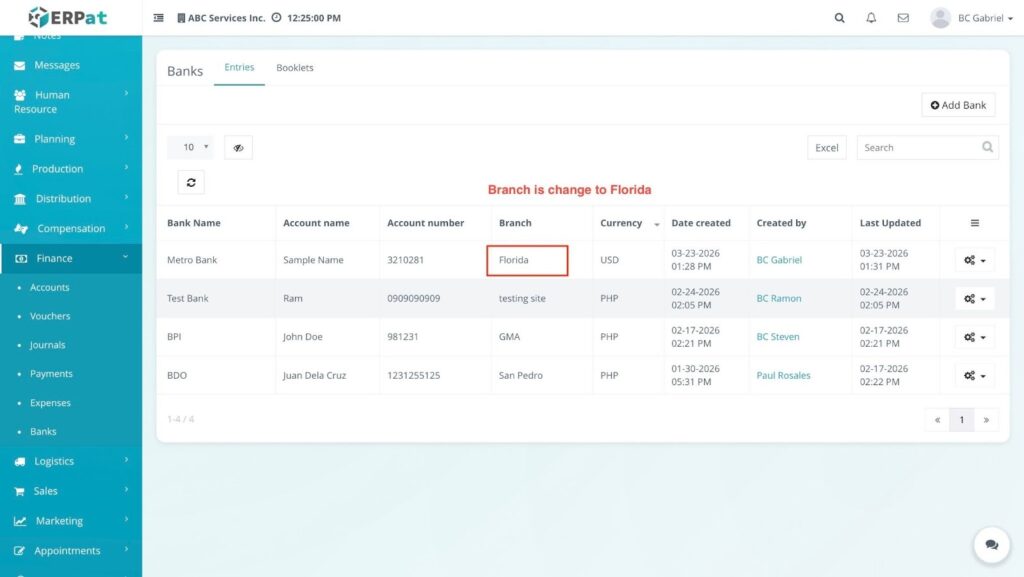
The modal closes and the modified information reflects immediately in the listing table.
Steps to Delete Bank Record #
- Initiate Deletion – Locate the entry to be removed and click the Gear (⚙️) icon.
- Select Delete – Choose Delete from the dropdown menu.
- Confirm Action – Click Delete on the system confirmation prompt.
- Verify Removal – Observe the interface for completion.
RESULT: #

A notification “The record has been deleted” appears at the bottom right, and the specific bank entry is removed from the table.
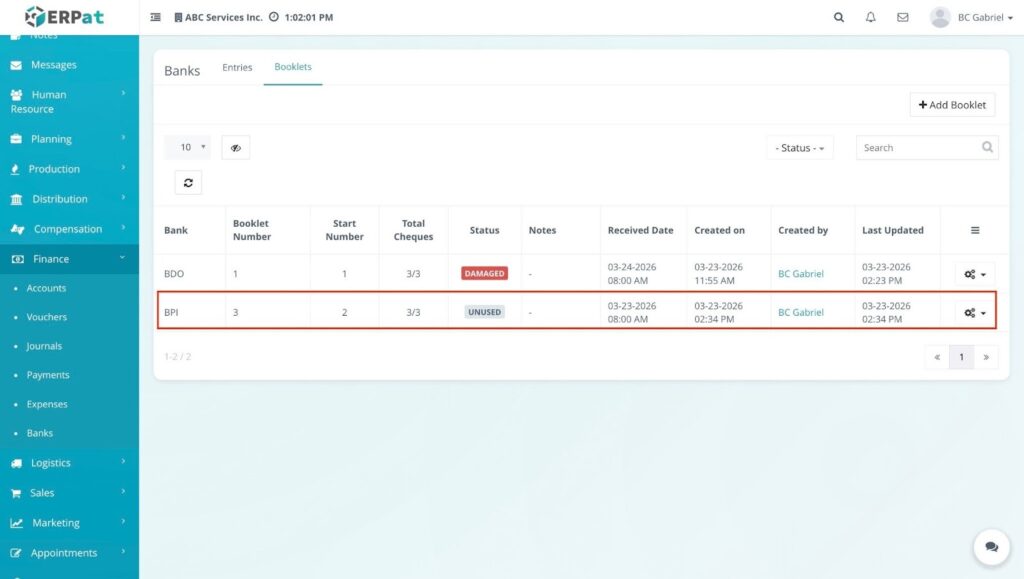
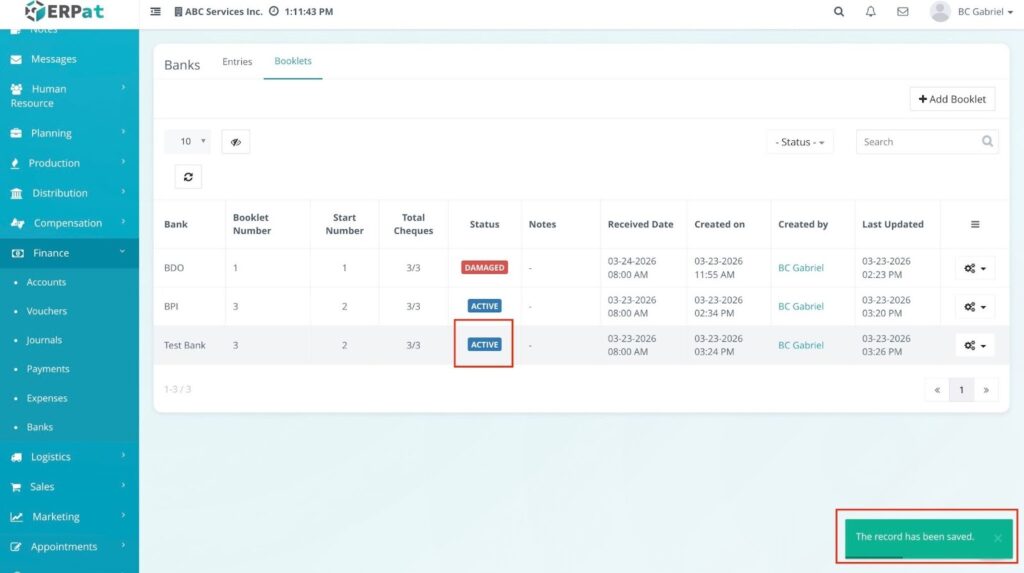
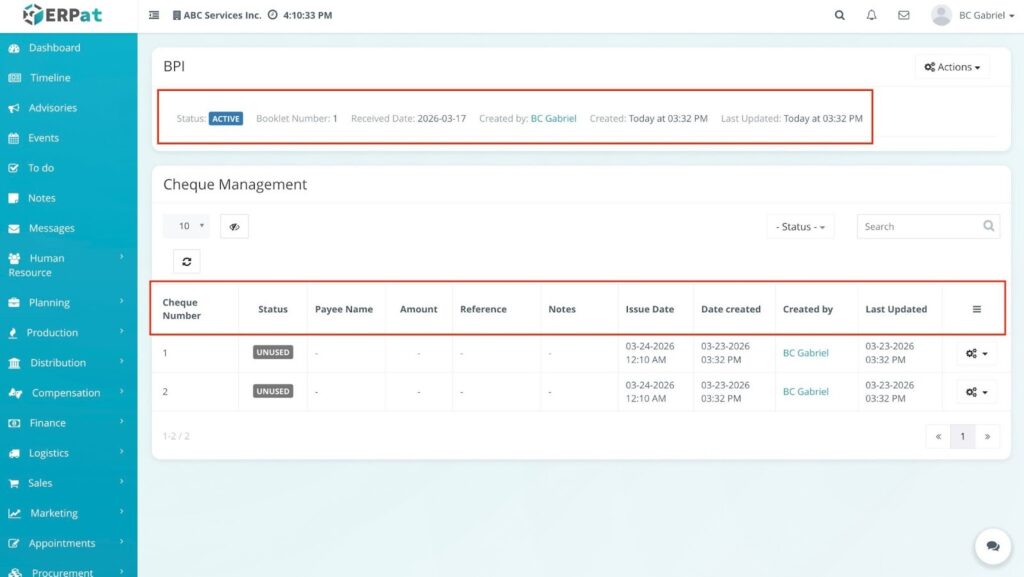
Accessing Booklets #
- Log in to the system.
- Navigate to Finance > Banks.
- Select the Booklets tab.
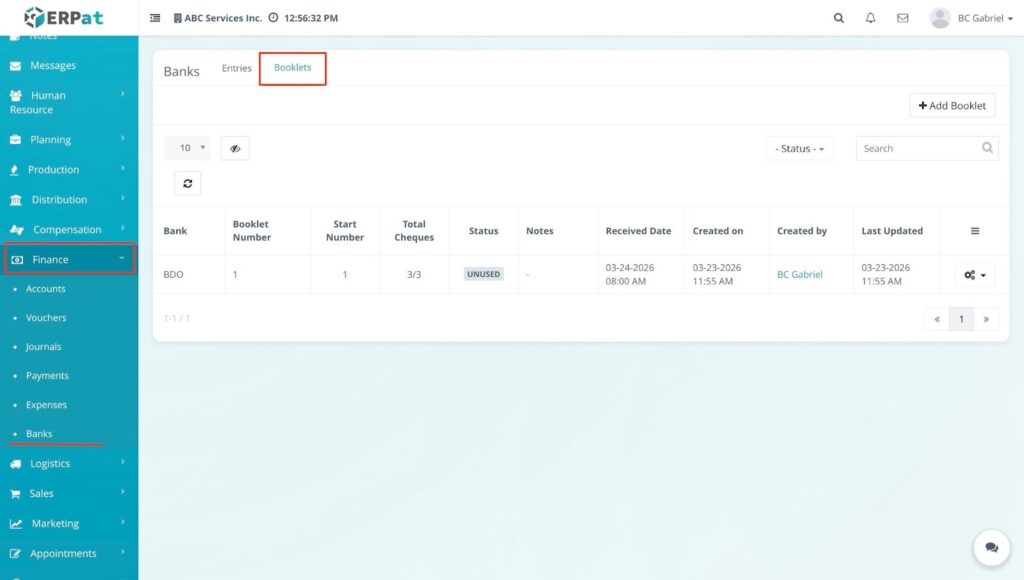
RESULT #
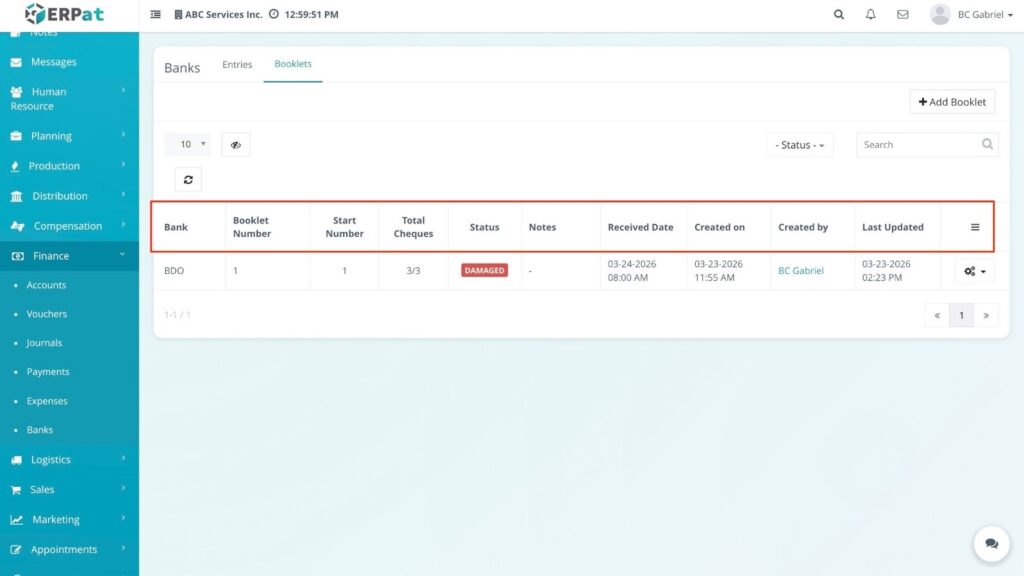
The system displays the Booklets listing page, showing details like Bank Name, Series Start/End, Booklet Type, and current Status.
Steps to Add Booklet #
- Click the + Add Booklet button at the top right.
- Select the appropriate Bank from the dropdown menu.
- Choose the Booklet Type (e.g., Checkbook or Deposit Slip).
- Enter the Series Start, Series End, and Total Pages.
- Click Save.
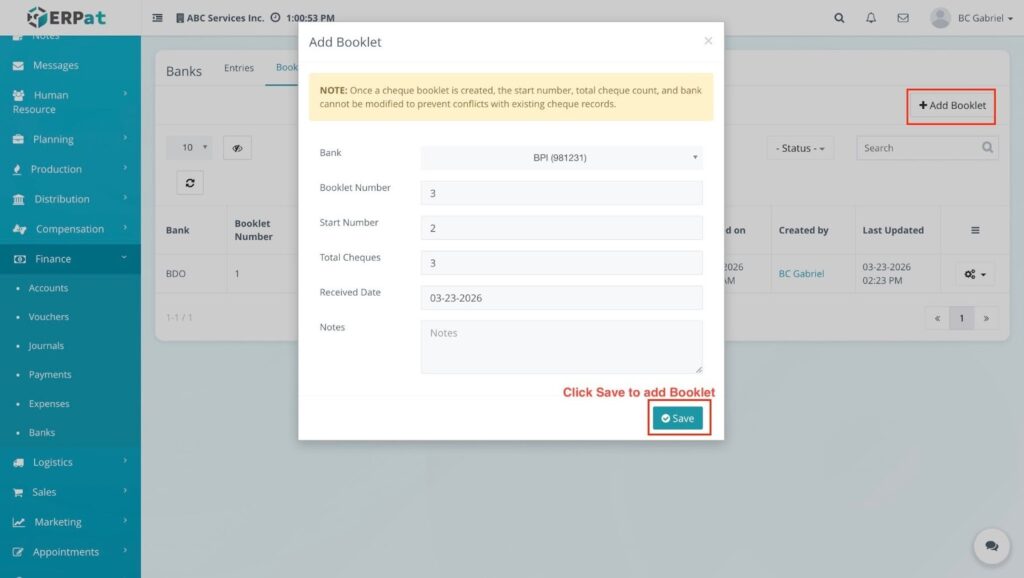
RESULT #
The modal closes and the new booklet is added to the listing table.
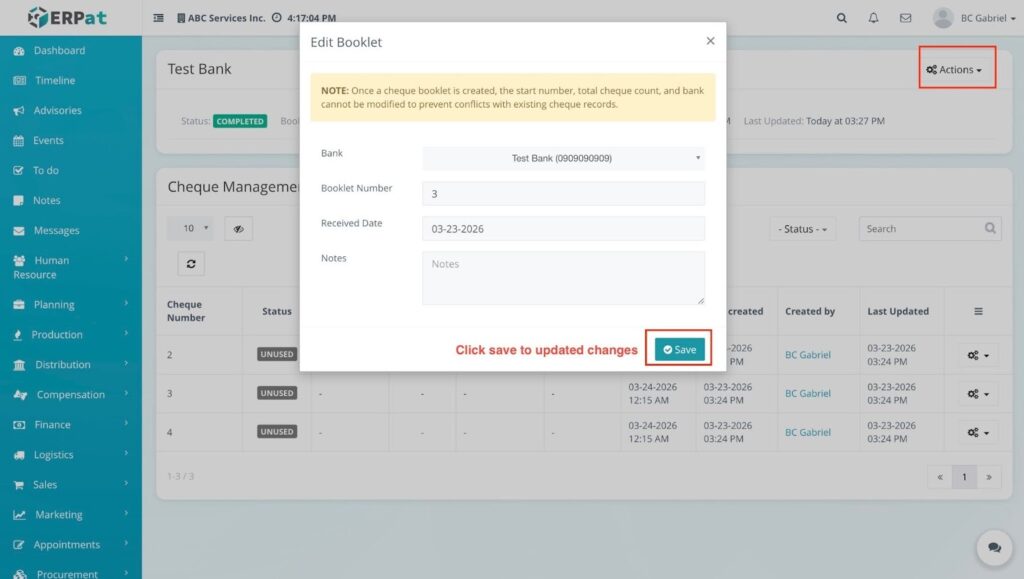
Steps to Edit Booklet #
- Locate the booklet and click the Gear (⚙️) icon.
- Select Edit from the dropdown menu.
- Modify the necessary fields (e.g., updating the series range or booklet type).
- Click Save.
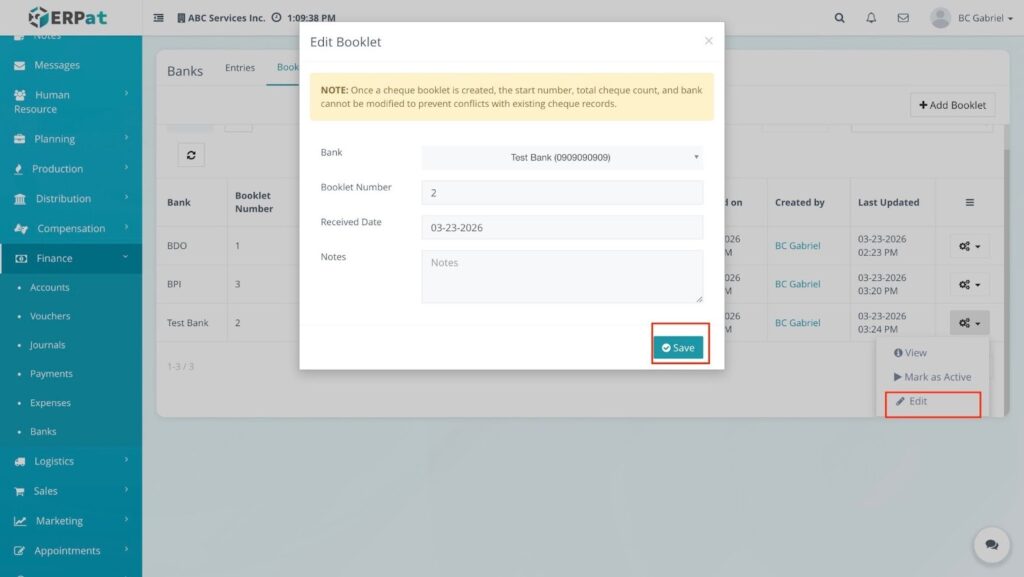
RESULT: #
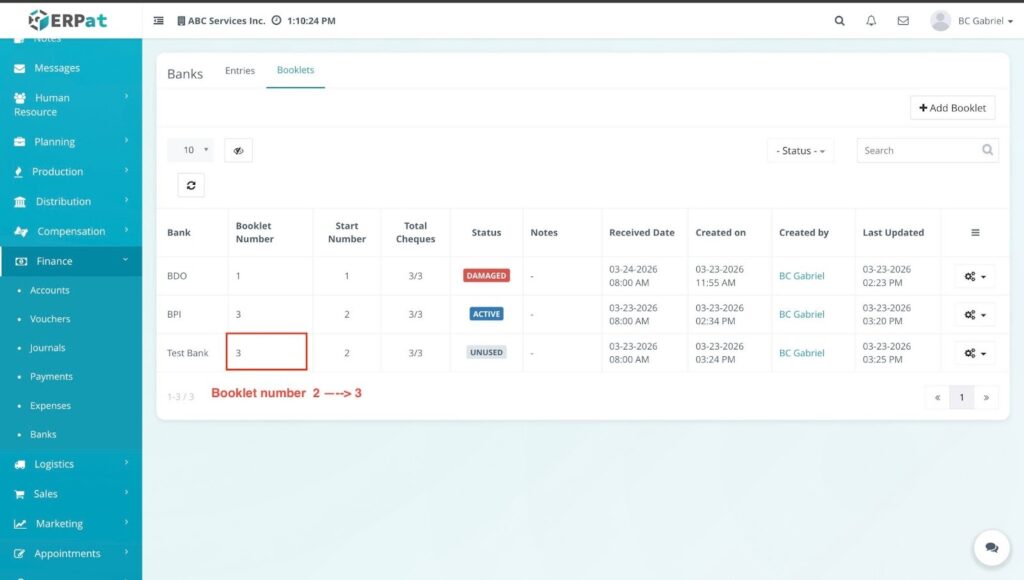
The modal closes and the updated information reflects immediately in the listing table.
Steps to Mark as Active #
- Locate the booklet you wish to activate and click the Gear (⚙️) icon.
- Select Mark as Active.
- Click Save on the confirmation prompt.
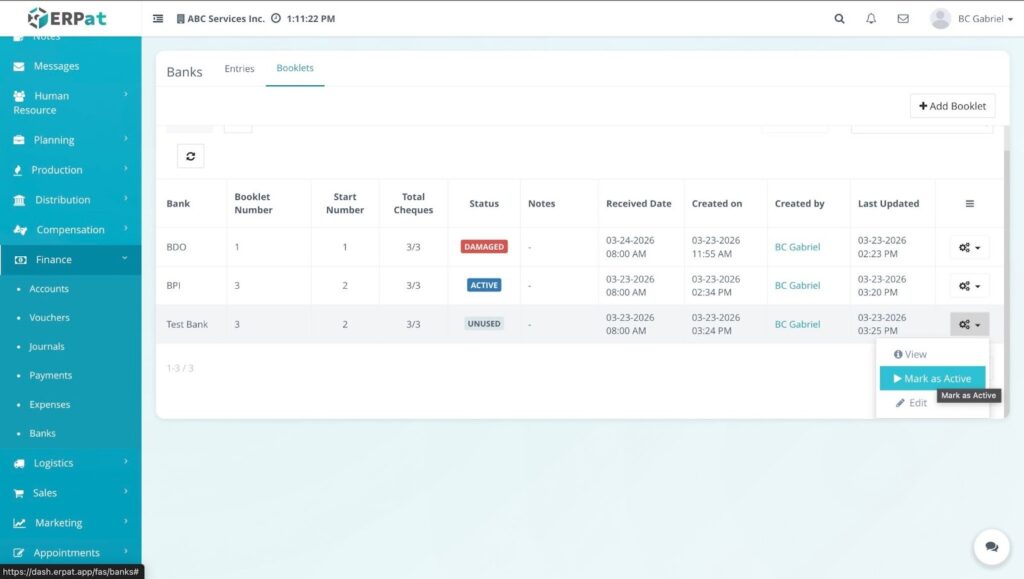
RESULT: #
A notification “The record has been updated” appears, and the booklet status changes to Active.
Steps to Mark as Damaged #
- Locate the booklet and click the Gear (⚙️) icon.
- Select Mark as Damage.
- Click Save on the confirmation prompt.
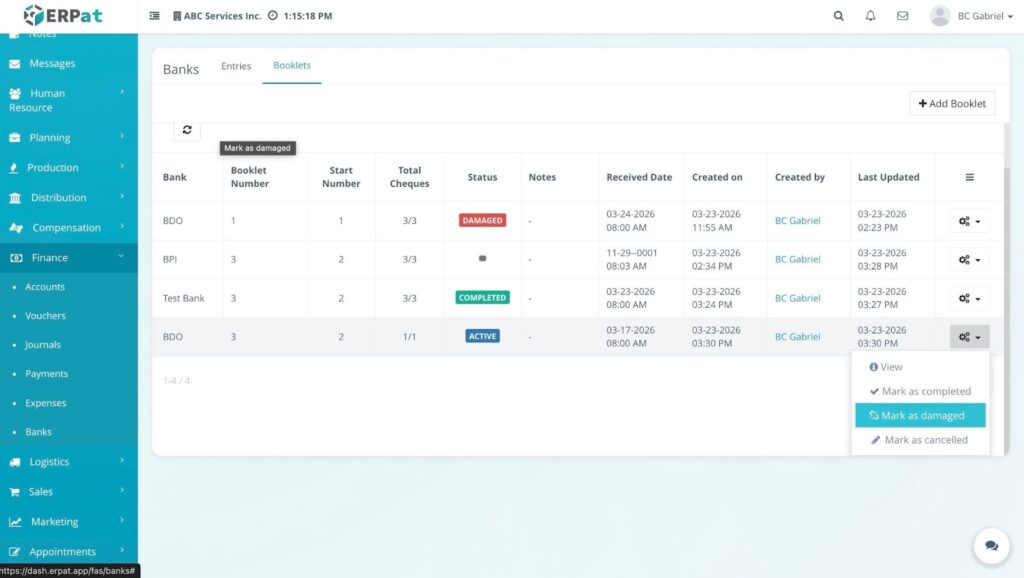
RESULT: #
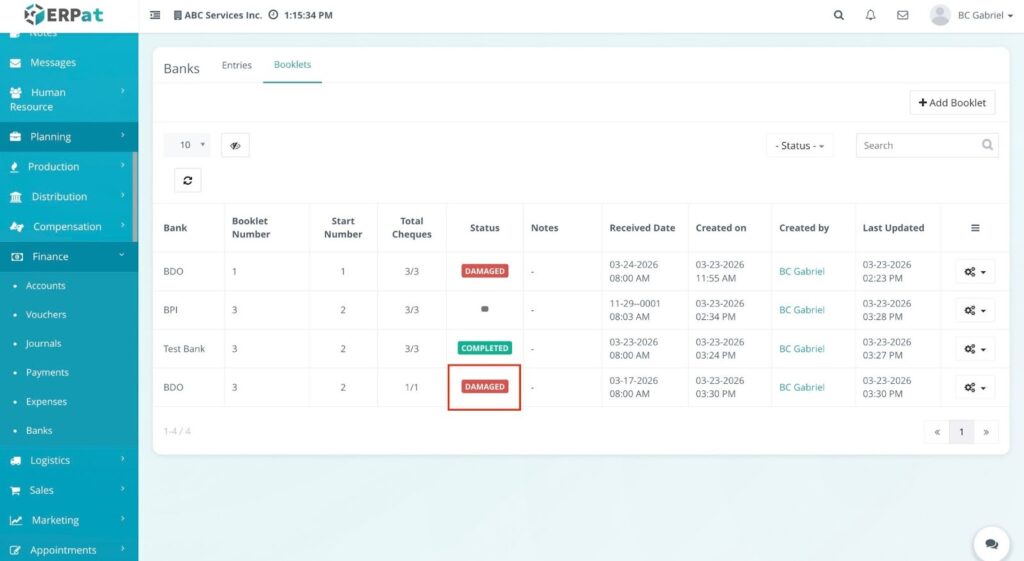
A notification “The record has been updated” appears, and the status changes to Damage.
Steps to Mark as Completed #
Click the Gear (⚙️) icon for the booklet that has been fully used.
Select Mark as Completed.
Click Save on the confirmation prompt.
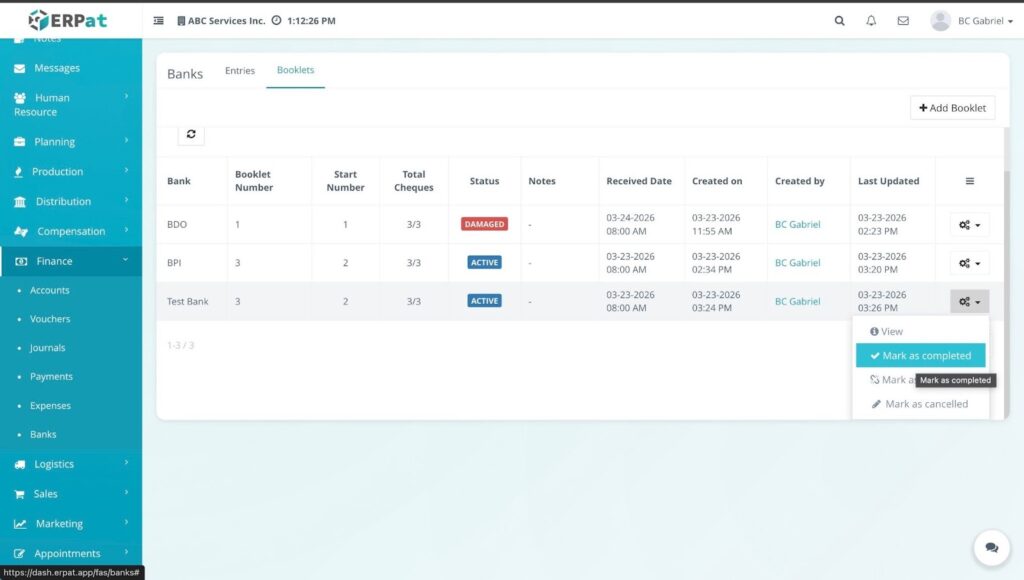
RESULT: #
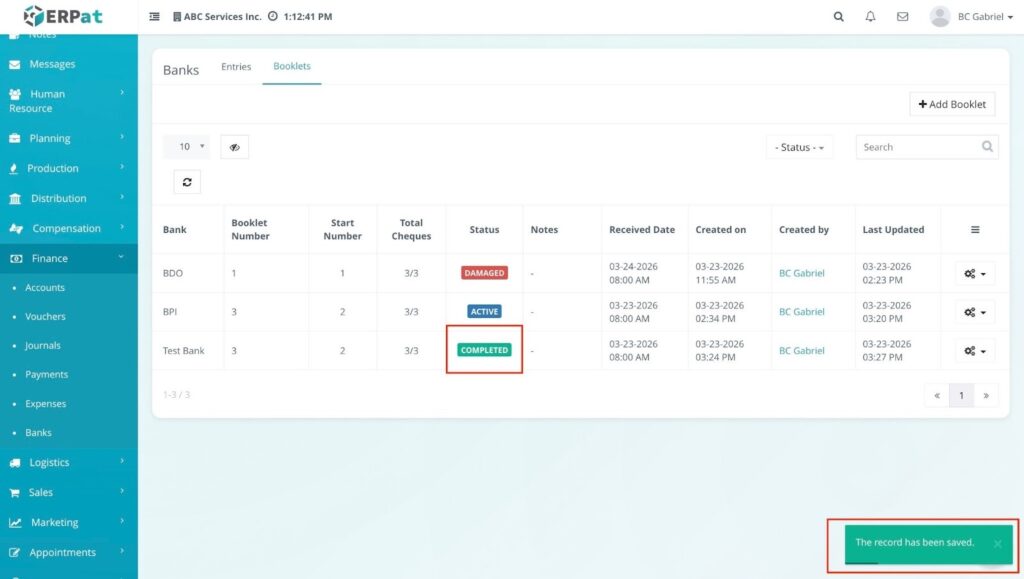
A notification “The record has been updated” appears, and the status changes to Completed.
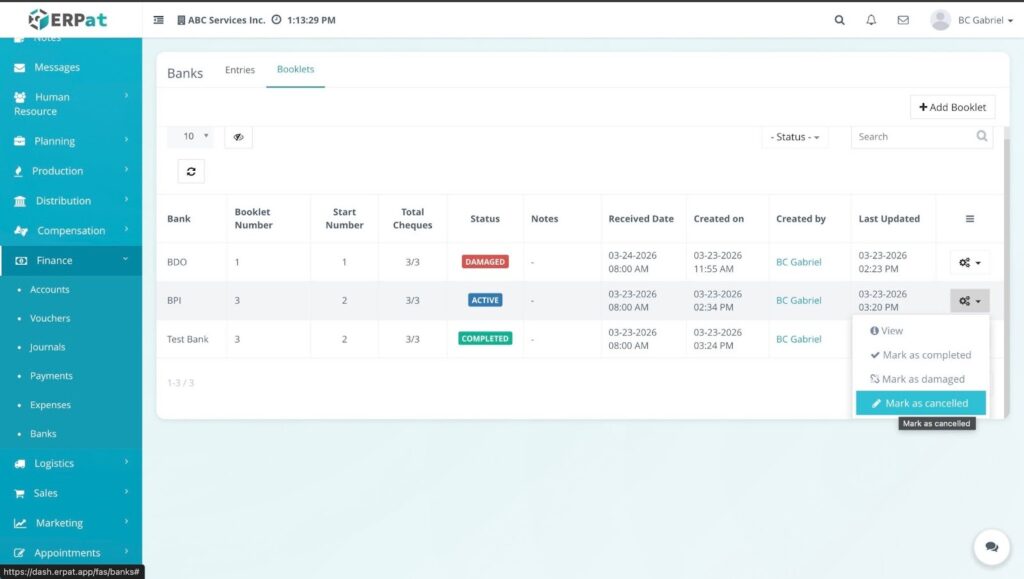
Steps to Mark as Cancelled #
- Locate the record and click the Gear (⚙️) icon.
- Select Mark as Cancelled.
- Click Save on the confirmation prompt.
RESULT: #
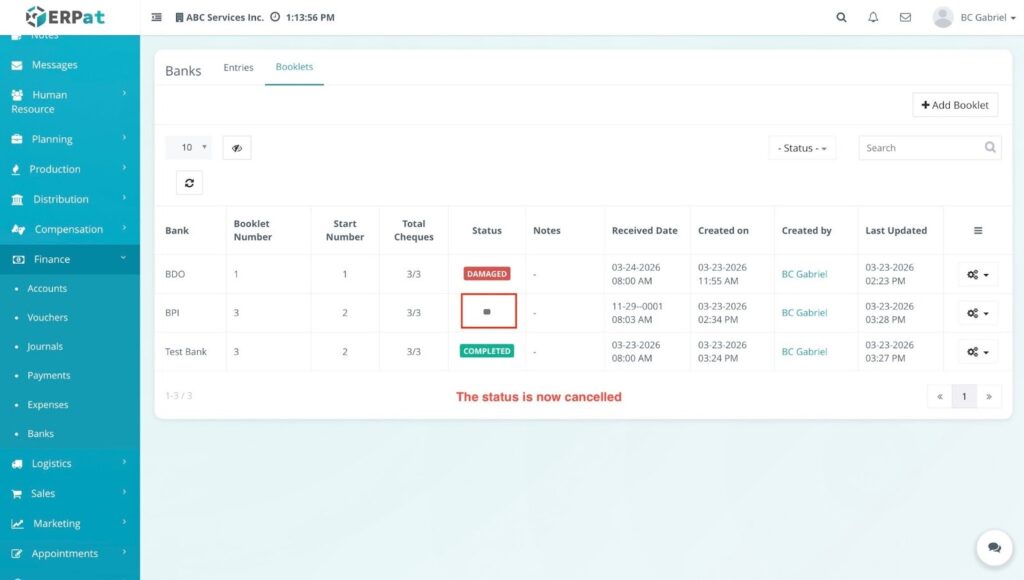
A notification “The record has been updated” appears, and the status changes to Blank.
Steps to View Check Posting #
- Locate the specific check record in the listing table.
- Click the Gear (⚙️) icon under the Actions column.
- Select View from the dropdown menu.
RESULT #
A View Check Posting modal opens, displaying a comprehensive summary of the check’s details, including Payee Name, Payment Amount, Bank Name, Check No, Payment/Check Dates, Reference Number, Category, Source, Description, and current Status.
Steps to Edit Check Posting #
- Locate the entry you wish to update and click the Gear (⚙️) icon.
- Select Edit from the dropdown menu.
- In the Edit Check Posting modal, update the necessary fields (e.g., Payee Name, Check Number, or Payment Date).
- Click Save.
RESULT: #
The modal closes and the modified check information reflects immediately in the listing table.
Steps to Issue a Cheque #
- Access the Tab – Navigate to Finance > Banks and click the Booklets tab.
2.. Open Booklet View – Locate the specific booklet series you wish to use, click the Gear (⚙️) icon, and select View.
3. Select Specific Leaf – Inside the View page, you will see a list of the series. Locate the specific Check Number you wish to issue.
4. Initiate Issuance – Click the Gear (⚙️) icon next to that specific number and select Issue.
5. Input Transaction Details – Fill in the following required fields in the modal:
- Payee Name – The recipient of the cheque.
- Payment Amount – The total numerical value.
- Check Date – The date to be written on the cheque.
- Category & Description – Select the appropriate accounting category and provide a brief note.
6. Save – Click the Save button.
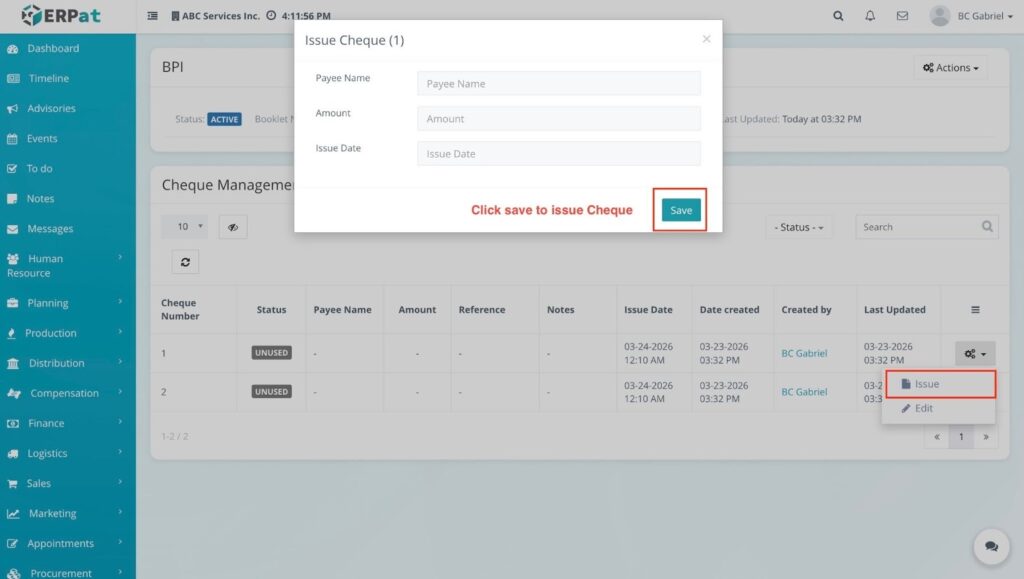
RESULT: #

The modal closes and the new cheque appears in the listing table with a status of “ISSUED”.
Steps to Mark as Cleared #
- Click the Gear (⚙️) icon for the relevant check record.
- Select Mark as Cleared from the dropdown.
- In the modal that appears, enter the Date Completed.
- Click Save.
RESULT: #
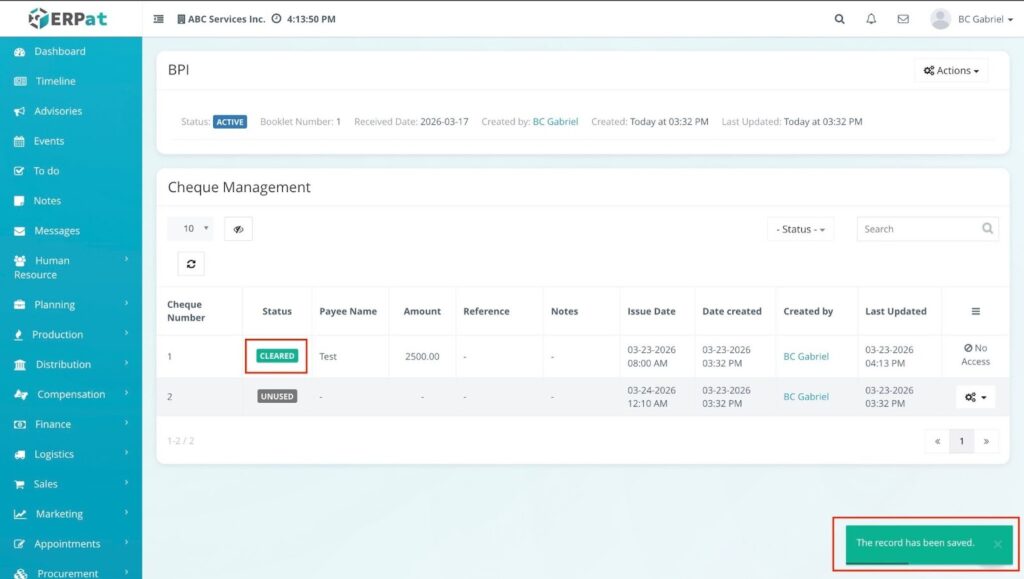
A notification “The record has been updated” appears at the bottom of the screen, and the check’s status changes to Cleared.
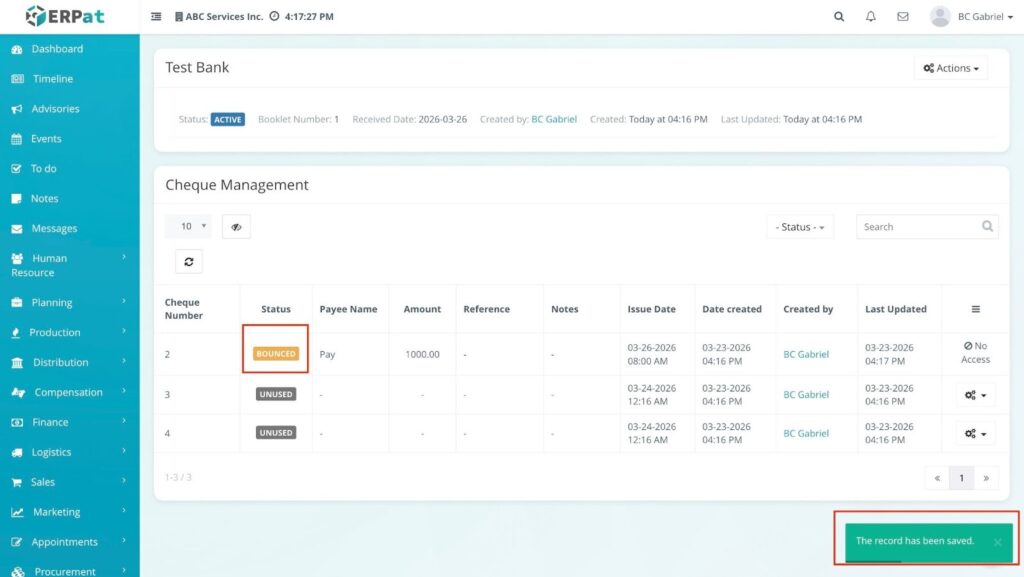
Steps to Mark as Bounced #
- Click the Gear (⚙️) icon for the specific check.
- Select Mark as Bounced from the dropdown menu.
- Enter the Date Bounced in the input field.
- Click Save.
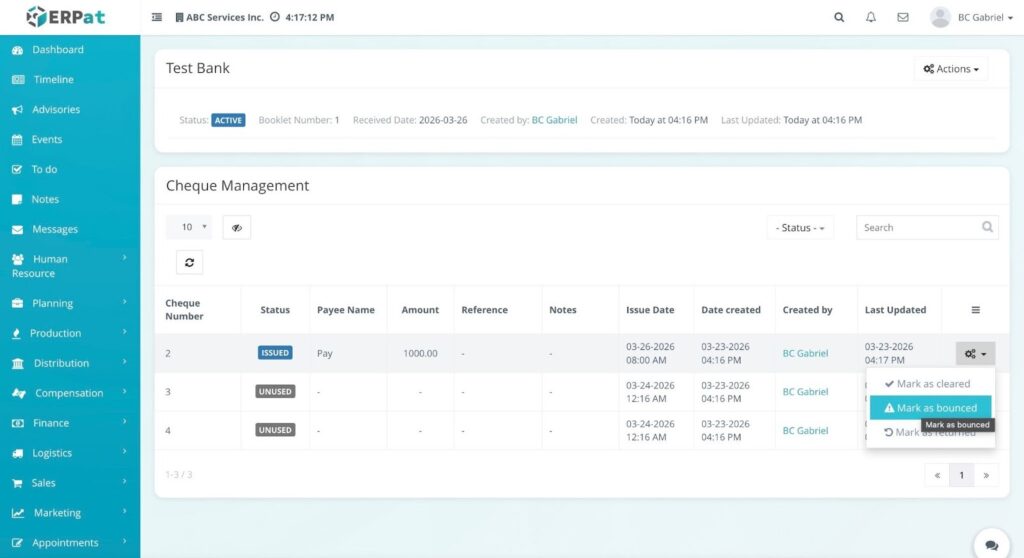
Result:
A notification “The record has been updated” appears, and the status is updated to Bounced in the system.
Steps to Mark as Returned #
- Click the Gear (⚙️) icon for the check that was returned.
- Select Mark as Returned from the dropdown.
- Input the Date Returned in the provided field.
- Click Save.
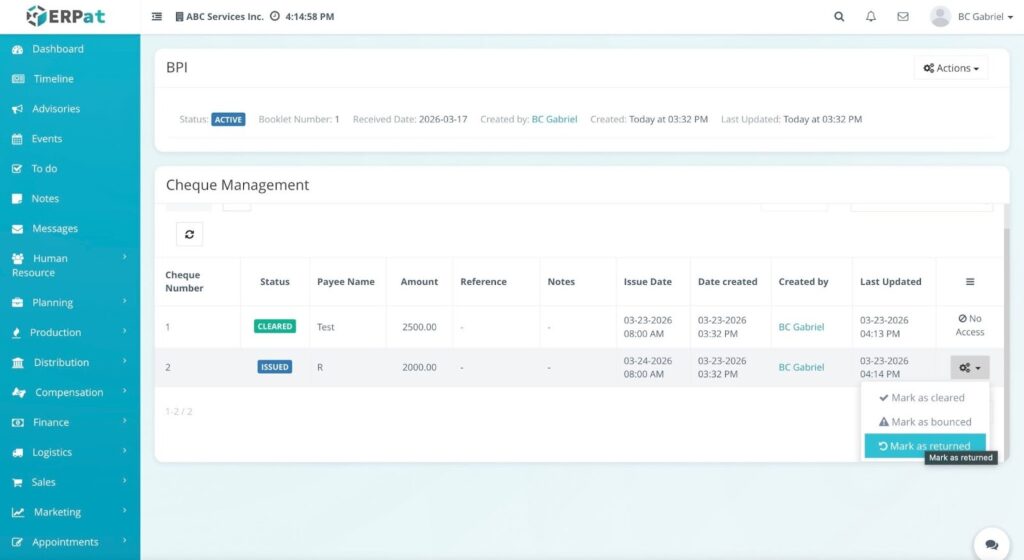
RESULT #
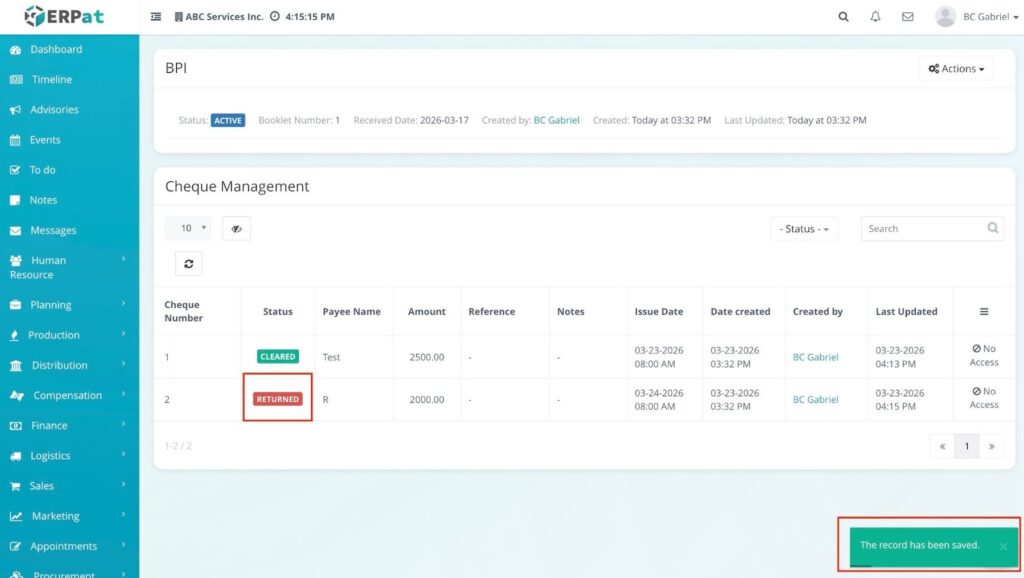
A notification “The record has been updated” appears, and the status changes to Returned in the listing table.
Permissions and Access Control #
- Access Restriction: Access to the Banks module, including Entries, Booklets, and Check Postings, is strictly limited to authorized Finance and Accounting personnel.
- Role-Based Actions: Functional permissions (e.g., adding new bank accounts, issuing cheques, or deleting records) are managed through role-based access control to prevent unauthorized financial modifications.
- Approval Workflows: Changes to critical account details or status overrides (e.g., marking a check as Bounced) follow established financial oversight protocols.
Best Practices #
- Data Accuracy: Ensure Bank Names and Account Numbers are double-checked against physical bank documents before saving to prevent payment errors.
- Booklet Monitoring: Regularly review booklet series to ensure that “Active” booklets have remaining pages and that “Completed” booklets are updated promptly.
- Real-Time Status Updates: Update the status of issued cheques (Completed, Bounced, or Returned) as soon as bank statements are reconciled to maintain an accurate cash-position report.
- Audit Trail Preservation: Avoid deleting bank entries that have existing transaction history; use status deactivation where possible to preserve financial records.
Audit & Logs #
Traceability is ensured by automatically recording all actions in audit logs, including timestamps, changes, and user attribution. This maintains data integrity and supports audit requirements while ensuring compliance with standard accounting practices for financial transparency.
Last Updated: [March 23, 2026] Module Owner: Finance IS – ERPat System


