OVERVIEW #
The Vendor section within the System Customization module provides administrators with a powerful toolkit to manage the visibility and accessibility of vendor-related features. This module allows you to tailor the user experience specifically for external partners, controlling everything from the sidebar navigation to global portal registration and security settings.
Key Features #
- Drag-and-Drop Sidebar Customization:
- Interface Builder: Easily arrange the order of modules like Dashboard, Timeline, and Human Resources specifically for vendor-view.
- Live Preview: A real-time visual representation of how the sidebar will look to a vendor once saved.
- Module Distribution: Automatically distributes menu items based on the specific permissions assigned to each vendor user.
- Vendor Group Management:
- Categorization: Organize vendors into specific Groups for easier mass-permissioning and reporting.
- Audit Tracking: Monitor when specific vendor groups were created or last updated to maintain a clean database.
- Registration & Access Control:
- Self-Service Signup: Toggle the “Allow vendor signup” feature to enable external partners to register their own accounts.
- Portal Security: Control sign-in permissions globally to lock or unlock the portal during maintenance or onboarding periods.
- Collaborative Portal Features:
- Support Ticketing: Enable or disable the “Allow vendor to submit ticket” feature to streamline communication and issue resolution within the platform.
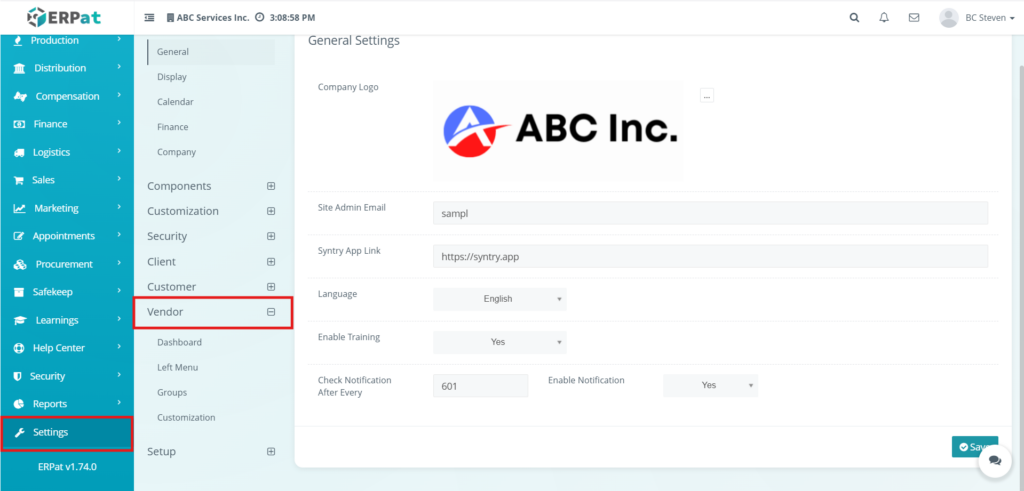
Accessing the Vendor Settings #
STEPS
- Log in to the ERPat System with Administrative privileges.
- On the left-hand Sidebar Menu, Click settings.
- Locate the Vendor Category.
- Select your desired configuration page:
- Left Menu: To customize the sidebar layout.
- Groups: To manage vendor categories.
- Customization: To adjust registration and portal feature settings.
- After making changes, ensure you click the Save button (teal) or Restore to default (red) to reset the layout.
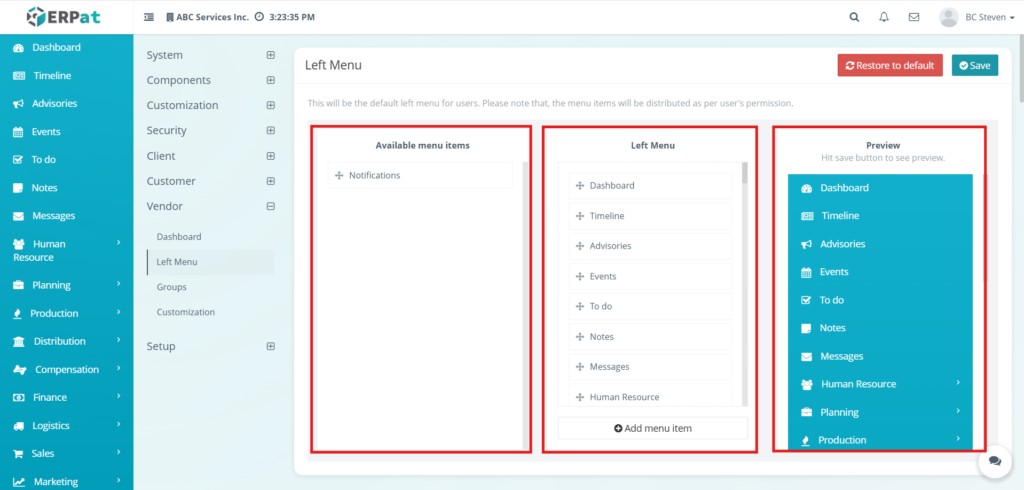
Steps to Customize the Vendor Left Menu #
STEPS #
- Navigate to Vendor Settings: On the sidebar, go to System (or Components) > Vendor and select the Left Menu sub-module.
- Identify Available Items: Review the Available menu items column on the far left. These are modules currently excluded from the vendor’s sidebar.
- Add or Remove Menu Items:
- To Add: Click and drag an item from the Available menu items column into the Left Menu.
- To Remove: Click and drag an item out of the Left Menu column and back into the Available menu items section.
- Reorder the Navigation: Within the Left Menu column, click and hold the drag handle (+ icon) next to any module name. Move it up or down to change its priority in the sidebar list.
- Verify via Preview: Check the Preview column on the far right. This displays a live mockup of how the sidebar will appear to vendors.
- Finalize Changes:
- Click the teal Save button at the top-right to apply the new layout globally.
- If you make a mistake and want to start over, click the red Restore to default button to revert to the system’s original configuration.
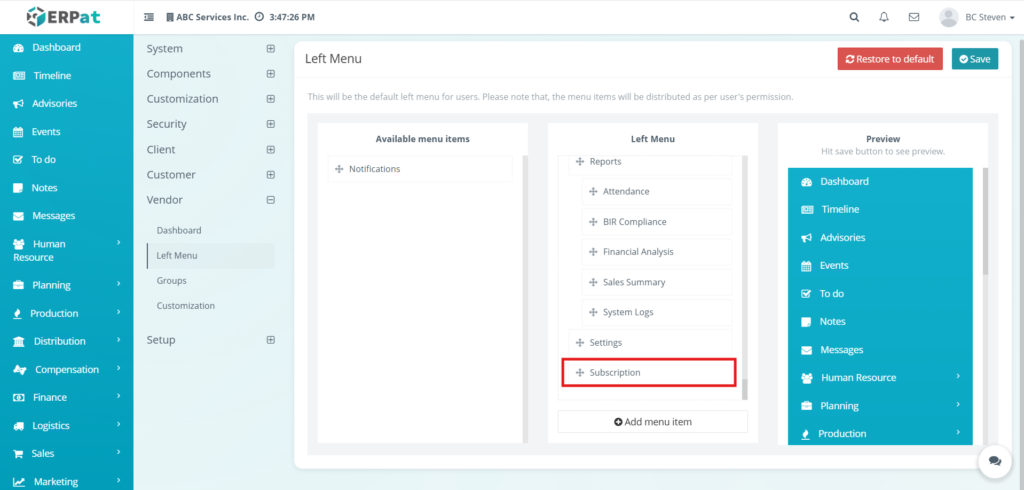
Steps to Add a New Menu Item #
STEPS #
- Open the Modal: In the Vendor > Left Menu configuration page, click the (+) Add menu item button at the bottom of the middle column.
- Define the Title: Enter the display name for the navigation link. This is the primary text users will see in the sidebar.
- Enter the URL: Input the specific destination path or external link for the module. Ensure internal paths are correctly routed to prevent “Page Not Found” errors.
- Configure Menu Hierarchy:
- This is Child Menu (Checkbox): Enable this if you want the item to appear as a sub-link under a parent category, creating a hierarchical dropdown menu.
- Open in new tab (Checkbox): Select this option if the link leads to an external website or a resource that should not replace the current dashboard view.
- Select a Visual Icon: Scroll through the comprehensive icon library and click on an icon that best represents the module (e.g., the $ icon for financial or subscription modules). A relevant icon ensures an intuitive user interface.
- Save the Entry:
- Click the teal Save button within the modal to commit the new item to the Left Menu staging list.
- Click Close if you wish to discard the entry and return to the main customization page.
- Apply and Preview: Once saved in the modal, the new item will appear in the Preview column on the right. To make the changes live for all vendors, remember to click the main Save button at the top-right of the page.


Result #
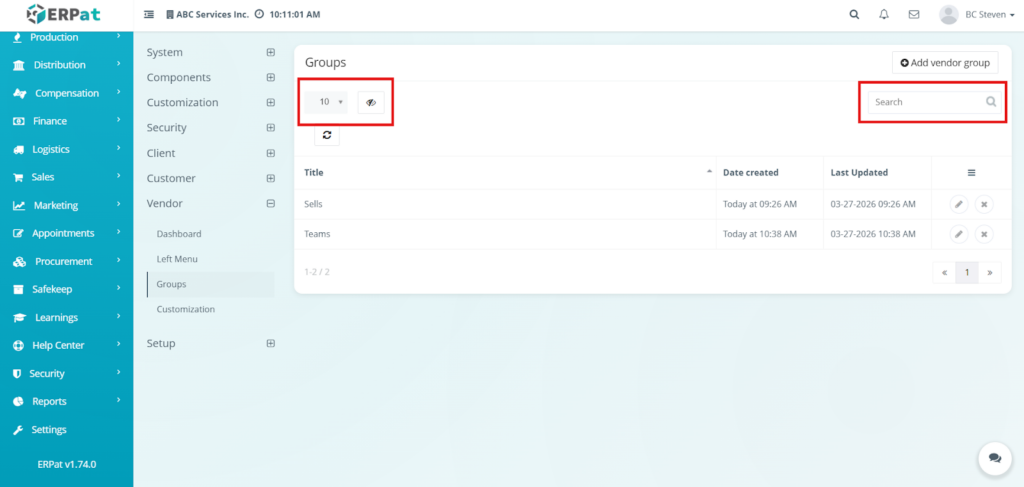
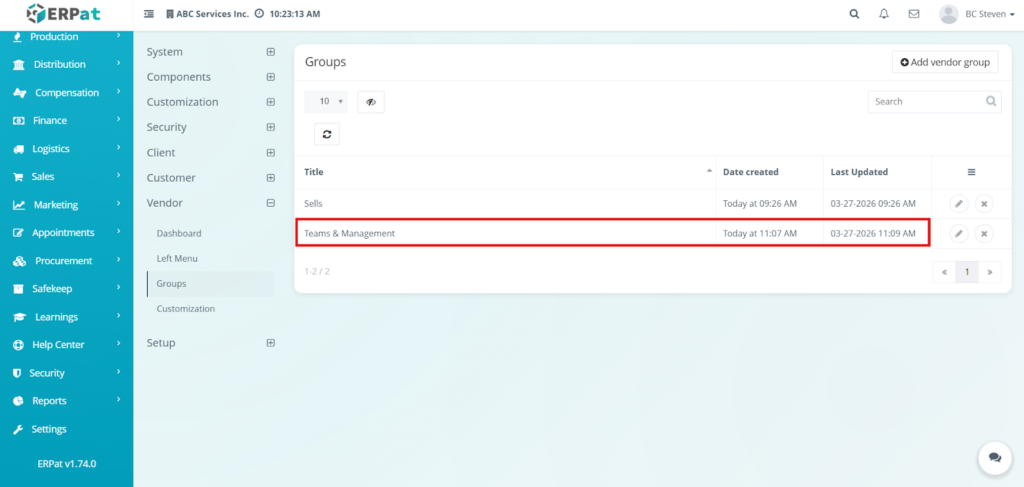
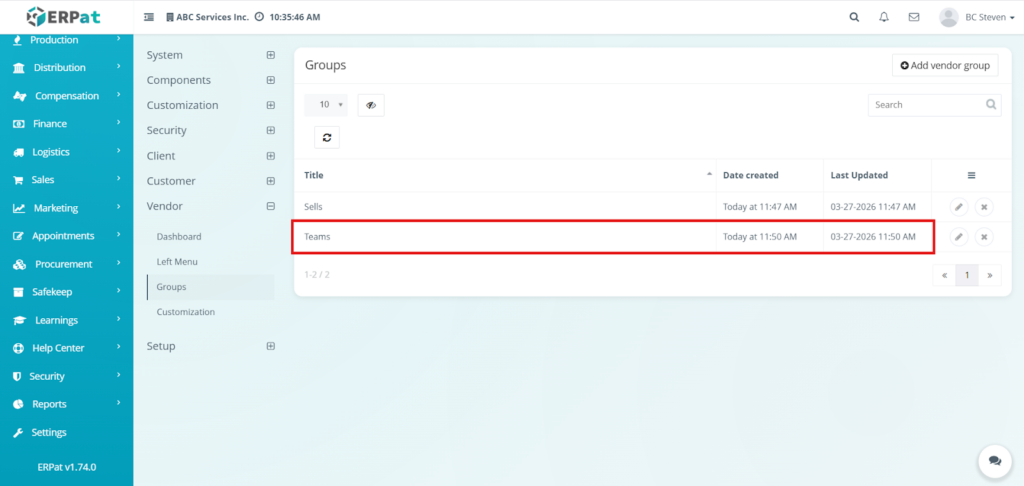
Vendor Management: Groups Listing Page in Settings #
Group ID – The unique, system-generated identifier for the vendor group. This number is used for backend database referencing.
Group Name – The descriptive title of the category. This name is visible when assigning vendors to a group.
Date Created – The exact timestamp when the group record was first registered in the ERPat system.
Created By – The name of the administrator who created the group.
Date Updated – The timestamp of the most recent modification made to the group’s name or settings.
Updated By – The name of the user who last edited the group record.
Action Controls #
Edit (Pencil Icon) – Opens a modal to modify the Group Name or adjust any specific settings associated with that category.
Delete (Trash Icon) – Permanently removes the vendor group from the system.
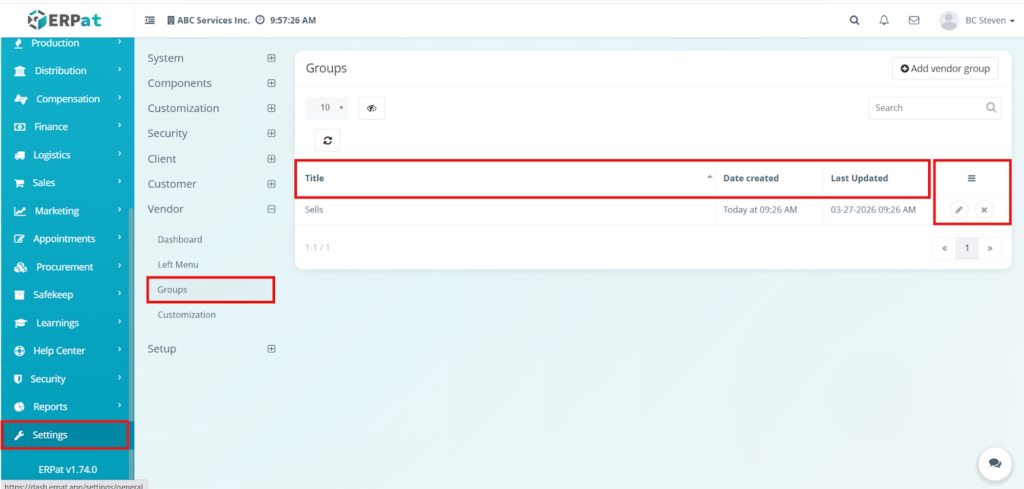
Additional Controls #
Row Visibility – Located at the top-left, this controls how many group records are displayed on a single page.
Column Toggle – Allows you to hide or show specific metadata columns
Refresh– Reloads the table to display the most recent updates and newly added groups.
Global Search Bar– A real-time text input field on the top-right used to quickly locate a specific group by its Name or ID.
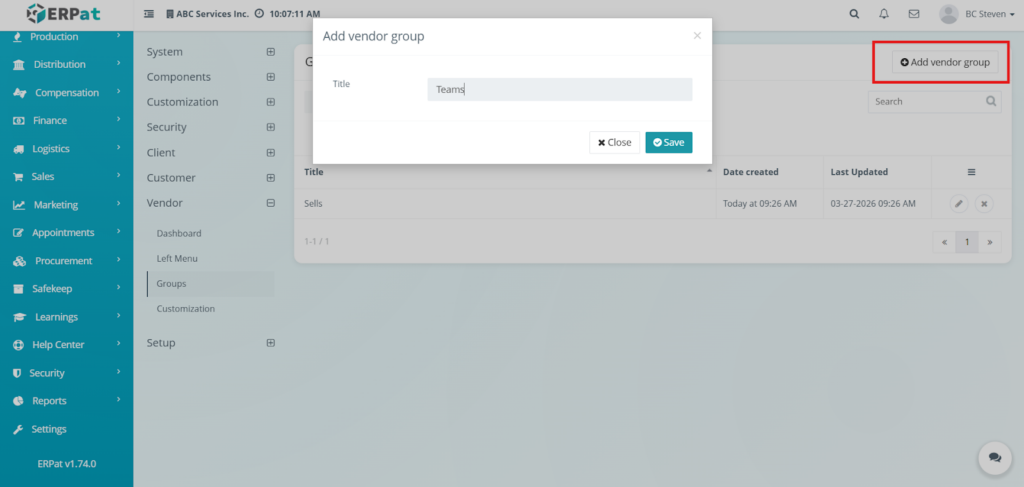
Steps to Add a Vendor Group in Settings #
STEPS
- Navigate to Groups: On the sidebar, go to Settings > Vendor and select the Groups sub-module.
- Open the Creation Modal: Click the Add vendor group button located at the top-right of the listing page.
- Define the Group Title: In the Add vendor group modal, enter a descriptive name in the
input filed. - Save the Group:
Click the teal Save button to register the new group in the system.
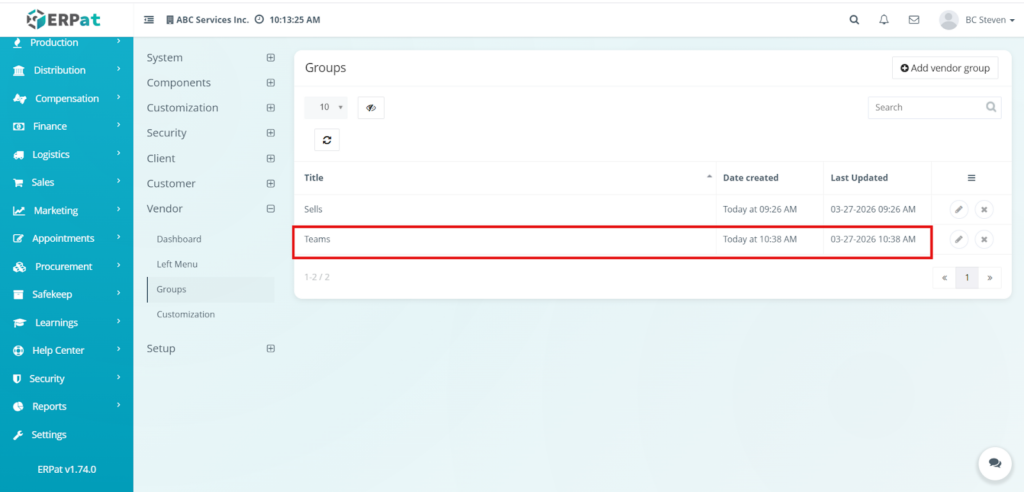
Click Close if you wish to cancel the action and return to the list. - Verify the Entry: Once saved, the new group will appear in the listing table. You can verify its creation by checking the Date created column
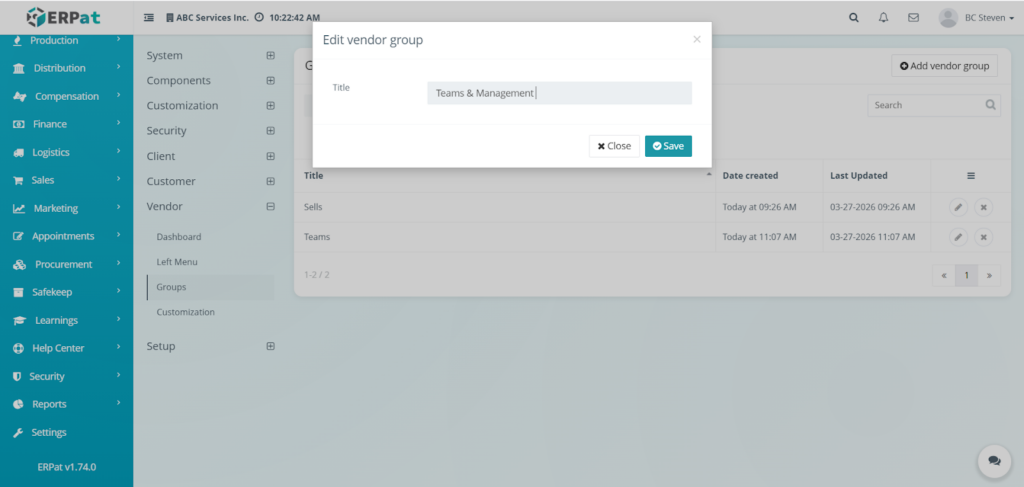
Steps to Edit a Vendor Group Record in Settings #
STEPS
- Locate the Target Record: In the Vendor > Groups listing page, find the group you wish to modify.
- Open the Edit Modal: Click the Pencil icon (Edit) in the Actions column on the far right of the target row.
- Modify the Title: In the Edit vendor group modal that appears, update the text in the Title field.
- Save the Changes:
- Click the teal Save button to apply the update across the system.
- Click Close if you wish to discard the changes and keep the original title.
- Confirm the Update: Verify the change in the listing table. The Last Updated column will automatically refresh with the current date and time to reflect the modification.
Result #
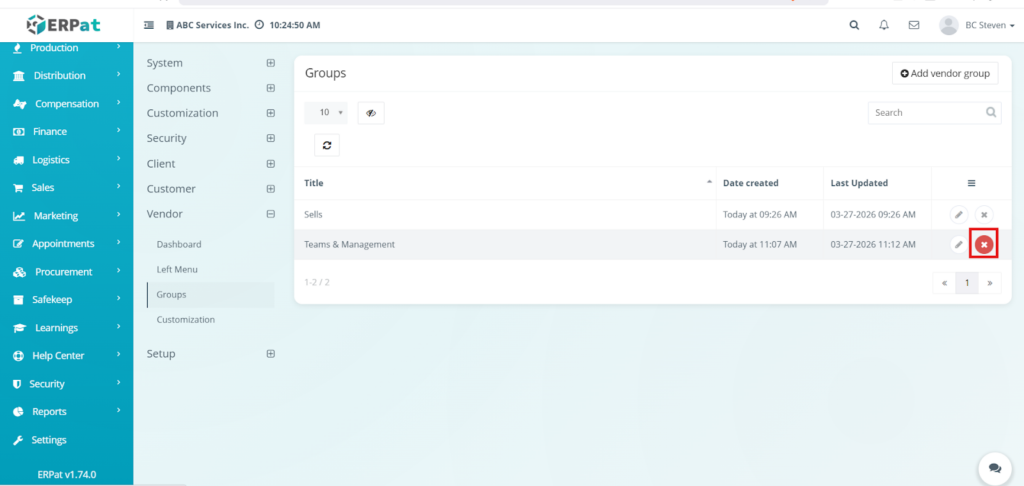
Steps to Delete a Vendor Group in Settings #
STEPS #
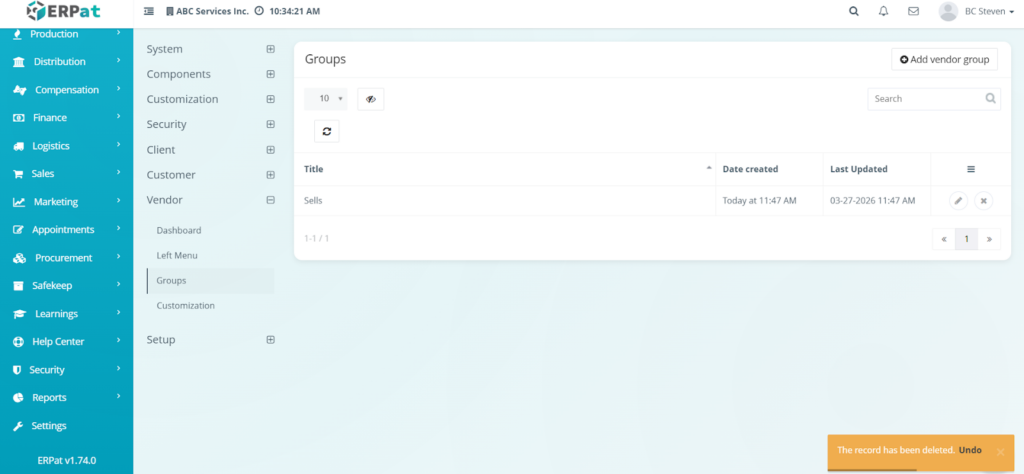
- Locate the Target Record: In the Settings > Vendor > Groups listing page, find the group you wish to remove.
- Execute Deletion: Click the red X icon in the Actions column on the far right of the target row.
- Confirm Deletion: Once clicked, the record will immediately disappear from the table, and a notification toast will appear at the bottom-right of the screen confirming that the record has been deleted.
Result
#
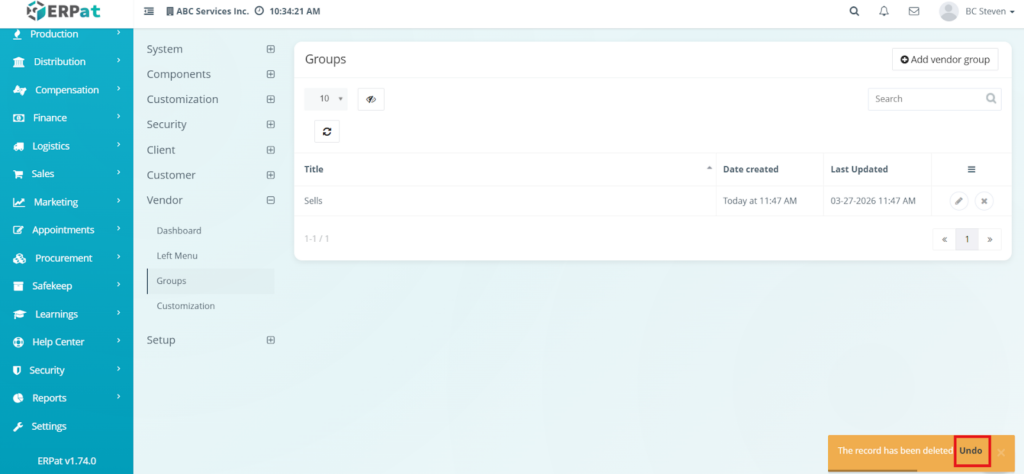
Steps to Undo a Deletion of Vendor Groups in Settings #
STEPS #
- Identify the Success Message: Immediately after deleting a record, look for the orange notification banner at the bottom-right of the interface.
- Click Undo: Within the notification banner, click the Undo link.
- Verify Restoration: The page will refresh, and the previously deleted record will reappear in the listing table with all its original data intact.
Result #
Vendor Settings: Customization Page #
- Customization Tab: Located in the sub-menu under Vendor settings, this tab provides access to global portal toggles that affect all vendor users.
- Allow vendor signup: This dropdown menu controls whether the registration page is public.
- No: Prevents external registration; vendors must be manually added by an administrator.
- Yes: Enables a signup link on the portal, allowing vendors to register their own accounts.
- Allow vendor signin: This is the primary authentication switch for the portal.
- No: Disables login capabilities for all vendors, effectively locking the portal (ideal for maintenance).
- Yes: Permits authorized vendors to log in to their respective accounts.
- Allow vendor to submit ticket: This toggle manages the support interaction feature.
- No: Vendors cannot create support or inquiry tickets.
- Yes: Enables the ticketing system within the Vendor Portal, allowing partners to send direct support requests to the internal team.
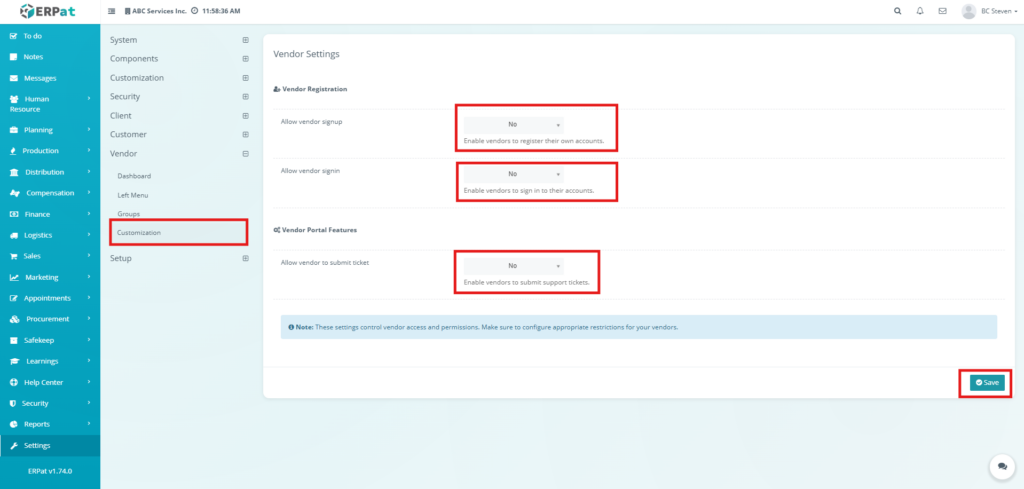
Additional Management Controls #
- Save Button: Located at the bottom-right of the interface. Any changes made to the dropdown toggles remain in a “draft” state until this teal button is clicked, ensuring that portal rules are not updated prematurely.
- Security Advisory: A persistent blue note at the bottom of the form reminds administrators that these settings control sensitive access and permissions, suggesting that appropriate restrictions be verified before saving.
Permissions and Access Control #
Access to vendor configuration is restricted to ensure that portal visibility and registration rules are managed only by qualified personnel:
- Primary Administrators: Only System Admins or IT Managers have full “Create, Read, Update, Delete” (CRUD) permissions for the Vendor Left Menu and Customization toggles.
- Operational Staff: Procurement Managers or HR Leads may be granted access to the Groups sub-module to categorize vendors, but are typically restricted from changing global “Signup” or “Signin” settings.
- Restricted Access: External vendors and standard internal employees are strictly prohibited from viewing or accessing the Settings menu to prevent unauthorized changes to the portal’s security posture.
Best Practices #
- Controlled Registration: Keep Allow vendor signup set to No by default. Only enable it during active onboarding campaigns to prevent bot registrations or unauthorized account creation.
- Maintenance Protocol: Before performing bulk data updates or system maintenance, set Allow vendor signin to No to prevent vendors from accessing the system during unstable periods.
- Menu Minimalism: When customizing the Left Menu, only include modules that are absolutely necessary for vendor operations. A cluttered sidebar decreases user efficiency and increases the risk of data exposure.
- Descriptive Grouping: Use clear, industry-standard names for Vendor Groups to ensure that permissions are applied accurately across the database.
- Preview Before Saving: Always use the Preview column in the Left Menu settings to verify the visual layout before committing changes to the live environment.
Audit & Logs #
- Configuration Tracking: Every toggle change in the Customization tab is logged with a unique Activity ID.
- UI History: Changes to the Left Menu structure, including the addition or reordering of menu items, are recorded to identify who modified the vendor experience.
- Group Accountability: The Groups listing page explicitly displays Date Created, Created By, Last Updated, and Updated By for every record, ensuring clear ownership of data categorization.
- Traceability: Each log entry includes the Administrator’s User ID, IP Address, and a Timestamp, providing a high-fidelity audit trail for compliance and security reviews.
Last Updated: March 27, 2026
Module Owner: Settings IS – ERPat System


