Overview #
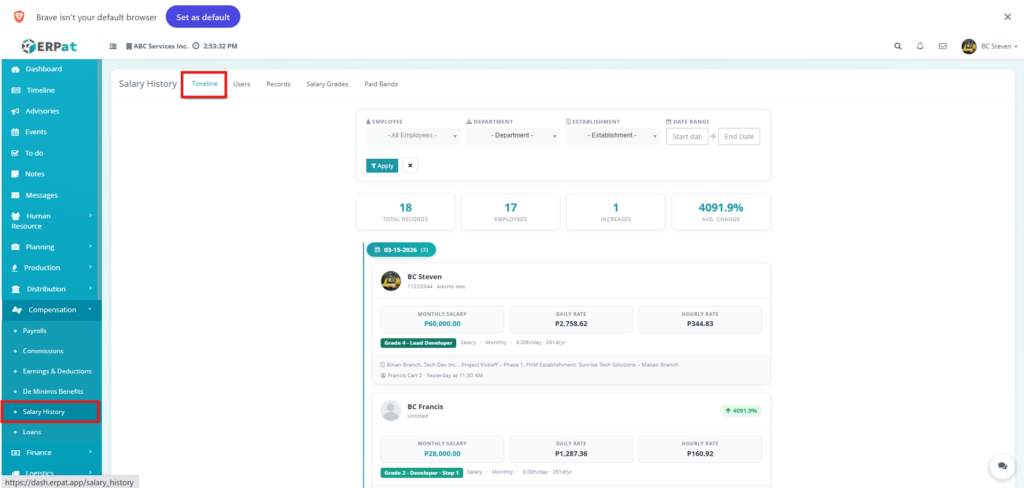
The Timeline view within the Salary History module provides a chronological audit of compensation changes across the organization. This interface allows administrators to track salary adjustments, promotions, and rate updates for individual employees, presented as a clear historical narrative. It serves as a vital tool for human resource professionals to verify pay consistency and review the evolution of labor costs over time.
Key Features #
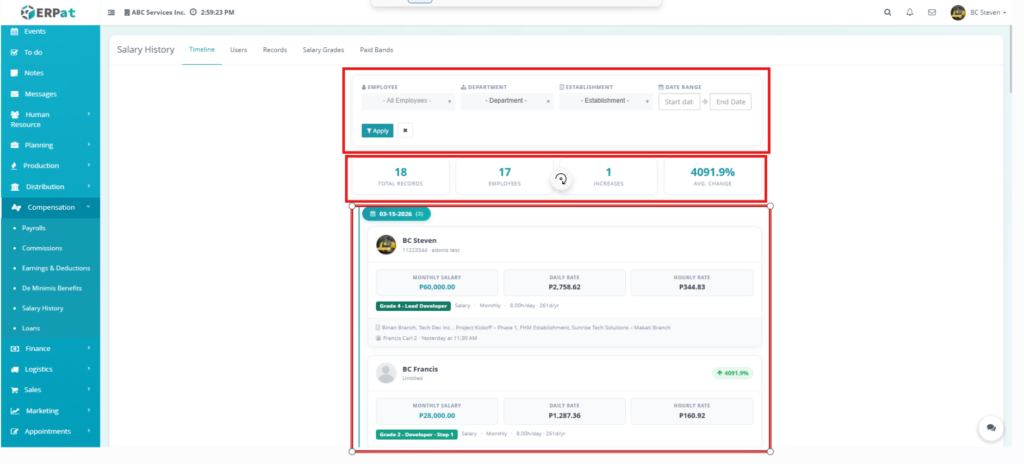
- Historical Log – Displays compensation updates in descending chronological order, grouped by specific dates.
- Comprehensive Pay Breakdown – Each entry provides a detailed view of an employee’s Monthly Salary, Daily Rate, and Hourly Rate.
- Job Grading Context – Lists the specific Grade and Position associated with each salary record.
- Summary Analytics – A top-level dashboard displays aggregate data, including Total Records, total Employees, number of Increases, and the Average Percentage Change across the filtered set.
- Advanced Filtering – Users can narrow the timeline by specific Employee, Department, Establishment, or a custom Date Range.
- Rate Calculation Details – Shows the basis for pay calculations, such as working hours per day and days per year.
- Branch Attribution – Identifies the specific office or branch and establishment associated with the pay record.
Accessing the Salary History Timeline #
- Log in to the ERPat System.
- Navigate to Compensation from the main sidebar.
- Select Salary History from the sub-menu.
- Click on the Timeline tab located at the top of the page.
- Apply filters as needed and click Apply to generate the historical view.
Salary History Page #
- Employee – Name of the employee
- Monthly Salary – Current monthly compensation
- Daily Rate – Computed daily pay based on schedule
- Hourly Rate – Computed hourly pay based on schedule
- Salary Grade – Job grade classification
- Salary Type – Basis of pay
- Work Schedule – Standard hours per day and days per year
- Previous Salary – Historical salary value before adjustment
- Salary Increase % – Percentage change in salary compared to previous record
- Project Assignments – Establishments, branches, or projects linked to the employee
- Last Updated By – User who last modified the record and timestamp
- Summary Statistics – Dashboard metrics showing total records, number of employees, number of increases, and average change percentage
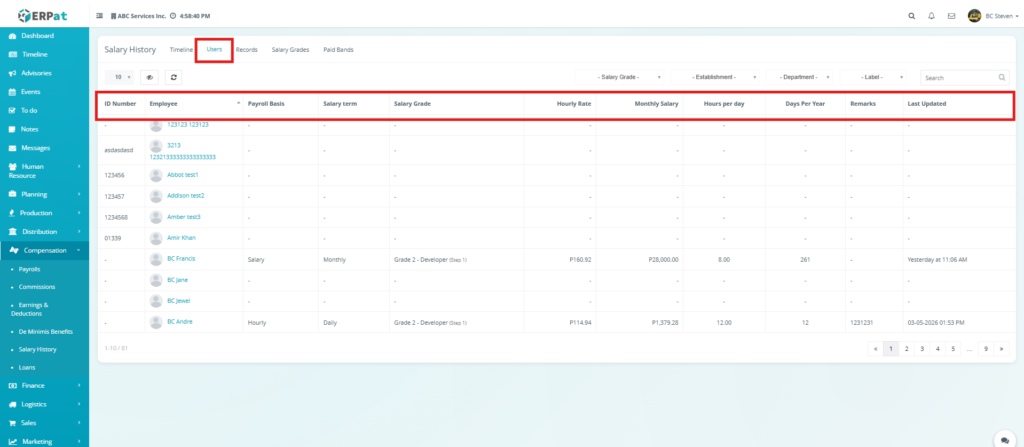
Salary History: Users Listing Page #
- ID Number – The unique identification number assigned to the employee record.
- Employee – Displays the profile photo and full name of the personnel.
- Payroll Basis – The fundamental basis for the employee’s pay.
- Salary term – The frequency or term of the compensation.
- Salary Grade – The job grade and specific step classification.
- Hourly Rate – The computed rate earned per hour.
- Monthly Salary – The total monthly gross compensation.
- Hours per day – The standard number of working hours assigned per day.
- Days Per Year – The total number of scheduled working days in a year used for calculations.
- Remarks – Any additional notes, codes, or internal comments relevant to the salary record.
- Last Updated – The date and time when the record was most recently modified.
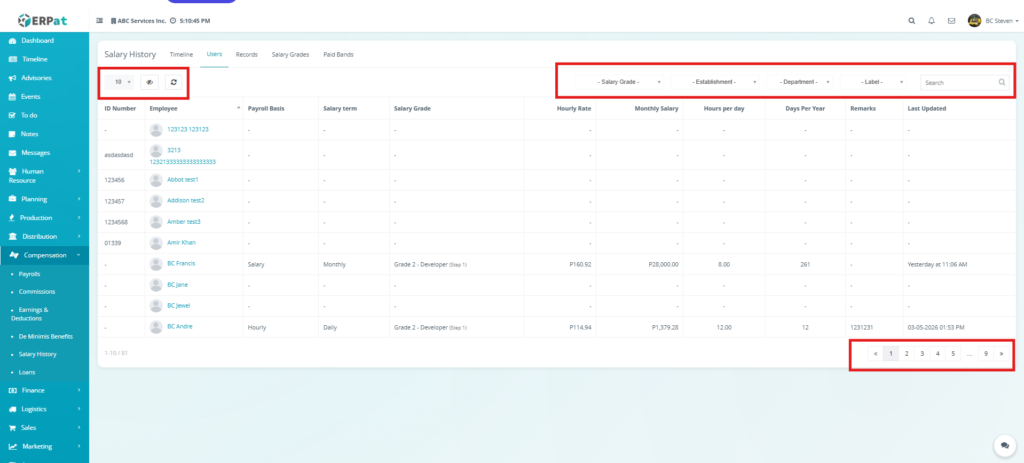
Additional Management Controls & Filtering #
- Row Display & Page Navigation – A dropdown menu on the top-left allows users to adjust the number of records visible per page, while the pagination controls on the bottom-right enable browsing through the full employee database.
- Visibility & Refresh Icons – Functional icons on the top-left allow administrators to toggle column visibility for a customized view and manually refresh the table to ensure all recently edited data is synchronized.
- Categorical Filtering Dropdowns – Specific dropdown menus at the top allow users to quickly filter the entire list by Salary Grade, Establishment, Department, and Label to isolate specific employee groups.
- Global Search Bar – A dedicated text input field at the top-right used for real-time filtering of the list by employee name, ID number, or other identifying keywords.
Steps for Viewing an Employee on Salary History Users #
STEPS
- Navigate to the Compensation module from the main sidebar and select Salary History.
- Click on the Users tab located at the top of the Salary History page.
- Locate the specific staff member you wish to view from the table.
- Click on the Employee’s Name link (highlighted in the table) to open their detailed profile.
- View the comprehensive employee dashboard, which includes:
- Primary Information – Name, Profile Photo, Position/Title, Email, and Date Hired.
- Operational Metrics – Leave Credit Balance, Total Hours Worked, and Project Assignments.
- Compliance & Performance – Number of open Disciplinary records, Certifications, and Leaves Approved.
- Use the sub-navigation tabs to dive deeper into specific categories of the employee’s record.


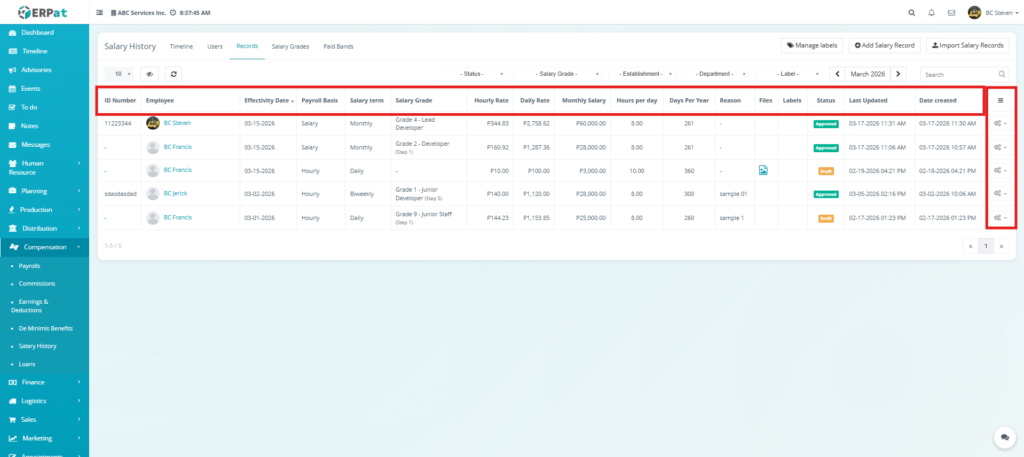
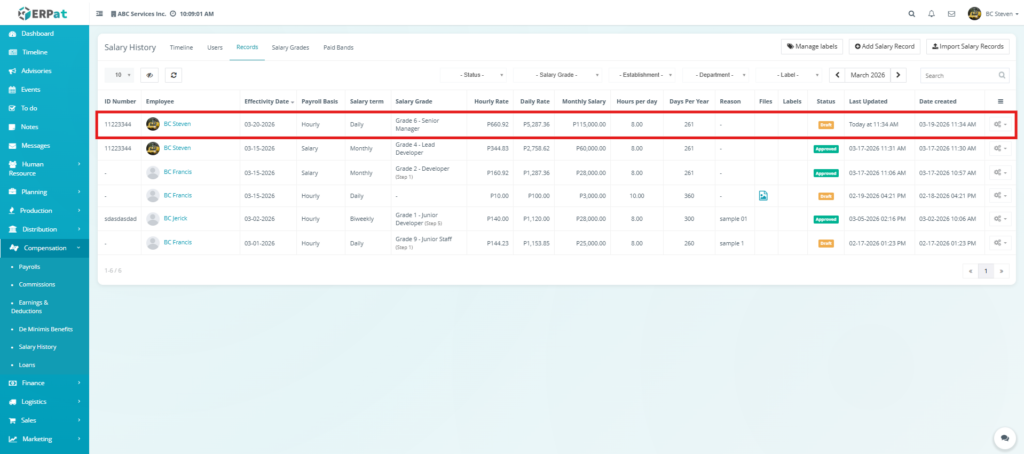
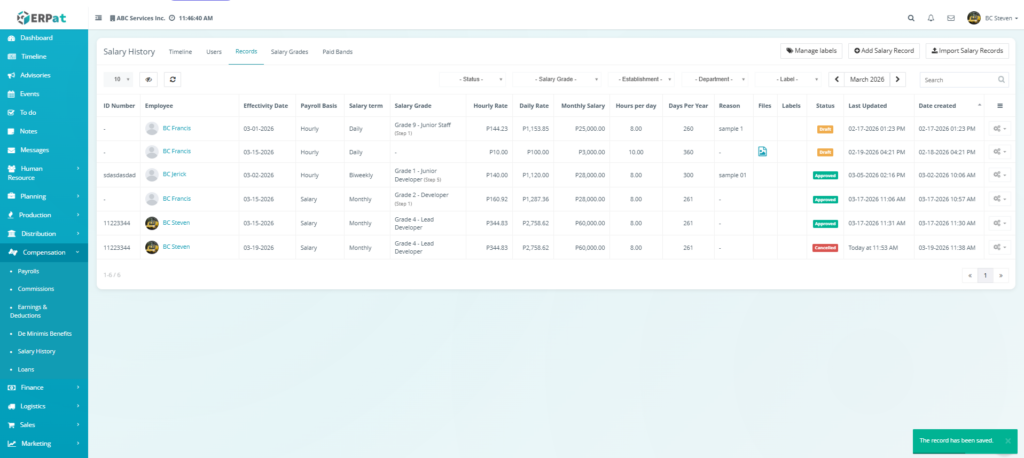
Salary History Records Tab Page #
- ID Number – Unique identifier for the salary record
- Employee – Name of the employee
- Effectivity Date – Date when the salary record takes effect
- Payroll Basis – Salary or hourly basis
- Salary Term – Payment frequency
- Salary Grade – Job grade and step classification
- Hourly Rate – Computed hourly pay
- Daily Rate – Computed daily pay
- Monthly Salary – Current monthly compensation
- Hours per Day – Standard work hours per day
- Days per Year – Total working days per year
- Reason – Notes or justification for salary changes
- Files – Attached supporting documents
- Labels – Tags for categorization
- Status – Approval state of the record
- Last Updated – Timestamp of the most recent modification
- Date Created – Timestamp when the record was first added
- Actions – Edit or Delete controls for managing records
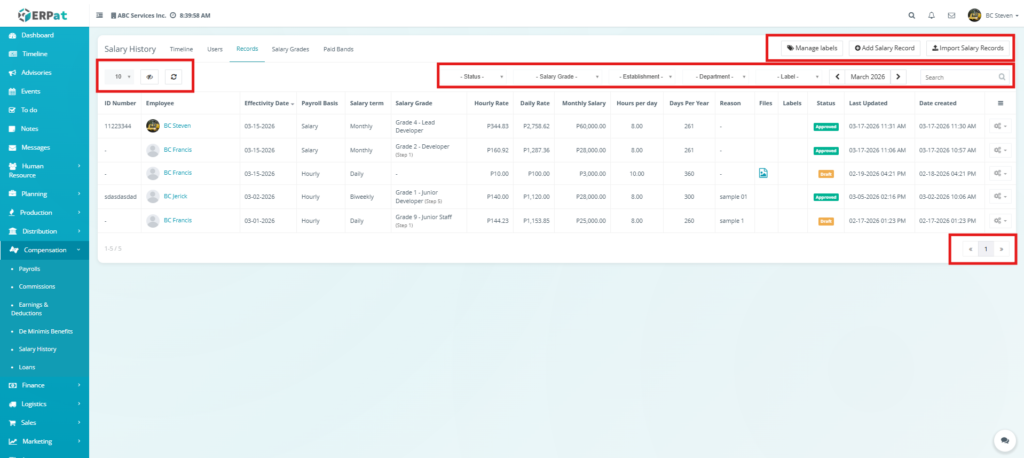
Additional Management Controls & Filtering #
- Manage Labels – Opens a configuration tool to create or edit categorical tags used to organize records.
- Add Salary Record – Launches the manual entry modal to register a single new compensation update.
- Import Salary Records – A bulk-processing tool that allows administrators to upload multiple records at once using a standardized Excel template.
- Categorical Dropdowns – Specific menus to filter the entire ledger by Status, Salary Grade, Establishment, Department, and Label.
- Date Range Selector – A calendar tool to define a custom start and end date, generating a focused report of all salary actions within that timeframe.
- Global Search Bar – A real-time text input field on the far right used to filter the list by Employee Name or ID Number.
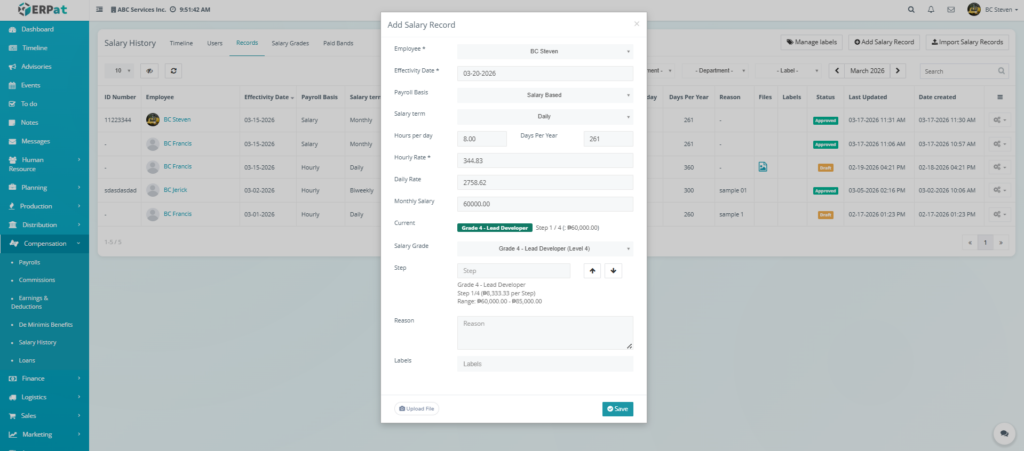
Steps to Create a Salary Record #
The Add Salary Record feature allows administrators to register a new compensation entry for an employee. This ensures that pay adjustments, promotions, or new hire rates are accurately captured with their corresponding effective dates and calculation parameters.
STEPS
- Navigate to the Compensation module from the main sidebar and select Salary History.
- Click on the Records tab located at the top of the page.
- Click the Add Salary Record button located at the top-right of the records listing table.
- Fill in the required information in the Add Salary Record modal:
- Employee – Select the staff member from the dropdown menu.
- Effectivity Date – Choose the date when the new compensation rate officially begins.
- Payroll Basis – Select the basis of pay from the dropdown.
- Salary term – Define the frequency of the pay term.
- Hours per day / Days Per Year – Input the standard work schedule units used for rate calculations.
- Hourly Rate / Daily Rate / Monthly Salary – Enter the specific financial values for the compensation.
- Salary Grade – Select the job grade classification from the dropdown.
- Reason – Provide an internal note or justification for the record.
- Labels – Apply relevant categorical tags for easier filtering and reporting.
- (Optional) Click the Upload File button at the bottom-left of the modal to attach supporting documentation or contracts.
- Click Save to register the new record, or click the X icon at the top-right to cancel the entry.
Key Considerations #
- BIR Tax & Statutory Compliance: The financial details entered in a salary record are critical, as they directly reflect on the Earnings & Deductions module. The system uses these values to automatically calculate BIR Tax, SSS, PhilHealth, and HDMF contributions, ensuring accurate payroll and government compliance.
- Grade and Step Progressions: Utilizing the Step arrows allows administrators to move an employee through a predefined salary range. The system will display the corresponding increment per step and the overall range (e.g., ₱60,000.00 to ₱65,000.00) to maintain pay equity.
- Automatic Rate Calculation: By entering the Monthly Salary along with the Hours per day and Days Per Year, the system will automatically compute the Hourly and Daily rates. This ensures consistency across all touchpoints in the Compensation module.
- Historical Accuracy: Always double-check the Effectivity Date. This date acts as the trigger for the system to switch to the new rate; an incorrect date can lead to discrepancies in the current or prior payroll periods.
- Audit Documentation: Use the Upload File feature to attach signed promotion letters or contracts. This creates a digital paper trail within the record, which is essential for internal audits and HR reviews.
Steps to Import Salary Records #
STEPS
- Navigate to the Compensation module from the main sidebar and select Salary History.
- Click on the Records tab located at the top of the interface.
- Click the Import Salary Records button located at the top-right of the page.
- In the Import Salary Records modal, click the Download Template button at the bottom-left.
- Open the downloaded file and input the salary data then save the document.
- Return to the ERPat system and either Drag-and-drop your completed file into the upload box or click inside the box to browse and select the file from your computer.
- Once the file is uploaded, click Next to proceed to the data validation screen.
- Review the uploaded data for any errors. If the information is correct, click Import to finalize the process.

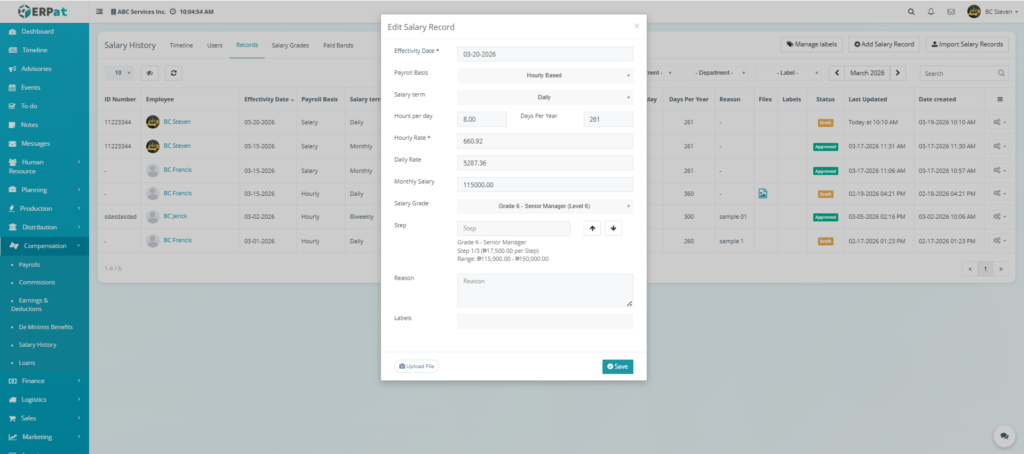
Steps to Edit a Salary Record #
STEPS
- Navigate to the Compensation module from the main sidebar and select Salary History.
- Click on the Records tab located at the top of the interface.
- Locate the specific record you wish to modify in the listing table.
- Click the Edit (pencil) icon under the Actions column at the far right of the record row.
- In the Edit Salary Record modal, update the necessary fields:
- Effectivity Date – Adjust the date the rate takes effect if necessary.
- Payroll Basis & Term – Modify how the employee is paid.
- Rates – Update the Hourly Rate, Daily Rate, or Monthly Salary.
- Salary Grade & Step – Use the dropdown or step arrows (up/down) to change the employee’s classification level.
- Reason & Labels – Revise the internal justification or categorical tags for the record.
- (Optional) Use the Upload File button to replace or add new supporting documentation.
- Click Save to apply the changes, or click the X icon to discard the edits.
RESULT‘
Steps to Approve a Salary Record #
STEPS
- Navigate to the Compensation module from the main sidebar and select Salary History.
- Click on the Records tab to view the list of all salary adjustments.
- Locate the specific record with a Draft status that you wish to authorize.
- Click the Actions icon at the far right of the record row.
- Select Approve from the dropdown menu.
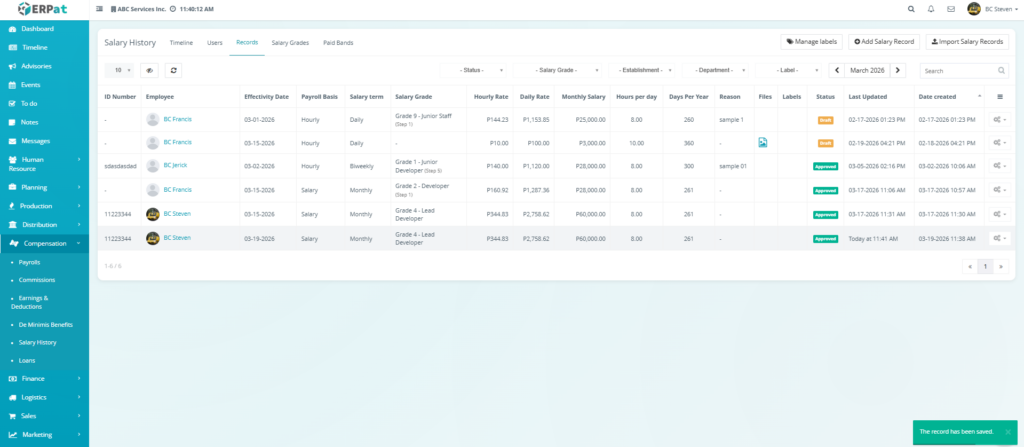
- The system will process the request, and a green notification toast will appear at the bottom-right of the screen stating: “The record has been saved.”
- Verify that the record status has now changed from Draft to Approved.
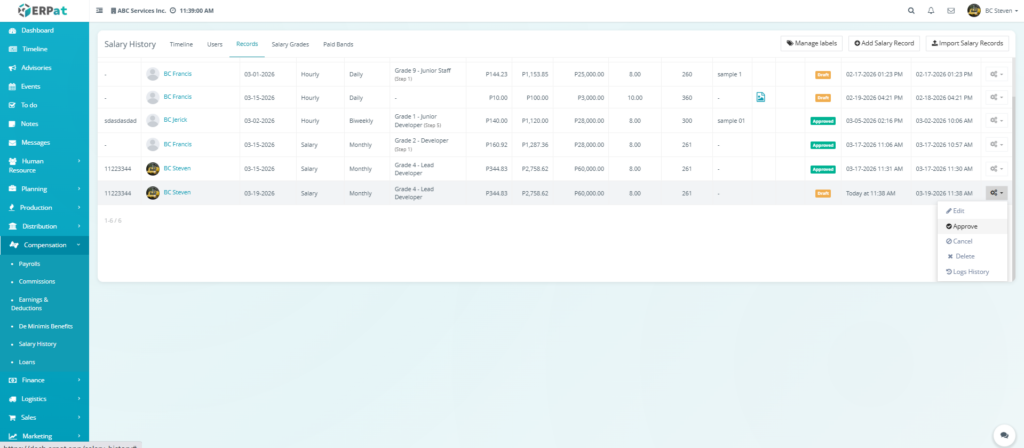
RESULT
Steps to Cancel a Salary Record #
STEPS
- Navigate to the Compensation module from the main sidebar and select Salary History.
- Click on the Records tab to access the compensation ledger.
- Locate the specific salary record you wish to invalidate.
- Click the Actions (settings/gear) icon at the far right of the record row.
- Select Cancel (indicated by the block/prohibited icon) from the dropdown menu.
- The system will update the record, effectively removing it from active payroll calculations while retaining the entry in the historical log.
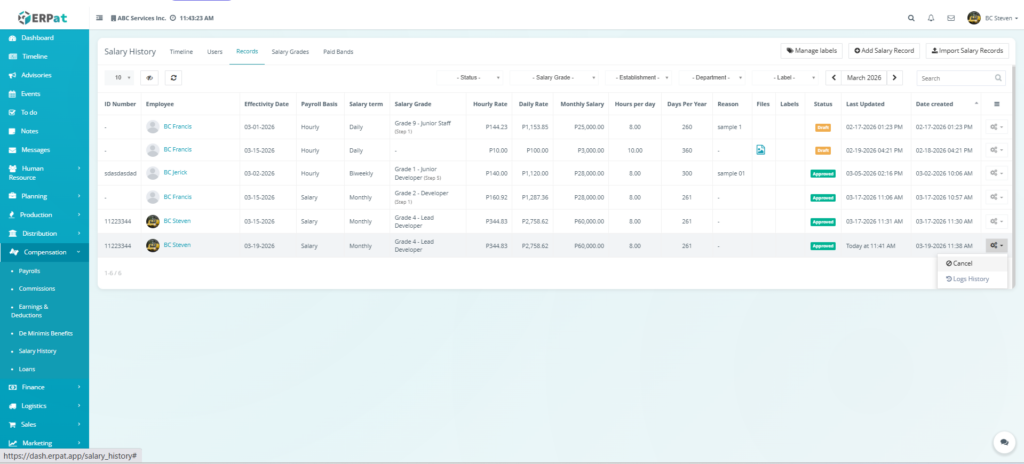
RESULT
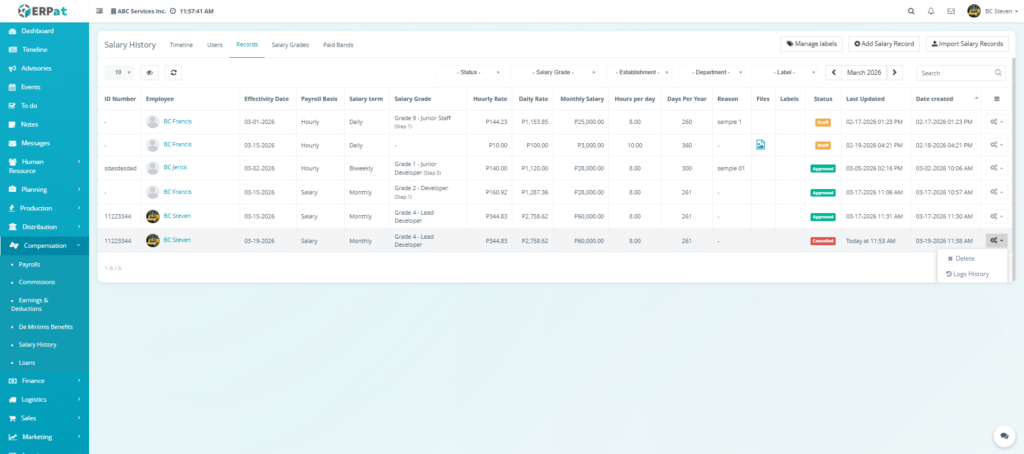
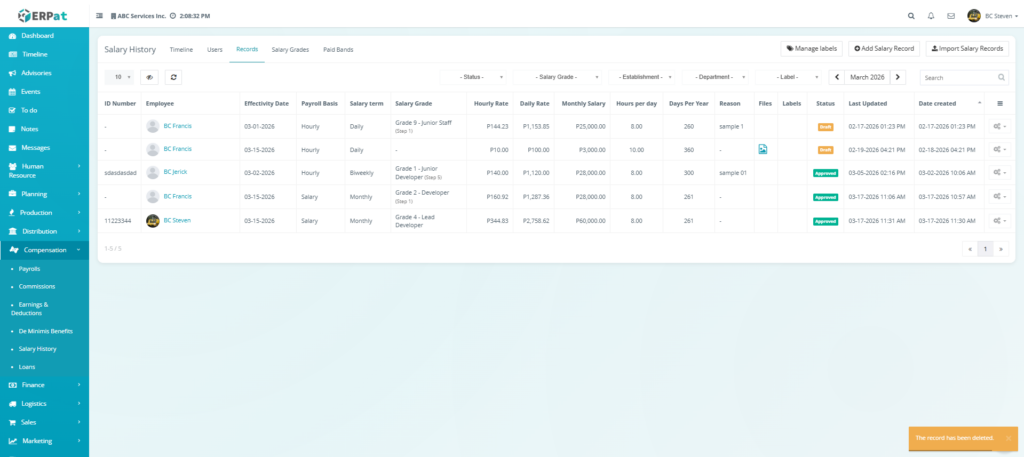
Steps to Delete a Salary Record #
STEPS
- Navigate to the Compensation module from the main sidebar and select Salary History.
- Click on the Records tab to view the salary ledger.
- Locate the specific record you wish to remove (e.g., a record with a Cancelled or Draft status).
- Click the Actions (settings/gear) icon at the far right of the record row.
- Select Delete (indicated by the “x” icon) from the dropdown menu.
- A confirmation prompt may appear; confirm the action to finalize the removal.
- Verify that the record has been successfully removed from the listing table.
RESULT
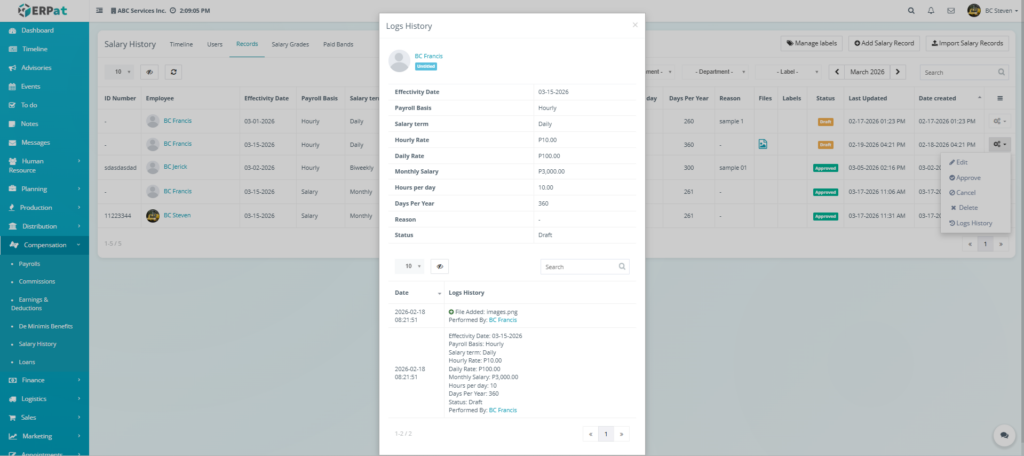
Steps to View Logs History #
STEPS
- Navigate to the Compensation module from the main sidebar and select Salary History.
- Click on the Records tab to view the list of compensation entries.
- Locate the specific employee record you wish to audit.
- Click the Actions (settings/gear) icon at the far right of the record row.
- Select Logs History (indicated by the list/clock icon) from the dropdown menu.
- The Logs History modal will appear, displaying:
- Record Summary – A snapshot of the current values for Effectivity Date, Payroll Basis, and Rates.
- Audit Timeline – A chronological list of events located at the bottom of the modal.
- Event Details – Specific information for each log entry, including the date, time, the action performed (e.g., “File Added”), and the name of the administrator (e.g., Performed By: BC Francis).
- Click the X icon at the top-right of the modal to close the history view.
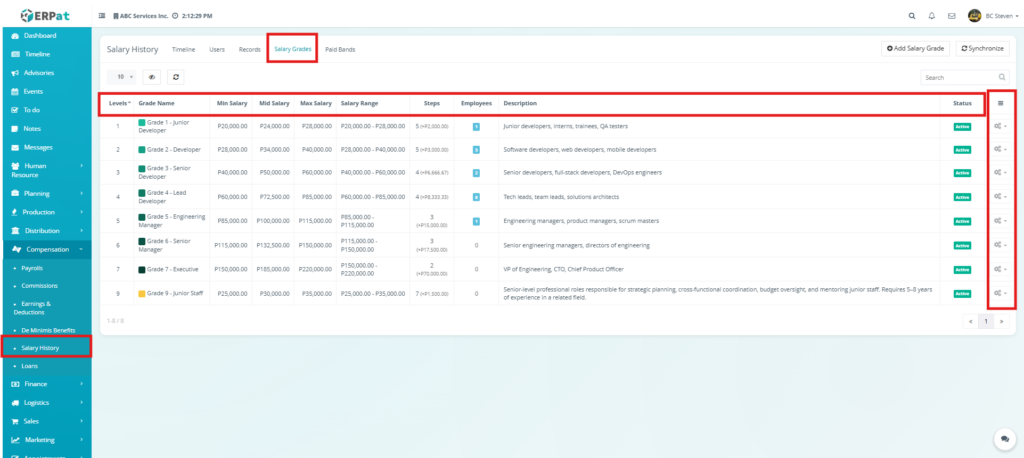
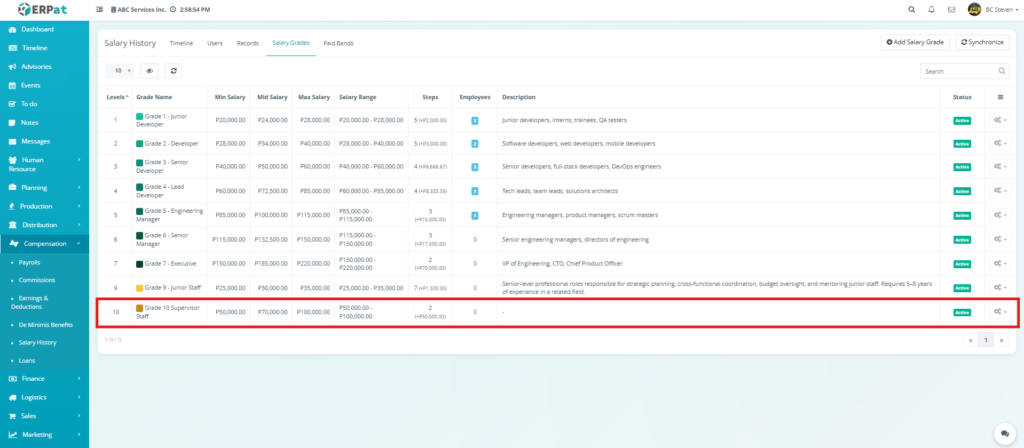
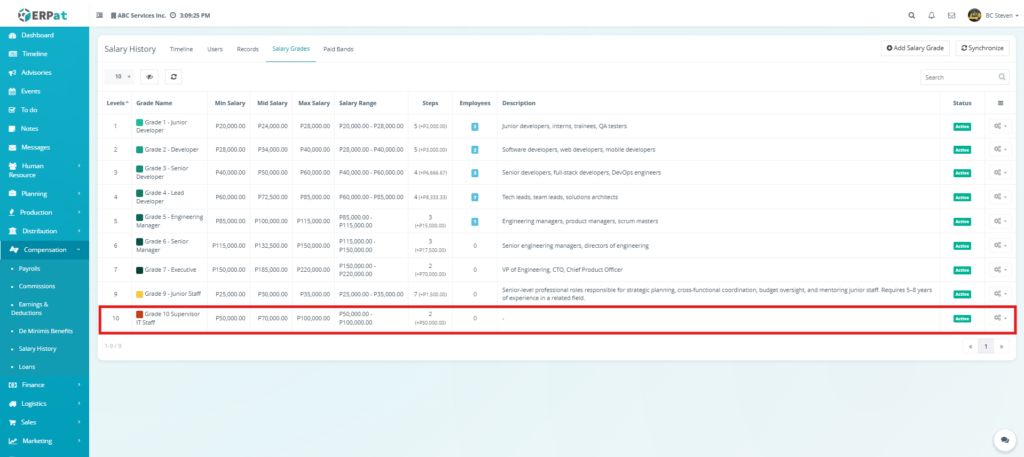
Salary History: Salary Grades Page #
- Levels – The numerical ranking of the grade within the organizational hierarchy (e.g., Level 1 to 9).
- Grade Name – The specific title assigned to the pay grade, often linked to seniority or role complexity (e.g., Grade 1 – Junior Developer).
- Min Salary – The entry-level or minimum gross compensation for that specific grade (e.g., ₱20,000.00).
- Mid Salary – The midpoint of the salary range, often used as a benchmark for market competitiveness (e.g., ₱24,000.00).
- Max Salary – The maximum gross compensation allowable for that grade level (e.g., ₱28,000.00).
- Salary Range – A summary of the total span between the Minimum and Maximum values.
- Steps – The number of incremental pay increases available within that grade and the specific monetary value per step (e.g., 5 steps at +₱2,000.00).
- Employees – A real-time count of personnel currently assigned to that specific grade level.
- Description – A brief definition of the roles and responsibilities associated with the grade (e.g., “Software developers, web developers, mobile developers”).
- Status – Indicates whether the grade is currently Active (green) and available for assignment.
- Actions – Settings/Gear icons on the far right to manage individual grade configurations.
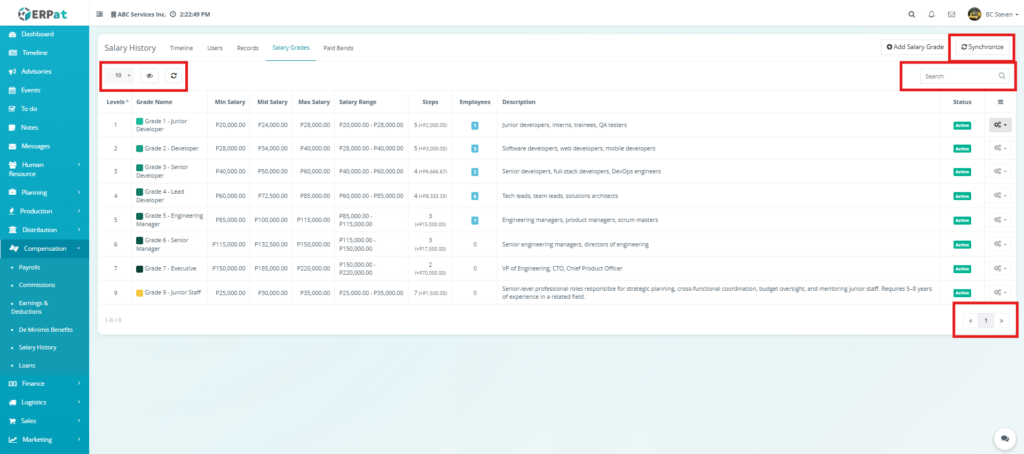
Additional Management Controls & Filtering #
- Row Display & Table View – A dropdown menu on the top-left allows users to set the number of records visible per page (e.g., 10). Adjacent to this are icons to toggle column visibility and a refresh button to sync the table with the latest structural changes.
- Synchronize – Match each employee’s latest approved salary record to a salary grade and step based on their monthly salary.
- Global Search Bar – A real-time text input field on the top-right used to quickly filter the list. Administrators can type a Grade Name or Level to isolate specific classifications within the hierarchy.
- Pagination Controls – Located at the bottom-right, these buttons enable seamless navigation through the different pages of the Salary Grade database (e.g., browsing page 1 of the total records).
Steps to Add a Salary Grade #
STEPS
- Navigate to the Compensation module from the main sidebar and select Salary History.
- Click on the Salary Grades tab located at the top of the interface.
- Click the Add Salary Grade button at the top-right of the page.
- In the Add Salary Grade modal, enter the basic classification details:
- Grade Name – Enter a descriptive title.
- Grade Level – Assign a numerical value for ordering.
- Color – Select a specific color to visually categorize this grade in the system.
- Define the Salary Range:
- Min Salary – The minimum compensation for this level.
- Mid Salary – The benchmark midpoint for the range.
- Max Salary – The maximum compensation cap for this level.
- Configure the Step Configuration:
- Total Steps – Enter the number of pay increments available.
- Step Increment – Input the monetary value added per step.
- Step Preview – Review the generated list to ensure the monthly salary for each step is correct.
- Add a Description detailing the roles covered by this grade.
- Set the Status to Active to make this grade available for employee assignment.
- Click Save to finalize the new salary grade.
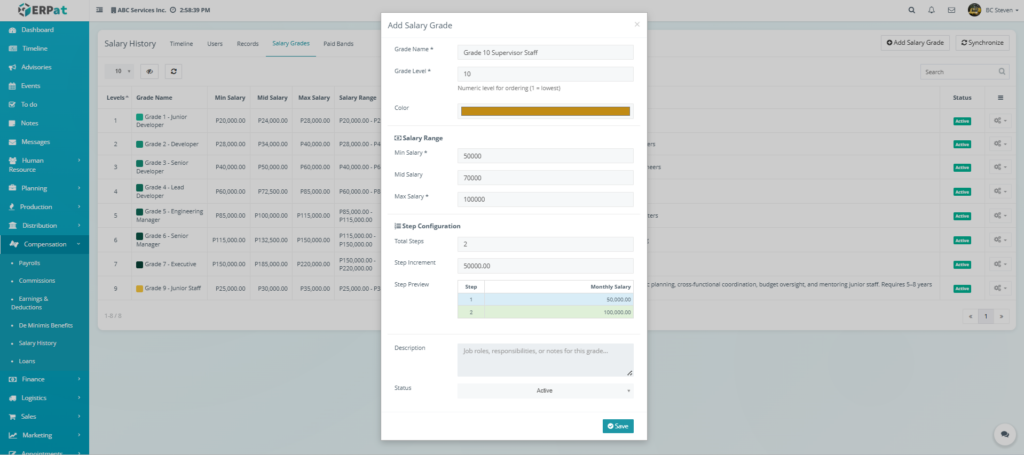
RESULT
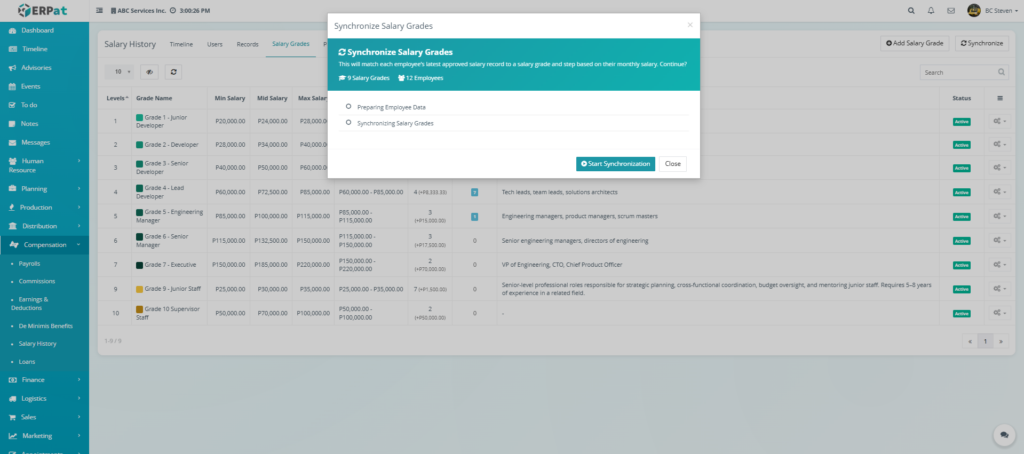
Steps to Synchronize Salary Grades #
STEPS
- Navigate to the Compensation module from the main sidebar and select Salary History.
- Click on the Salary Grades tab located at the top of the interface.
- Click the Synchronize button at the top-right of the page.
- A Synchronize Salary Grades modal will appear, displaying a summary of the data to be processed.
- Click the Start Synchronization button to begin the automated process.
- Monitor the progress through the real-time status indicators:
- Preparing Employee Data – The system gathers all active personnel records.
- Synchronizing Salary Grades – The system matches salaries to the updated grade hierarchy.
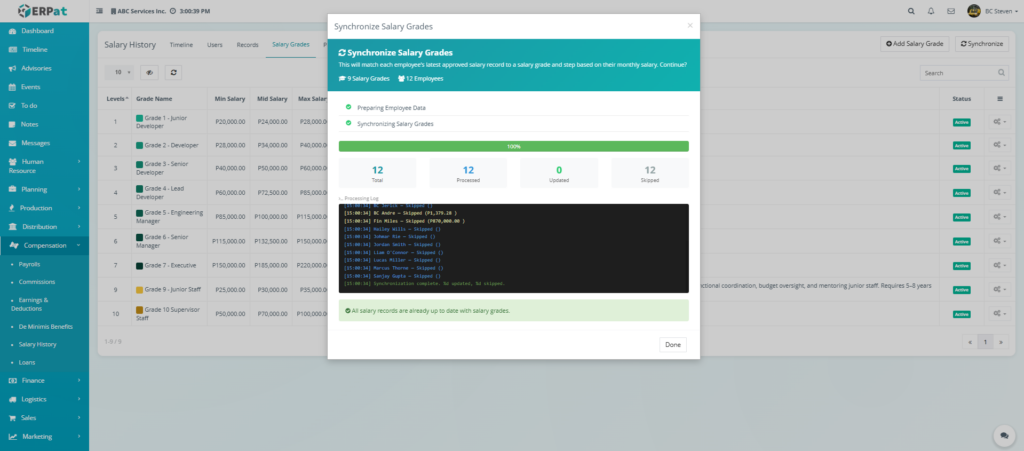
- Once the progress bar reaches 100%, review the results summary:
- Total – Total number of records evaluated.
- Processed – Number of records successfully checked.
- Updated – Number of records where the grade or step was adjusted.
- Skipped – Records that were already up-to-date or didn’t meet criteria.
- Review the Processing Log for specific details on individual employees.
- Click Done to close the modal once the message “All salary records are already up to date with salary grades” appears.
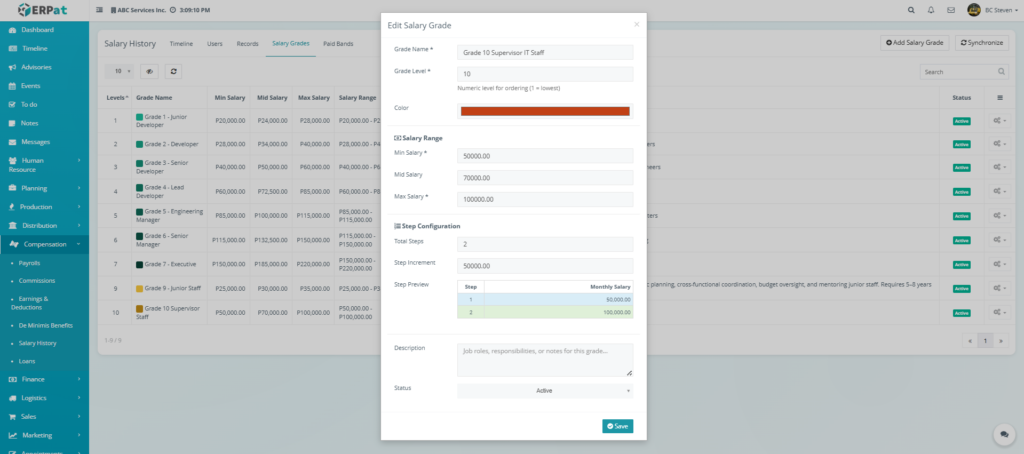
Steps to Edit a Salary Grade #
STEPS
- Navigate to the Compensation module from the main sidebar and select Salary History.
- Click on the Salary Grades tab located at the top of the interface.
- Locate the specific grade you wish to modify in the listing table.
- Click the Actions (settings/gear) icon at the far right of the record row.
- Select the Edit (pencil) icon from the dropdown menu to launch the Edit Salary Grade modal.
- Modify the necessary fields:
- Grade Name & Level – Update the title or numerical rank if the role’s position in the hierarchy has changed.
- Salary Range – Adjust the Min, Mid, or Max Salary values to reflect new compensation benchmarks.
- Step Configuration – Change the Total Steps or the Step Increment amount. The Step Preview will automatically update the monthly salary values for each step.
- Description – Update the list of eligible roles or responsibilities.
- Ensure the Status is set to Active if you want the grade to remain available for employee assignments.
- Click Save to apply the changes.
RESULT
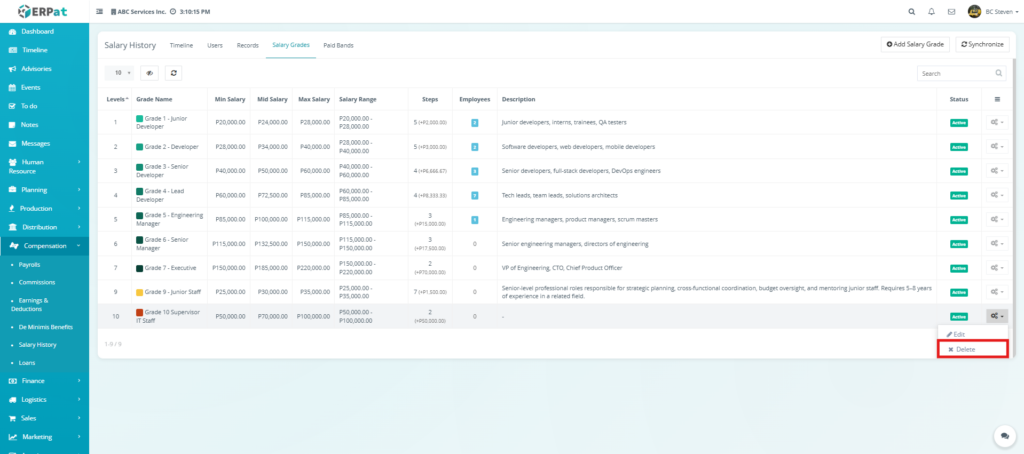
Steps to Delete a Salary Grade Record #
STEPS
- Navigate to the Compensation module from the main sidebar and select Salary History.
- Click on the Salary Grades tab located at the top of the interface.
- Locate the specific grade you wish to remove from the list.
- Click the Actions (settings/gear) icon at the far right of the record row.
- Select Delete (indicated by the “x” icon) from the dropdown menu.
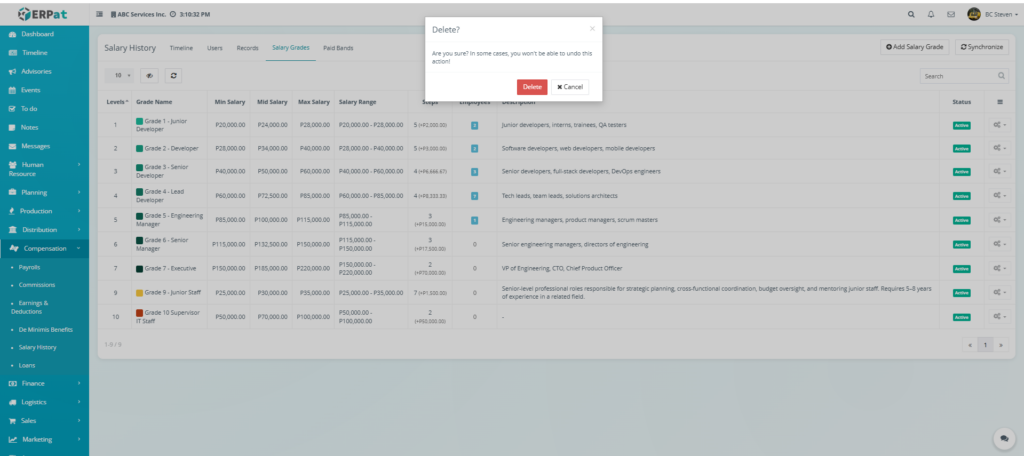
- A Delete? confirmation modal will appear with the message: “Are you sure? In some cases, you won’t be able to undo this action!”
- Click the red Delete button to finalize the removal, or click Cancel to keep the record.
- Verify that the grade is no longer visible in the Salary Grades listing.
RESULT

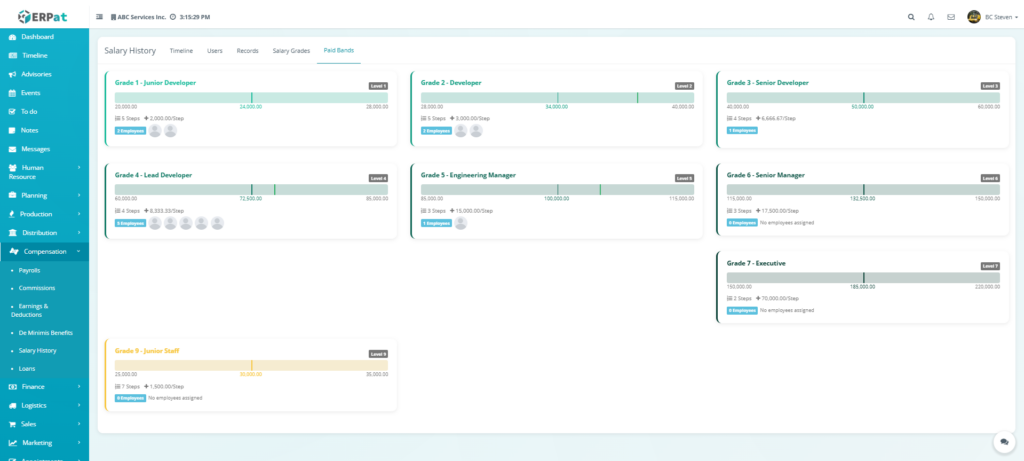
Salary History: Paid Bands Page #
Each Paid Band card provides a summary of the following information:
- Grade Title & Level – The name of the salary grade and its hierarchical rank.
- Financial Spectrum – A visual progress bar showing the Minimum, Midpoint, and Maximum salary values for that specific band.
- Step Configuration – Displays the total number of available steps and the specific monetary value added per step.
- Employee Distribution – A real-time count of staff members assigned to the band, accompanied by their profile avatars for quick identification.
- Visual Categorization – Bands are color-coded to help administrators distinguish between different career paths at a glance.
Strategic Utility #
- Visual Range Audit – Administrators can quickly identify which salary grades have reached their maximum capacity or where the majority of the workforce is clustered
- Gap Analysis – The page makes it easy to spot “unpopulated” levels, which can assist in succession planning or identifying recruitment needs.
- Compensation Transparency – By visualizing the Midpoint, HR can easily assess whether the current workforce is being paid competitively against the organizational benchmark.
Search and Filtering #
- Search Field – Use the global search bar to quickly find specific grades by Grade Name or by their hierarchical Level.
- Pagination Controls – Located at the bottom-right, these allow you to browse through multiple pages of salary classifications if the organization has an extensive grading system.
- Synchronize Tool – A specialized control that ensures any structural changes to a grade are immediately cross-referenced and updated across all linked employee records.
Permissions and Access Control #
- Authorized Roles – Only System Administrators or Senior HR Managers are granted the permissions to add, edit, or delete Salary Grades.
- View-Only Access – Department Heads or specific supervisors may be granted view-only access to the Paid Bands or Salary Grades to assist in budget planning without the ability to modify the base configurations.
Best Practices #
- Standardized Naming – Use clear and consistent naming conventions for grades to ensure they are easily searchable and logically ordered.
- Regular Range Reviews – Periodically update the Min, Mid, and Max values to stay competitive with market inflation and industry benchmarks.
- Avoid Deleting Active Grades – Never delete a salary grade that still has employees assigned to it. If a grade is being phased out, move all associated employees to a new grade first.
- Logical Step Increments – Ensure the Step Increments are mathematically sound and fit within the defined Salary Range to avoid “pay ceiling” errors during synchronization.
Audit & Logs #
- Administrative Accountability – Every creation, modification, or deletion of a Salary Grade is captured in the system’s internal audit logs.
- Detailed Traceability – Each log entry records the Timestamp, the Action Performed, and the Administrator’s Identity, providing a transparent history for internal financial audits or compliance reviews within the ERPat System.


